So, you’re ready to attempt a brisket in your Pit Boss Pellet Grill? Smoking a brisket is a marathon effort, and a lot can go wrong. The advantage of pellet grills is their ability to maintain a stable temperature over a long period. However, if you want to nail the perfect smoked brisket, the cook is only half the battle. Preparation is important and there are a few techniques to master if you want to serve the perfect smoked brisket.
The best way to smoke a brisket in a Pit Boss is to set the temperature to 250°F. Prior to cooking, dry brine the meat with kosher salt, apply a binder and the barbeque rub. Mop or spritz the brisket every 30 minutes for the first 4-5 hours until the internal meat temperature reaches 150°F. Once the bark has formed and the brisket has a nice color, wrap the meat in foil or butcher paper and continue cooking until the internal meat temperature hits 203°F. Allow the brisket to rest at least one hour before slicing, or hold it for up to 4 hours in a dry cooler wrapped in a towel.
Key Points
- Set the temperature to 250°F on your Pit Boss Pellet Grill
- Dry brine the brisket with kosher salt and apply a binder and BBQ rub
- Mop or spritz the brisket every 30 minutes for the first 4-5 hours until the internal temperature reaches 150°F
- Once the bark has formed and the brisket has a nice color, wrap it in foil or butcher paper and continue cooking until the internal temperature reaches 203°F
- Allow the brisket to rest for at least one hour before slicing, or hold it for up to 4 hours in a dry cooler wrapped in a towel
Have you seen the most advanced thermometer on the market? FireBoard can be controlled via your phone, holds meat 6 probes, and records your cook data on a cloud.
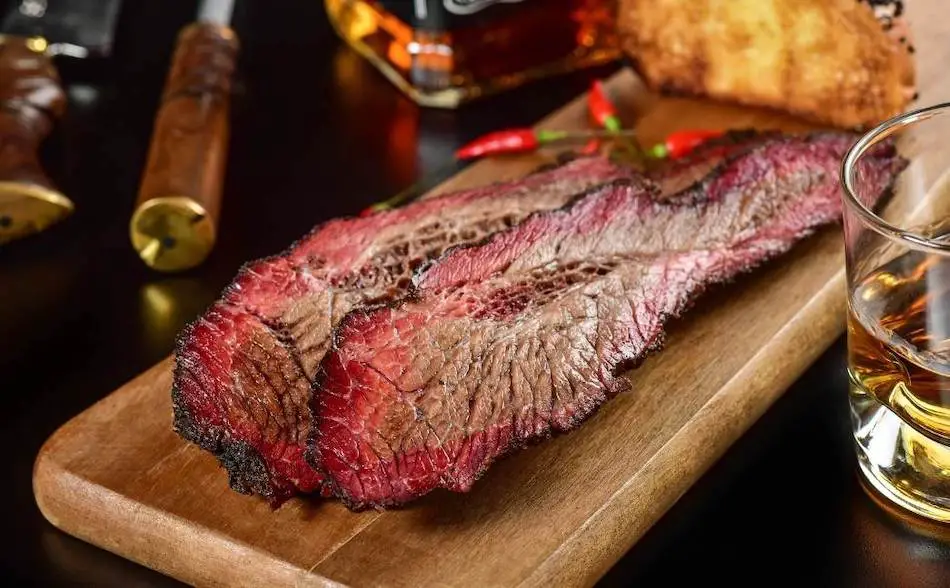
Brisket On A Pit Boss Pellet Grill
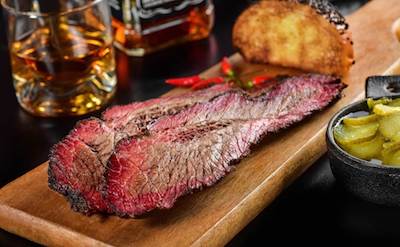
A tender, juicy cut of beef, slow smoked on a pellet grill.
Ingredients
- Brisket
- Barbecue Rub
- Olive oil or Yellow Mustard (for binder).
Instructions
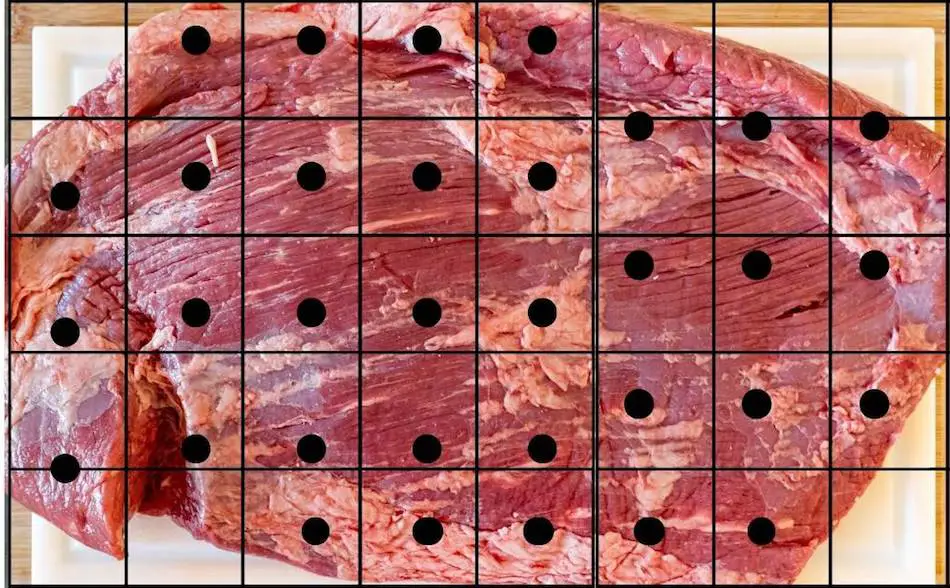
- Select a brisket with good marbling.
- Trim the fat but leave 1/4 inch of fat on top.
- Dry brine the brisket by sprinkling kosher salt on both sides of the meat and refrigerate for a few hours or overnight.
- Inject the brisket with broth or marinade. * Optional
- Slather the brisket with olive oil or yellow mustard. *Optional
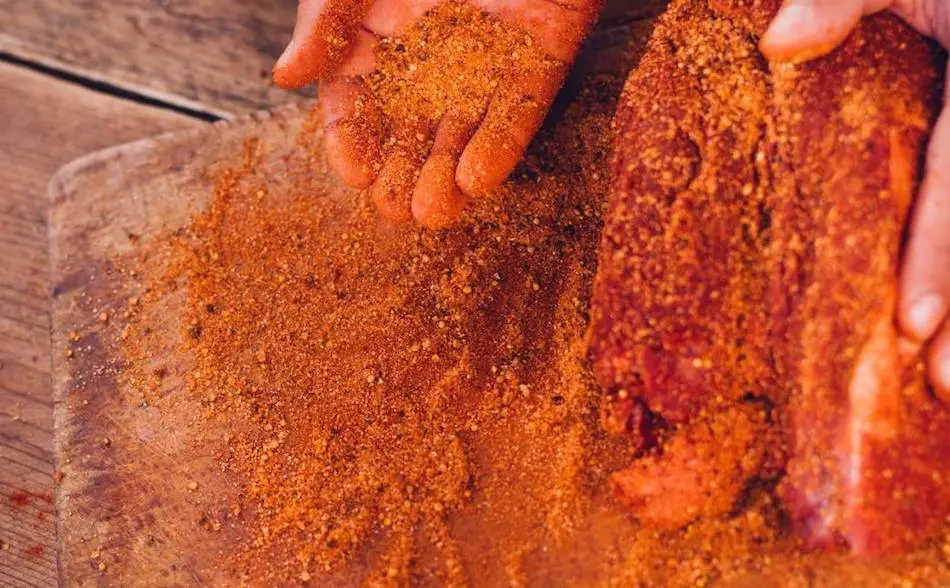
- Apply an even layer barbeque rub. If the rub contains salt, skip the dry brine step.
- Fill the hopper of your Pit Boss with wood pellets. Make sure there are enough to last 10 plus hours. Use hickory, pecan or competition blend.
- Set the temperature of your Pit Boss to 250°F
- Place the brisket in the middle and remove the other racks.
- Fill the water pan with water.
- Insert the temperature probe into the brisket.
- Spritz or mop the brisket every hour with either apple juice, broth, apple cider vinegar or beer.
- Wrap the brisket in foil or butcher paper once the bark has formed, and the meat has reached an internal temperature between 150°F and 160°F.
- Place the brisket back in the pellet grill and insert the probe back into the meat.
- Continue cooking until the internal meat temperature reads 203°F.
- Allow the meat to rest for about 1 hour before slicing, or hold the brisket wrapped in a towel and place it in a dry cooler.
- Slice against the grain and serve.
Nutrition Information:
Amount Per Serving: Calories: 130
Best Wood Pellets For Brisket
You don’t need to be too picky about what type of wood pellets to use when smoking brisket. Cuts of meat such as turkey, fish, and chicken have sensitive flesh and can be overpowered by certain types of wood. That’s not the case with brisket. Brisket is a hardy slab of meat, and can handle the strongest wood flavors, such as hickory or mesquite. The Pit Boss Competition Blend is a safe wood pellet to use on any meat. It’s a mixture of maple, cherry, and hickory.
If you enjoy trying different wood pellets, do yourself a favor and try the Pit Boss Charcoal Wood Pellet. These pellets look like compressed charcoal mixed with wood. If you’ve smoked meat on a charcoal smoker, you would know that charcoal gives your barbeque a distinct flavor. The downside of pellet grills is the flavor comes from wood alone, and can be less smokey than other types of smokers. So Pit Boss produced a charcoal flavored wood pellet, so if you love the taste of charcoal, use these pellets or mix them in with regular pellets.
When you buy a bag of wood pellets, often there will be a lot of dust at the bottom of the bag. If this dust gets into your hopper, it can cause some problems. When filling up your pellet hopper in the Pit Boss, make sure you don’t let too much dust fall through. The best way to avoid dust is to run the pellets through a sieve before filling the hopper.
The Best Wood Pellets For Smoking Brisket On A Pellet Grill
Barbecue experts generally agree that oak is one of the best woods for smoking brisket. It has a strong, robust flavor that pairs well with the rich, beefy flavor of brisket. Other good options for brisket include pecan and mesquite, which also have strong flavors that can stand up to the bold taste of brisket. Some experts also recommend using fruitwoods, such as cherry or apple, for a slightly sweeter and more subtle smoke flavor.
- In general, it’s a good idea to use a wood that has a strong, robust flavor, as the long cooking time of brisket can dilute more subtle smoke flavors.
- Avoid using woods with resinous or pine-like flavors, as these can taste unpleasant when used for long cooks like brisket.
- Some competition pitmasters recommend using oak or pecan as their go-to woods for brisket, as they provide a consistent, reliable smoke flavor that pairs well with the rich, beefy taste of brisket.
- Fruitwoods, such as cherry or apple, can also be used to add a slightly sweeter, more subtle smoke flavor to brisket.
Here are a few quotes from competition pitmasters on the subject of wood selection for brisket:
- “For brisket, I like to use oak. It has a strong, robust flavor that stands up well to the long cook time of brisket.”
- “Pecan is my go-to wood for brisket. It has a rich, smoky flavor that pairs well with the bold taste of beef.”
- “I like to use a mix of oak and fruitwood, like cherry or apple, for brisket. The oak provides a strong, bold smoke flavor, while the fruitwood adds a touch of sweetness.”
How Long Will It Take? When Is It Done?
Whenever you’re smoking brisket, clear the calendar for the day because you’re in for a long one! The time it will take for you to smoke the brisket will depend on the size of the brisket, the temperature of your smoker, the weather and whether you wrap the brisket.
Unlike traditional roasting, low-and-slow cooking is about cooking to internal meat temperature rather than cooking to time. The magic number we’re looking for with brisket is a 203°F internal meat temperature, and we’ll be leaving the brisket in our Pit Boss until it reaches the target temperature.
A huge packer brisket could take well over 10 hours, but a small brisket flat might only take five or six hours. The great thing about pellet grills is they are set-and-forget, which makes smoking a brisket much easier.
| Temperature | 4-6 lb brisket | 6-8 lb brisket | 8-10 lb brisket |
|---|---|---|---|
| 225°F | 6-8 hours | 8-10 hours | 10-12 hours |
| 250°F | 5-7 hours | 7-9 hours | 9-11 hours |
| 275°F | 4-6 hours | 6-8 hours | 8-10 hours |
| Brisket Total Cook Time | Start Time | Begin Spritzing | Wrap Brisket | Finish in Oven | Done Time (203°F) | Holding Time In Dry Cooler (1-4 hours) |
| 12 hours | 6pm | 9pm | 12am | 12am | 6am | Between 7am – 10am |
| 15 hours | 5pm | 8pm | 11pm | 11pm | 8am | Between 9am – 12pm |
| 18 hours | 2pm | 5pm | 8pm | 8pm | 8am | Between 9am- 12pm |
Overnight Cooks in a PitBoss – Is it Safe?
Many people do overnight smokes with their pellet grills, and you can attempt this as well. However, there are risks associated with leaving a pellet grill unattended.
Within the first six months of me owning my Pit Boss, I had a back burn in the pellet hopper, which completely smoked out my alfresco. Another risk is if you haven’t opened the chimney stack enough, gases can build up and cause an explosion.
If you are going to attempt an overnight smoke, make sure you know your pellet grill very well and have smoked a lot of meat. Also, make sure you have sifted your wood pellets before putting it into the hopper. If too much dust gets caught in your hopper, it can cause problems.
Although I love the ease of set-and-forget pellet grills, I always like to keep a close eye on it. I like to see my grill and glance at it every so often just to make sure everything is okay.
Brisket Time Planner
| Brisket Weight | Cook Time | Rest Time | Total Time | Served At |
|---|---|---|---|---|
| 6-8 lbs | 7 hours | 1 hour | 8 hours | 6:00 PM |
| 8-10 lbs | 9 hours | 1 hour | 10 hours | 6:00 PM |
| 10-12 lbs | 11 hours | 1 hour | 12 hours | 6:00 PM |
| 6-8 lbs | 7 hours | 1 hour | 8 hours | 8:00 AM |
| 8-10 lbs | 9 hours | 1 hour | 10 hours | 8:00 AM |
| 10-12 lbs | 11 hours | 1 hour | 12 hours | 8:00 AM |
How to Buy a Good Brisket
One of the most important steps in smoking the perfect brisket begins in the butcher. If you choose the wrong brisket, you have lost the battle before it has even begun. Choose a brisket with good marbling, because this will make a world of difference to the final product.
Marbling is the fatty lines in the meat. When the brisket is cooking, those fatty lines will melt and blend in with the meat, making it moist and juicy. The reason Wagyu beef is so expensive is that it has the highest level of marbling.
They say you should always buy the best meat that you can afford. If all you can buy is the cheaper grades of beef, then try to find a brisket with the most marbling. If you’re only smoking a brisket flat, choose a flat with fat on the bottom and the top. Flats can dry out easily, so it’s important to select a thick flat with fat on the bottom and the top.
When trimming the brisket, you need to take most of the fat off because smoke cannot penetrate through the fat layer. Also, remove the fat if you want to get a nice bark. Trim the fat back and leave 1/4 of an inch of fat on the top.
Some people like to place their brisket with the fat facing the heat, because this will shield the meat and prevent it from drying out. Depending on the model of Pit Boss, you can lay your brisket fat side down if the heat source is coming from below. As always, experiment with different techniques.
The Best Rub for Brisket
There are many benefits to making your own barbecue rub for brisket, as you can customize the flavors to your liking and control the amount of salt and sugar in the mix. Here are a few tips from barbecue experts on making your own brisket rub:
- A standard beef rub typically includes ingredients such as salt, pepper, garlic powder, onion powder, cumin, and paprika. You can adjust the proportions of these ingredients to suit your taste, or add other spices such as chili powder, mustard powder, or coriander to give the rub more depth of flavor.
- Some experts recommend using a combination of sweet and savory spices in a brisket rub, such as brown sugar or molasses to add sweetness and balance out the heat from the chili powder or paprika.
- If you are brining your brisket before smoking, you may want to omit the salt from the rub or reduce the amount of salt in the mix. This can help to prevent the brisket from becoming too salty when combined with the dry brine
- You can store your homemade rub in an airtight container for several months, or you can freeze it for longer storage.
- When applying the rub to the brisket, be sure to coat the meat evenly and use enough rub to create a nice, thick crust on the surface of the meat. Some experts recommend letting the rub sit on the brisket for a few hours or overnight to allow the flavors to penetrate the meat.
There are many barbecue rubs on the market, and if you want to know more, I’ve written a lengthy article on the Best Rubs For Brisket. I prefer to make homemade rub, it’s easy to do and I can control the amount of salt and sugar. I’ve made a few salty briskets and learn from my mistakes. Ever since then, I’ll make my own rub and leave out the salt. I prefer to salt meat separately when brining.
A standard beef rub contains salt, pepper, garlic powder, onion powder, cumin and paprika. If you have these ingredients, you can make a big batch of rub that will last awhile.
Apply a Binder so the Rub Sticks
The other question you need to ask yourself is whether to apply a binder before the rub. You can skip this step if you wish, but I find the rub sticks better when you apply a binder first.
Binders are ingredients that are used to help hold the rub or seasonings onto the surface of the brisket. They are often used in conjunction with a dry rub or seasoning mix, and can help to create a more cohesive, sticky coating on the meat. Here are a few common binders that are used for brisket:
- Mustard: Mustard can be used as a binder for brisket rubs, as it helps to create a sticky surface on the meat that the rub can adhere to. Some experts recommend using a dry mustard or a spicy brown mustard, as these have a more assertive flavor that can complement the bold taste of brisket.
- Olive oil: Olive oil can be used as a binder to help the rub stick to the surface of the brisket. It can also help to moisten the surface of the meat and add a mild, savory flavor.
- Worcestershire sauce: Worcestershire sauce can be used as a binder to help the rub stick to the brisket, and it can also add a depth of flavor to the meat.
- Honey: Honey can be used as a binder for brisket rubs, as it helps to create a sticky surface on the meat that the rub can adhere to. It can also add a touch of sweetness to the rub.
You won’t be able to taste the binder, and its sole purpose is to make the rub stick. Read more about binders here.
Dry Brine the Brisket
Dry brining is a method of seasoning a brisket by rubbing it with salt and other seasonings and allowing it to sit for a period of time before cooking. This allows the salt to penetrate the meat, seasoning it from the inside out, and helps to retain moisture during the cooking process.
To dry brine a brisket, you will need:
- A brisket
- Salt
- Seasonings of your choice (such as black pepper, garlic powder, onion powder, paprika, etc.)
To begin, sprinkle the brisket generously with salt on all sides, using about 1 teaspoon of salt per pound of meat. You can also add other seasonings at this time if desired. Place the brisket in a large resealable plastic bag and refrigerate for at least 6 hours, or up to 24 hours.
After the brining time has passed, remove the brisket from the bag and pat it dry with paper towels. The brisket is now ready to be cooked according to your preferred method (such as smoking, grilling, or roasting). The dry brining process will help to enhance the flavor and moisture content of the meat. For more info, check out this article: Brining.
Inject The Brisket for a Flavor Boost
Injecting a brisket is a technique used by some pitmasters to add moisture and flavor to the meat. This is often done in competition BBQ, where judges are looking for tender and flavorful brisket.
To inject a brisket, a pitmaster will use a syringe or injector tool to inject a marinade or other liquid mixture directly into the meat. The marinade can contain a variety of ingredients, such as broth, apple cider vinegar, Worcestershire sauce, and various seasonings.
There are a few reasons why competition pitmasters might choose to inject their brisket:
- To add moisture: Injecting a marinade can help to add moisture to the brisket, which can be especially helpful in a competition setting where the meat is cooked for a long time at a low temperature.
- To add flavor: The marinade used for injecting can also add flavor to the brisket, helping to make it more appealing to the judges.
- To speed up the cooking process: By injecting the marinade directly into the meat, the flavors can be absorbed more quickly, potentially reducing the overall cooking time.
It’s worth noting that injecting a brisket is not for everyone, and some pitmasters prefer to rely on other methods (such as dry brining or applying a wet rub) to add flavor and moisture to their meat. If you want to know more about injecting brisket, check out this article I wrote a while back.
This brisket injection marinade is the secret used in competitions and made by a World Barbecue champion.
| Meat Injector | Description | Barrel Size | Needle Size | Popularity | Price | Where To Buy |
| Beast Injector | Made from 304 high grade stainless steel. Includes 3 needles and ebook. 100% money-back guarantee and lifetime warranty. Weighs 9.3 oz. Dimensions 8 x 5.25 x 1.75 inches | 2 oz | Includes one 6″ angled needle, one 6″ needle with 12 holes, and one 3″ fine spray needle | Amazon Best Seller. Over 2k ratings. | $30- $40 | Amazon |
| Ofargo | 304-Stainless Steel. Includes 4 needles, spare silicone O-rings, needle cleaners, barrel brush, and ebook. Dimensions: 6.8 x 1.2 x 1.5 inches. Weighs 14 oz. | 2 oz | 4 different needles (3x 6” plus 1x 3”) for different applications. Made of #304 stainless steel, clog-resistant to both fluid and chunky marinades | Amazon Choice. Over 600 ratings. | $30- $35 | Amazon |
| Ofargo Plastic Marinade Injector | Plastic barrel with stainless steel plunger and 2x stainless needles. Includes needle cleaning brush and ebook. Dimensions: 8.7 x 2.8 x 1.2 inches. Weighs 2.56 oz | 1 oz | 2 types of needles | Amazon Choice. Over 4.5k ratings. | $16- $20 | |
| Butcher BBQ Pistol Grip Gourmet Meat | Metal Handle 50cc Pistol Grip Syringe with 2 Different Needles a cleaning brush, a spare gasket. Dimensions: 20.32 x 2.54 x 15.24 cm. Weighs 458 g | 1.69 oz | 2 needles – side port hole and bottom port hole | Butcher BBQ products are produced by multiple World Barbecue Champion David Bouska | $35 -$40 | Amazon or Butcher BBQ |
If you don’t have a meat injectors, you can get one for about $30 on Amazon: Simple Meat Injectors.
Don’t Trust the Pit Boss Thermometer
Use a high-quality meat thermometer to accurately gauge the internal temperature of your brisket. Many factory-installed thermometers in grills and smokers are not very accurate, and can give misleading readings that can lead to overcooked or undercooked meat. Using a separate, high-quality meat thermometer can help to ensure that your brisket is cooked to the proper temperature and texture.
My Pit Boss thermometer is not very accurate, but I don’t mind because I’ve always used my own thermometer. One of the first things I learned when starting out smoking meat was to buy a decent thermometer and not trust the factory thermometers. The inbuilt thermometers are wildly inaccurate, and my Pit Boss thermometer is sometimes 50°F different to my reliable thermometer.
Here are a few additional tips from barbecue experts on using a meat thermometer:
- Choose a meat thermometer with a long probe and a digital display, which can make it easier to get an accurate reading without having to open the grill or smoker lid.
- Make sure to insert the thermometer probe into the thickest part of the brisket, away from any bone or fat, to get the most accurate reading.
- Some experts recommend using multiple thermometers to check the temperature of the brisket, as this can help to confirm the accuracy of the readings.
- When checking the temperature of the brisket, be sure to allow the thermometer to stabilize for a few seconds before taking the reading, to ensure that you are getting a accurate measurement.
- Keep in mind that the internal temperature of the brisket will continue to rise even after it has been removed from the grill or smoker, so be sure to take this into account when determining when the meat is done.
If you want to know more about thermometers, check out this article.
Mopping and Spritzing Brisket for Extra Moisture
Adding liquid to the brisket is a very important step, especially during the first phase of the cook. Adding liquid will slow down the cooking process. What we are trying to achieve with low-and-slow cooking is allowing the meat to break down the connective tissue. Wetting the meat will also help the rub stick to the fat and meat and form the crust.
You can either spritz or mop the brisket. By far the quickest and easiest method is to spritz with a spray bottle using apple juice, apple cider vinegar, beer or whatever. You can also try making a mop sauce which will help the brisket develop a nice color.
- Some experts recommend using a mop or spritz solution to add liquid to the brisket during the cooking process. A mop is a small amount of liquid, usually a thinned-down barbecue sauce, that is applied to the surface of the meat using a brush or sponge. A spritz is a fine mist of liquid that is sprayed onto the surface of the meat using a squirt bottle. Both the mop and the spritz help to add moisture to the surface of the brisket, which can help to keep the meat from drying out during the long cook time.
- Some pitmasters recommend using a combination of water and apple cider vinegar as a mop or spritz solution for brisket. This can help to add flavor and moisture to the meat, as well as helping to tenderize the tough connective tissue in the brisket.
- Some experts recommend adding a pan of water, broth, or other liquid to the smoker or grill to help create a moist cooking environment and prevent the brisket from drying out.
- When adding liquid to the brisket, be sure to use a light hand and avoid over-wetting the meat. Too much liquid can cause the rub to wash off and dilute the flavor of the meat.
For more on spritzing and mopping brisket, check out this article.
Should I Wrap my Brisket in Paper or Foil?
Once the brisket has reached 150°F, start inspecting the bark and the color. If the bark is firm, and has a nice color, then it’s time to wrap. Wrap the brisket in heavy duty aluminium foil, give it another spritz, then wrap it tightly. Place your probe into the side of the brisket and place it back in the smoker.
The wrapped brisket will create a steaming effect inside the parcel, which will keep the meat moist and speed up the cooking. You can leave the brisket unwrapped, but it will take a few hours longer and it may taste a little drier than a wrapped brisket. However, a naked brisket will have a much firmer bark. Try smoking one brisket wrapped, and another day experiment with an unwrapped brisket and see the results for yourself.
You can also try wrapping your brisket in peach paper, or butcher paper. You will probably find the bark has a different texture when wrapped in paper. If you want to know more about this, check out my article, Foil or Paper?
Allow Your Brisket Time to Rest
Once the brisket has reached 203°F, and you have verified all areas of the roast, then it’s time to remove the brisket from the smoker. Allow at least 30 minutes to an hour to rest the brisket. This will give them meat time to re-absorb its juices. Slicing immediately after removing the brisket from the pellet grill will cause lost meat juice and a dry brisket.
If you are not quite ready to serve, wrap the brisket in a towel keeping the foil intact, then place it in a dry cooler where it can sit for four hours, even longer. It will stay hot for 10 hours, however this can become a food safety issue.
- Some experts recommend allowing the brisket to rest for at least 1 hour, or even longer, to allow the juices to redistribute throughout the meat and ensure that the brisket is moist and tender when sliced.
- To help keep the brisket warm while it rests, some pitmasters recommend wrapping it in a towel or a layer of foil, which will help to retain heat and moisture.
- If you are not ready to serve the brisket immediately after it has finished cooking, you can store it in a dry cooler for up to 4 hours. This will help to keep the meat hot and moist until you are ready to serve it. However, it’s important to note that storing the brisket for longer than 4 hours can pose a food safety risk, so it’s best to aim to serve the brisket within this time frame.
- Some experts recommend storing the brisket in a cooler with a hot water bottle or heating pad to help maintain a consistent temperature and prevent the meat from cooling too quickly.
- When storing the brisket in a cooler, be sure to keep it wrapped in foil or a towel to help retain heat and moisture.
Slice and Leftovers
- Allow the brisket to rest for at least 30 minutes to an hour before slicing, to allow the juices to redistribute throughout the meat and ensure that the brisket is moist and tender.
- Use a sharp, long knife, such as a slicing knife or a chef’s knife, to slice the brisket. A dull knife can compress the meat and cause it to become dry and tough.
- Slice the brisket against the grain, or perpendicular to the lines of muscle fiber. This can help to make the slices more tender and easier to chew.
- Slice the brisket as thinly as possible, using long, smooth strokes.
- If the brisket has a thick fat cap, you may want to trim off some or all of the fat before slicing the meat.
- Some experts recommend slicing the brisket on a slight diagonal, which can create more surface area and help the meat to retain more moisture.
- If you are serving the brisket as part of a buffet or potluck, you may want to slice the brisket in advance and store it in a slow cooker or chafing dish to keep it warm.
- To store leftover brisket, slice the meat and wrap it in foil or plastic wrap before placing it in an airtight container in the refrigerator. Brisket will keep for up to 4 days in the refrigerator or up to 3 months in the freezer.
When slicing brisket, it’s important to slice against the grain. If you slice with the grain, the meat will be tough and chewy. Another important tip is to only slice what you need. If you slice the whole brisket, the leftovers will be dry because all the liquid will spill out. If you only slice what you need, you can then put the remaining brisket into the refrigerator and slice what you need in the coming days. More on preserving brisket leftovers, check out this article.
My Favorite Brisket Tools
Thanks for checking out this article. I hope you learned a few things. Here are some of my favorite tools I use when smoking brisket that may be useful to you. These are affiliate links, so if you decide to purchase any of these products, I’ll earn a commission. But in all honesty, these are the tools I recommend to my family and friends who are just starting out.
Meat Injector: Injecting meat is a great way to take your barbecue to the next level and help you make competition-style brisket. An injector is the only way you will be able to get flavor and moisture into the middle of the meat. The Beast Injector is a stainless steel injector that is sturdy and affordable. Check the latest price on Amazon here.
Brisket Marinade: The best injection solution on the market is the Butcher BBQ Brisket Injection. This marinade is used in competitions and is made by World Barbecue Champion pitmaster, Dave Bouska. You can find the marinade on Amazon here.
Butcher Paper: Wrapping brisket in butcher paper has become a huge trend in barbeque thanks to Aaron Franklin. Wrapping your brisket in paper will give you a nice brisket bark. However, you can’t just use any old paper, it has to be unwaxed, food grade paper. You can find it on Amazon here.
Brisket Rub: These days I make my own rub when possible, but I always have a few pre-made rubs for when I’m running low. Barbecue guru Malcom Reed produces Killer Hogs, one of the best brisket rubs I’ve found over the years. Another great rub is Slap Yo Daddy, made by brisket master and multiple World Barbecue Champion, Harry Soo.
Meat Thermometer: There are dozens of fancy thermometers on the market, but I still use my trusty TP20. For around $50, I have a high-quality meat thermometer with two probes, and can track the temperature of my smoker with one probe, and my meat with the other probe. The ThermoPro TP20 is an Amazon Best Seller because it’s the easiest thermometer to operate, is durable, highly accurate, and comes with pre-programmed meat settings.
Instant Read Thermometer: Arguably, the second most important tool you need is a fast and accurate instant-read thermometer. These tools play an important role in the latter stages of the cook when the meat needs regular checking in multiple areas. I use the ThermoPro TP19 because it can do everything a ThermaPen can do, but for a fraction of the cost. You can check out the TP19 on Amazon here.
Advanced Thermometer and Automatic Temperature Controller: Once you’re ready to take things seriously, the FireBoard 2 Drive is a six-channel Bluetooth/Wi-Fi thermometer that can monitor up to 6 pieces of meat, control and graph your cook sessions on your smartphone, and attaches to an an automatic blower that will convert your charcoal smoker to a set-and-forget. This is one of the most advanced meat thermometers on the market. You can check it out on the FireBoard website here.