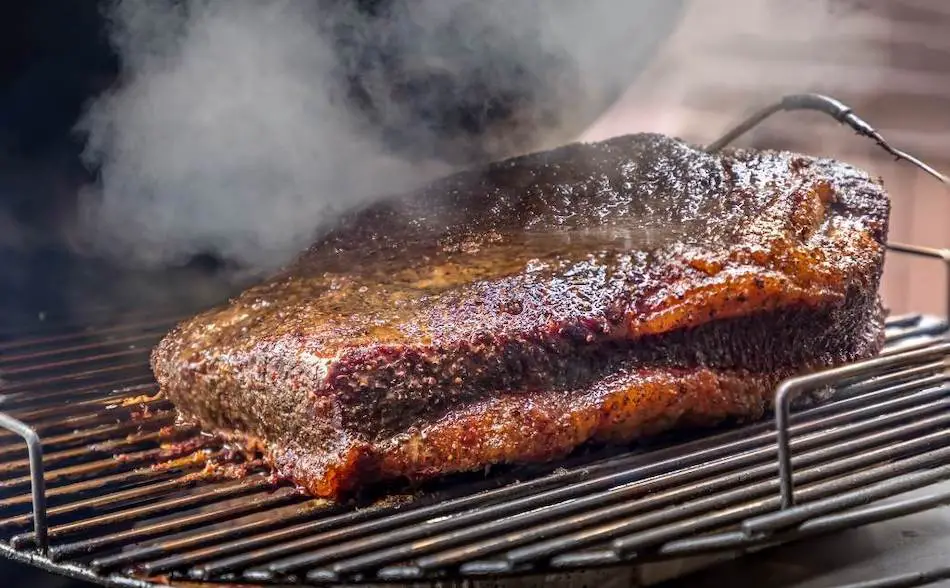
Cooking a brisket hot and fast on a Big Green Egg is a popular method among BBQ enthusiasts. It seems all the barbecue channels on YouTube are running H&F experiments with briskets cooked at insane temperatures. The hot and fast brisket and the Big Green Egg are the perfect match because one of the best features of the BGE is the ability to maintain high temperatures. I wanted to find out how a brisket would turn out when cooked at different temperatures, so I went deep into the world of “Eggheads” to find out. I’ll show you how to set up your Green Egg for a fast brisket and walk through the entire process, plus I’ll give you some tips and tricks from the experts.
For a hot and fast brisket, bring the temperature of your Big Green Egg up to 350°F and 400°F. Scatter five to six chunks of wood amongst the lump charcoal before placing the brisket fat side down. Cook the brisket until the internal meat temperature reaches between 160°F and 170°F and then wrap in foil or butcher paper. Return the brisket to the grill and cook until the meat reaches 203°F. Allow the brisket to rest for at least 1 hour. The total cook time should range anywhere from 3.5 hours to 5 hours depending on the size of the brisket and the temperature of the Big Green Egg.
| Step | Description |
|---|---|
| 1 | Preheat Big Green Egg to 350°F or 400°F |
| 2 | Scatter 5-6 chunks of wood amongst the lump charcoal |
| 3 | Place brisket on grill with fat cap down |
| 4 | Smoke uncovered for 3-4 hours at 350°F or 3.5 hours at 400°F |
| 5 | Check internal meat temperature and remove when it reaches 160-170°F |
| 6 | Wrap brisket in foil or butcher paper |
| 7 | Return wrapped brisket to grill for 1-2 hours at 350°F or until internal temperature reaches 203°F or meat is probe tender at 400°F |
| 8 | Allow brisket to rest for at least 1 hour before slicing and serving |
Cooking Brisket at 350°F
A 350°F brisket should take about 5 or 6 hours to cook in your Big Green Egg, depending on the size of the brisket.
- Fill the BGE with lump charcoal, throw in about 5 or 6 chunks of wood, adjust the vents and wait for the temperature to stabilize around the 350°F range.
- Once the temperature is stable, lay the brisket fat cap down on the grill.
- Smoke the brisket uncovered for about 3-4 hours.
- After 3-4 hours, check the internal meat temperature. Remove the brisket once the internal meat temperature reaches 160°F to 170°F.
- Wrap the brisket in foil or butcher paper.
- After you wrap the brisket, return it to the Green Egg and cook for another 1 – 2 hours.
- Keep the thermometer inserted into the meat so you can monitor into internal temperature. Remove the brisket from the egg once the brisket reaches 203°F or is probe tender.
- Rest for at least 1 hour then slice.
To cook a brisket on a Big Green Egg at 350°F, fill the grill with lump charcoal and add a few chunks of wood. After the temperature stabilizes, place the brisket on the grill with the fat cap down and smoke uncovered for 3-4 hours. Check the internal temperature and wrap the brisket in foil or butcher paper once it reaches 160-170°F. Return the wrapped brisket to the grill for an additional 1-2 hours, or until the internal temperature reaches 203°F or the meat is probe tender. Allow the brisket to rest for at least an hour before slicing and serving.
Cooking Brisket at 400°F
- Preheat your Big Green Egg to 400°F.
- If possible, use prime grade brisket for the best results.
- Inject the brisket with broth to help keep it moist while cooking at a high temperature.
- Dry brine the brisket by applying a generous amount of kosher or sea salt to the meat and leaving it in the refrigerator overnight.
- Be mindful not to use a rub with a high salt content in addition to the dry brine.
- Place the brisket on the grill and cook for approximately 3.5 hours, or until it reaches the desired level of doneness.
If you want your brisket done even faster, increase the temperature to 400°F. You can expect the brisket to be done in around about 3.5 hours at this high temperature. For the best results, use prime grade brisket if you want the meat cooked at 400°F.
A prime brisket will have more marbling and keep the meat tender and juicy. Also consider injecting the brisket with broth to help replace some of the lost liquid that may escape cooking at such a high temperature. Also, apply a decent amount of kosher salt or sea salt to the brisket prior to smoking.
Salting the brisket will help the meat retain moisture and also add flavor. This method is called dry brining and works best if you leave it in the refrigerator overnight. A word of caution: if you’re using the dry brining method, be careful your rub doesn’t have a high salt content or you will give your brisket double the salt.
Start Low and Finish High
- Cook brisket at lower temperature and increase later
- Cook time: 7-10 hours
- Start at 250°F-270°F, increase to 350°F-400°F once brisket reaches wrapping stage
To cook a brisket on a Big Green Egg with a combination of low and high temperatures, begin by preheating the grill to 250°F-270°F. Place the brisket on the grill and cook until the internal temperature reaches 170°F. This lower cooking temperature will allow the brisket to absorb more smoke and form a flavorful bark.
Once the brisket is ready to be wrapped, increase the temperature to 350°F-400°F. This higher temperature will help the brisket cook faster and allow it to reach the desired level of doneness in 7-10 hours. This method is a good compromise between the hot and fast and slow cooking methods, giving you the best of both worlds.
How Long Will it Take?
- Hot and fast cooking time: 3.5-6 hours on a Big Green Egg
- 400°F: 3.5-4 hours
- 350°F: 5-6 hours
- Don’t forget to include resting time (at least 1 hour)
When cooking a brisket using the hot and fast method on a Big Green Egg, you can expect the cooking time to range from 3.5 to 6 hours depending on the temperature you choose and the size of the brisket. If you cook the brisket at 400°F, it will take between 3.5 and 4 hours to reach the desired level of doneness.
For a slightly longer cook time, set the temperature to 350°F and plan for the brisket to take between 5 and 6 hours. It’s important to remember to allow for at least 1 hour of resting time after the brisket is done cooking, as this will allow the juices to redistribute and make the meat more tender.
Fat-Side-Up or Fat-Side-Down?
- Place brisket fat side down on kamado grill
- Heat source from below on Big Green Egg
- Fat cap should face downward to shield meat
- Deflector plate on Big Green Egg provides some protection, but fat on brisket adds another layer
- Trim brisket leaving 1/4 inch of fat on top for protection
When cooking a brisket hot and fast on a kamado grill such as a Big Green Egg, it’s essential to position the meat with the fat side down. This is because the heat source on a Big Green Egg is located below the grill, so the fat cap of the brisket should face downward to protect the meat from drying out or burning.
The deflector plate on the Big Green Egg provides some protection, but the fat on the brisket adds an extra layer of defense against the high heat. When trimming the brisket, be sure to leave about 1/4 inch of fat on top to ensure sufficient protection during the cooking process. This is especially important when cooking at high temperatures, as the meat is exposed to the heat for an extended period of time.
“Brisket Fat Side Up or Down? (We Settle The Debate)”
Why Wrap Brisket?
- Wrapping helps keep meat moist and prevent drying out
- Wrapping speeds up cooking process and helps brisket move through “stall”
- Options for wrapping: foil or butcher paper
- Foil creates braising effect but may not be ideal for bark
- Butcher paper allows meat to breathe more and preserves bark
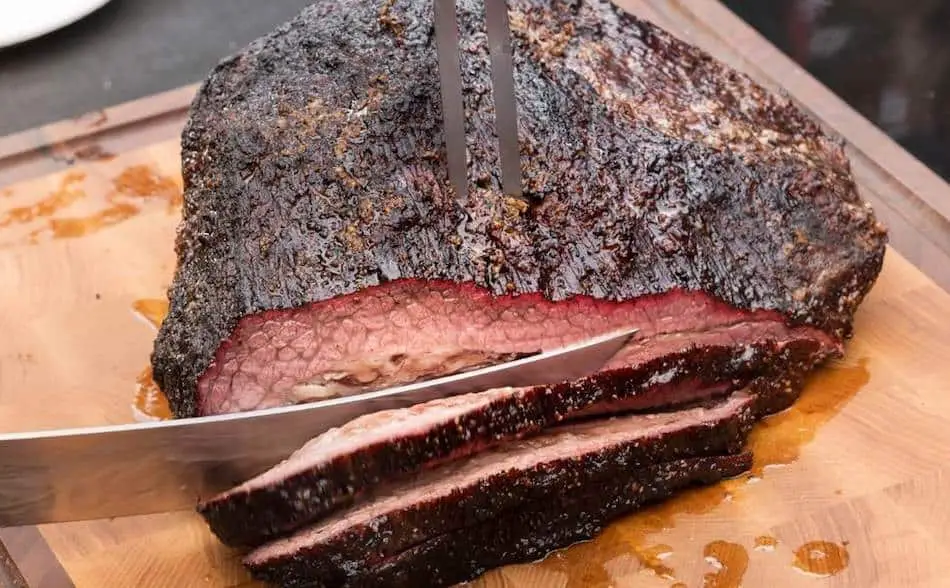
Wrapping a brisket while smoking it is a crucial step in the cooking process, as it helps to keep the meat moist and prevent it from drying out. It also helps to speed up the cooking process and can assist the brisket in moving through the “stall,” a period during which the internal temperature of the meat stops rising and remains constant for a time.
When it comes to wrapping materials, there are two main options: foil and butcher paper. Foil creates a steaming or braising effect that can be beneficial for the meat, but may not be ideal for the bark (the exterior of the meat). Butcher paper, on the other hand, allows the meat to breathe a little more, which can help to preserve the bark.
Both foil and butcher paper have their own advantages and drawbacks, so it’s up to the individual cook to decide which method works best for their needs.
Butcher paper will allow the brisket to breathe a little more and will preserve the bark. A foil wrapped brisket will steam or even braise, which is good for the brisket but not so good for the bark.
The Best Time to Wrap Brisket?
- Recommended to wrap brisket at an internal temperature of 160°F-170°F
- Typically done after 3-4 hours of smoking
- Wrapping seals in moisture and prevents meat from drying out
- Wrapping speeds up cooking process
- Once wrapped, remove brisket at internal temperature of around 203°F
- Allow to rest for at least 1 hour before slicing and serving
When cooking a brisket using the hot and fast method, it is generally recommended to wrap the meat once it reaches an internal temperature of between 160°F and 170°F. This is typically done after the brisket has been smoking for 3-4 hours, depending on the size of the meat and the temperature of the smoker.
At this stage, the brisket should have developed some color, the bark (the exterior of the meat) should have set, and it should have absorbed some smoke flavor. Wrapping the brisket at this point helps to seal in the moisture and prevents the meat from drying out. It also helps to speed up the cooking process, as the wrapped meat will continue to cook and increase in temperature until it reaches the desired level of doneness.
Once the wrapped brisket has reached an internal temperature of around 203°F, it should be removed from the grill and allowed to rest for at least 1 hour before slicing and serving. This resting time will allow the juices to redistribute throughout the meat, making it more tender and flavorful.
Injecting Brisket for Extra Flavor and Moisture
When you put a brisket in your Big Green Egg and raise the temperature to the 400°F range, the brisket is going to be at risk of losing a lot of moisture. When cooking a brisket at such high temperature, injecting the meat with some extra moisture is only going to do the brisket good. It will replace some of the lost fluid and prevent the meat from tasting dry.
You can use bone broth or a marinade to inject your brisket. This will add extra flavor and replace some lost moisture because of cooking at such high temperatures. I like to use Butcher BBQ Prime Barbecue Brisket Injection because it’s competition standard. However, you can use a simple beef broth and it will do the job.
You can inject the brisket prior to adding the rub while in the preparation stage. I have also seen people inject the brisket after the first 2 hours in the Big Green Egg. If you don’t have a meat injector, you can buy a stainless steel injector on Amazon. They are affordable and easy to use. Check the latest price here.
Brine the Brisket Prior to Smoking
Brining is a good way to help brisket retain moisture, which is especially important when cooking at the hot and fast temperature. When you add salt to meat, it will add flavor, but help the meat retain moisture. Dry brining involves rubbing kosher salt or sea salt into the brisket and allowing time to penetrate the meat. I prefer to dry brine the night before the cook, and then the following morning apply the rub. Be careful not to double salt the brisket, so check the salt content in your rub. Should I Brine Brisket?
The Best Rub and Seasoning for Brisket
- Rub adds flavor to brisket
- Choose flavors that complement beef
- Experiment with different combinations and proportions
- Be mindful of salt content
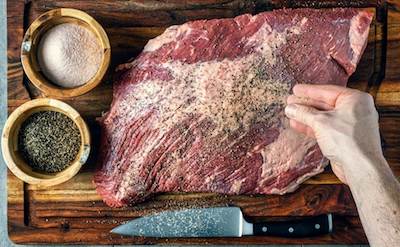
Barbecue experts and competition pitmasters agree that a rub is an important element in the flavor of a brisket. When choosing a rub, it’s important to select flavors that complement the beef, such as paprika, garlic, and onion. Experimenting with different combinations and proportions of ingredients can lead to new and exciting flavor profiles. It’s also crucial to be mindful of the salt content of your rub, as using too much can result in an overly salty brisket.
I prefer to make my rub, but when I use store-bought rubs, I use Killer Hogs or Slap Yo Daddy because barbeque gurus produce them, so I know they are competition grade. There are dozens of ways to season a brisket, and if you want a detailed guide check out my Brisket Rub article and a post I wrote a while back called Should I Slather Brisket?
Standard Barbecue Rub
I found this great rub recipe through How To BBQ Right. I use this recipe and alter it slightly depending on what I'm cooking. Made by the guys at Townsend Spice & Supply: https://townsendspice.com/
Ingredients
- - ½ Cup Paprika
- - ½ Cup Salt
- - ½ Cup Sugar
- - ½ Cup Granulated Garlic
- - ¼ Cup Granulated Onion
- - ¼ Cup Chili
- - ¼ Cup Cumin
- - 2 Tablespoons Black Pepper
- - 2 Tablespoons Dry Mustard
- - 1 Tablespoon Cayenne Pepper
Instructions
- Combine all the spices together in a large mixing bowl
- Store rub in rub shakers
How Long Do You Rest Brisket?
- Allow brisket to rest for 1-2 hours
- Place in dry cooler for one hour before slicing
- Resting is an important step for a successful smoked brisket
It is essential to allow your brisket to rest for at least an hour, but ideally closer to two hours, after it has finished cooking. If you don’t allow the meat to rest, the juices will spill out onto the cutting board when you slice it, resulting in a dry and less flavorful brisket.
To ensure that the juices stay within the meat, place the brisket into a dry cooler and let it sit for about an hour before slicing. This will allow the juices to redistribute throughout the meat, giving you a more tender and moist brisket.
Keep in mind that when cooking a brisket at a high temperature, it’s important to pay attention to all the details to ensure the best possible outcome. Allowing the brisket to rest is just one of these important steps that you don’t want to skip.
“How Long Should I Rest Brisket? We Asked The Pitmasters”
The Best Wood for Smoking Brisket
- Place 6-7 wood chunks in Big Green Egg
- Mix wood with lump charcoal
- Some people place wood on top, others underneath
- For hot and fast smoke, place wood on top
- Brisket needs every minute of smoke
When preparing your Big Green Egg for a hot and fast smoke, it’s important to add enough wood to ensure that the brisket gets a good amount of smoke flavor. I recommend adding about six or seven chunks of wood and mixing them in with the lump charcoal.
Some people prefer to place the wood on top of the charcoal, while others swear by placing the wood underneath the lump charcoal so the wood smolders. Personally, I like to lay the wood on top of the charcoal so that it’s burning from the beginning. Keep in mind that the brisket will not be on the grill for very long, so it needs every minute of smoke that it can get. Regardless of where you choose to place the wood, make sure to mix it in with the lump charcoal for even burning.
“The Ultimate Guide to Smoking Wood: Flavors, Forms, and Expert Tips”
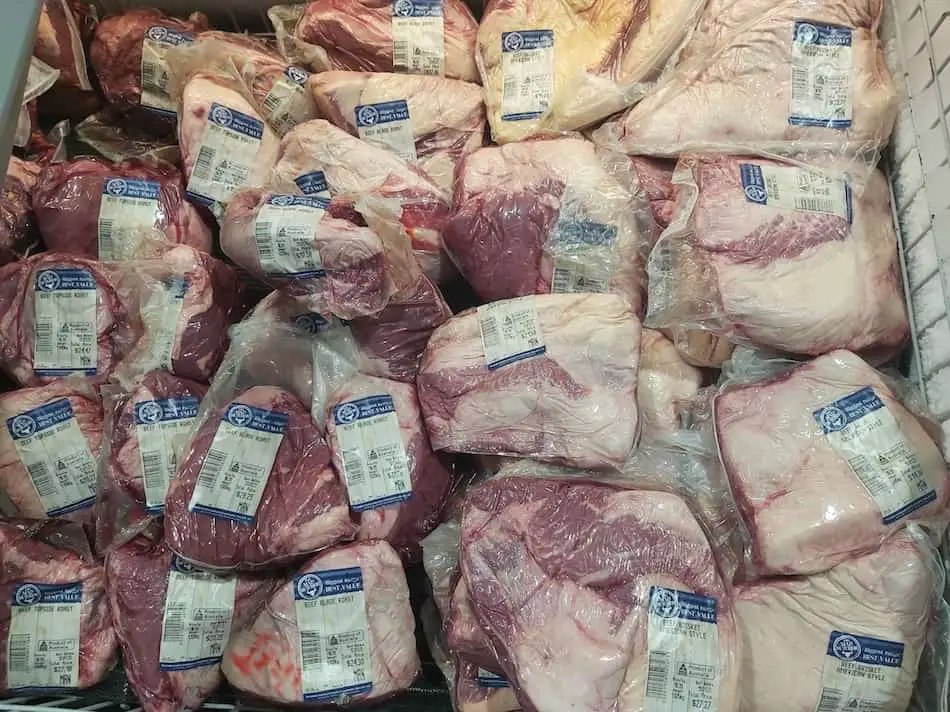
Beef Grades Make a Difference
- Understanding USDA beef grades is important for cooking brisket hot and fast on a Big Green Egg
- Prime beef grade will produce a higher quality final product
- Using Select beef may result in a less tender and juicy brisket
When it comes to cooking a brisket hot and fast on a Big Green Egg, understanding the different USDA beef grades is crucial to achieving a high quality final product. While you may have seen some YouTube videos of people cooking brisket hot and fast, they often don’t mention the grade of beef they are using. This can make a huge difference in the final result. For example, if you were to conduct the same hot and fast experiment using Prime beef grade brisket, the resulting brisket would likely be much more tender and juicy compared to using a USDA Select beef grade. It’s important to keep this in mind as you plan and prepare your hot and fast brisket on a Big Green Egg.
“What Brisket Should I Buy? (Prime, Choice, Select or Wagyu)”
Buy a Brisket with Marbling
- Prime beef contains a high level of marbling
- Marbling is important for a tender and juicy brisket
- Poor quality beef can’t be made restaurant quality with good techniques
If you’re looking to achieve a high quality, restaurant-style smoked brisket, it’s important to start with the right type of beef. USDA Prime beef is known for its high level of marbling, which is a key factor in determining the tenderness and juiciness of the final product.
Most restaurants and barbecue joints serve Prime grade beef for this reason. While it’s true that you can use good preparation and cooking techniques to enhance the flavor and texture of your brisket, if you start with poor quality beef, it’s unlikely that you’ll be able to achieve the same level of tenderness and flavor as a restaurant. Therefore, it’s important to pay attention to the marbling of the beef when you’re choosing a brisket to ensure the best possible outcome.
“Marbling On Brisket – Why It Matters (And How To Find It”
Budget Briskets: Are they Worth It?
- Select brisket is leaner and has less marbling
- This may result in less flavor and juiciness
- Select brisket is at risk when cooked at high temperatures
- Techniques like brining, injecting, and using beef tallow can help improve the final product
When it comes to cooking a brisket hot and fast on a Big Green Egg, the grade of beef you use can make a big difference. A USDA Select brisket will be leaner and have less marbling compared to a Prime grade, which can result in a less flavorful and juicy brisket.
This can be especially problematic when cooking at high temperatures, as the leaner meat is more at risk of drying out. However, this doesn’t mean that you can’t achieve a delicious smoked brisket using Select grade beef.
While your expectations may need to be adjusted, there are a number of techniques that you can use to improve the finished product. For example, brining the meat, injecting it with a marinade, or even using beef tallow can help to add flavor and moisture to the brisket. So even if you’re limited to using a Select grade brisket, with the right techniques, you can still end up with a delicious smoked brisket.
“USDA Select Grade Briskets – Are They Good For Smoking?”
The Taste Difference: Hot-and-Fast Brisket
- Low and slow cooking produces a better-tasting brisket
- Hot and fast brisket may be less tender and have less smoke flavor
- Low and slow is best for perfection and impressing guests
- Hot and fast is good for time constraints
Expanded paragraph: While it’s possible to achieve a delicious smoked brisket using the hot and fast method, the final product will not be as good as a brisket cooked low and slow at a lower temperature. I’ve seen numerous taste tests that confirm this point. The reason for this is that brisket needs time at a low heat to break down the connective tissue and develop its characteristic tenderness.
It also needs time to sit in the smoke in order to fully infuse the meat with flavor. When you cook a brisket hot and fast at a high temperature, the meat is only exposed to the smoke for a couple of hours, which is not enough time to achieve the same level of tenderness and smoke flavor as a low and slow cooked brisket.
While a hot and fast brisket can still taste good, if you want to achieve perfection or wow your guests, it’s best to stick to the low and slow method. On the other hand, if you’re in a hurry and need to get a brisket on the table quickly, the hot and fast method is a good option.
“The Great Brisket Showdown: Hot-and-Fast vs Low-and-Slow”
My Favorite Brisket Tools
Thanks for checking out this article. I hope you learned a few things. Here are some of my favorite tools I use when smoking brisket that may be useful to you. These are affiliate links, so if you decide to purchase any of these products, I’ll earn a commission. But in all honesty, these are the tools I recommend to my family and friends who are just starting out.
Meat Injector: Injecting meat is a great way to take your barbecue to the next level and help you make competition-style brisket. An injector is the only way you will be able to get flavor and moisture into the middle of the meat. The Beast Injector is a stainless steel injector that is sturdy and affordable. Check the latest price on Amazon here.
Brisket Marinade: The best injection solution on the market is the Butcher BBQ Brisket Injection. This marinade is used in competitions and is made by World Barbecue Champion pitmaster, Dave Bouska. You can find the marinade on Amazon here.
Butcher Paper: Wrapping brisket in butcher paper has become a huge trend in barbeque thanks to Aaron Franklin. Wrapping your brisket in paper will give you a nice brisket bark. However, you can’t just use any old paper, it has to be unwaxed, food grade paper. You can find it on Amazon here.
Brisket Rub: These days I make my own rub when possible, but I always have a few pre-made rubs for when I’m running low. Barbecue guru Malcom Reed produces Killer Hogs, one of the best brisket rubs I’ve found over the years. Another great rub is Slap Yo Daddy, made by brisket master and multiple World Barbecue Champion, Harry Soo.
Meat Thermometer: There are dozens of fancy thermometers on the market, but I still use my trusty TP20. For around $50, I have a high-quality meat thermometer with two probes, and can track the temperature of my smoker with one probe, and my meat with the other probe. The ThermoPro TP20 is an Amazon Best Seller because it’s the easiest thermometer to operate, is durable, highly accurate, and comes with pre-programmed meat settings.
Instant Read Thermometer: Arguably, the second most important tool you need is a fast and accurate instant-read thermometer. These tools play an important role in the latter stages of the cook when the meat needs regular checking in multiple areas. I use the ThermoPro TP19 because it can do everything a ThermaPen can do, but for a fraction of the cost. You can check out the TP19 on Amazon here.
Advanced Thermometer and Automatic Temperature Controller: Once you’re ready to take things seriously, the FireBoard 2 Drive is a six-channel Bluetooth/Wi-Fi thermometer that can monitor up to 6 pieces of meat, control and graph your cook sessions on your smartphone, and attaches to an an automatic blower that will convert your charcoal smoker to a set-and-forget. This is one of the most advanced meat thermometers on the market. You can check it out on the FireBoard website here.