The secret to unforgettable grilling lies in selecting the perfect cut of meat, a task that can be daunting due to the sheer variety of options. This comprehensive guide aims to help you navigate the world of meat cuts and their unique characteristics, focusing on the most popular choices for grilling in the United States, and around the world. In this guide, we’ll explore everything from the rich marbling of a ribeye to the tender delicacy of a filet mignon, providing expert advice on choosing, preparing, and grilling each cut to perfection. We’ll also delve into the differences in meat cut terminology across various regions, ensuring you can confidently identify and select the best cuts, no matter where you are.
To choose the right cut of meat, consider the flavor and texture preferences, as well as the occasion, budget, and cooking equipment. When selecting a cut of meat, look for marbling, which is the fat content within the muscle fibers that adds flavor and tenderness. For leaner cuts, consider marinating or seasoning the meat to add flavor and moisture. It’s also important to choose a cut of meat that is suitable for the desired cooking method, such as direct heat grilling or indirect heat grilling. Lastly, it’s essential to monitor the internal temperature of the meat to ensure it’s cooked to the desired level of doneness. By following these tips, one can choose the perfect cut of meat for their grilling needs.
| Beef Cut | Characteristics | Grilling Recommendations |
|---|---|---|
| Ribeye | Rich marbling, tender, flavorful | High heat, sear for crust |
| New York Strip | Good balance of tenderness and flavor, juicy | Medium-high heat, nice sear |
| T-Bone | Combines filet mignon and strip steak, T-shaped bone | Two-zone cooking, sear and lower heat |
| Filet Mignon | Exceptional tenderness, subtle flavor | Medium heat, prevent drying out |
| Skirt Steak | Intense beefy flavor, long and thin, coarse texture | High heat, quick cook, marinate |
| Flank Steak | Lean, flavorful, coarse texture, distinct grain | High heat, quick cook, marinate |
The Importance of Choosing the Right Cut for Grilling
Grilling is more than just a way to cook food; it’s a culinary art form that has the power to transform simple ingredients into mouthwatering masterpieces. A key component to achieving grilling greatness lies in selecting the right cut of meat. The cut you choose can significantly impact the flavor, tenderness, and overall success of your grilled dish.
In the United States, there is a wide variety of meat cuts available, each with its own unique characteristics and grilling potential. By understanding the differences between these cuts and learning how to choose the perfect cut for your specific grilling needs, you can elevate your outdoor cooking skills and impress your family and friends with delectable, perfectly cooked meals.
Popular Beef Cuts for Grilling and Their Characteristics
As we dive into the world of grilling, it’s essential to understand the different cuts of beef that are ideally suited for this cooking method. Each cut offers a unique combination of flavor, texture, and tenderness, contributing to a memorable grilling experience.
In this section, we’ll explore six popular beef cuts for grilling, examining their characteristics and highlighting what makes them stand out. From the marbling king that is the ribeye to the lean and versatile flank steak, let’s discover the qualities of these cuts and learn how to bring out their best on the grill.
Ribeye: The King of Marbling
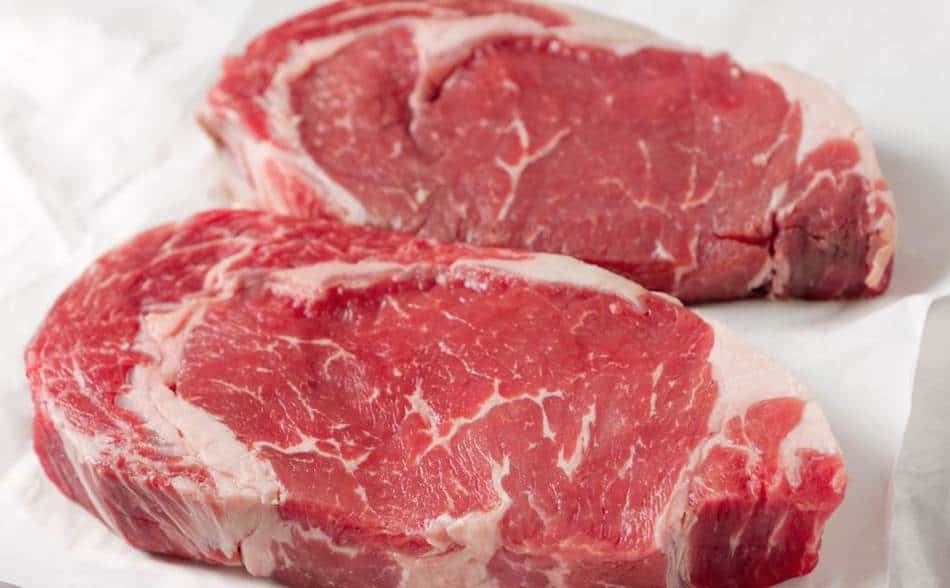
The ribeye steak is a true favorite among grill enthusiasts, and for good reason. Hailing from the rib section of the cow, this cut is known for its rich marbling – the fine veins of fat that run throughout the meat. This marbling is what sets the ribeye apart, as it melts during the grilling process, infusing the meat with flavor and ensuring a tender, juicy result.
Ribeye has great marbling and great flavor. I like to use a simple seasoning like salt and pepper or a dry rub. Let the meat come to room temperature for about 20 minutes before you grill it. Preheat your grill, then sear the steak on both sides over high heat.
Then, move it to a cooler part of the grill and cook it to your desired temperature. Let it rest for at least 5 minutes before cutting into it. That’s the key to a perfect ribeye.
Bobby Flay
Typically, ribeye steaks have a large, round central eye of meat surrounded by a cap of more marbled meat, known as the spinalis dorsi. This cap is particularly prized for its tenderness and flavor. When selecting a ribeye, look for even marbling throughout the steak, as this will contribute to a more consistent texture and taste.
To grill a ribeye, it’s best to use high heat, which helps create a beautiful crust on the outside while keeping the interior moist and tender. Searing the steak over direct heat and then finishing it over indirect heat allows for a more even cook and prevents flare-ups from the melting fat. With its exceptional marbling and robust flavor, the ribeye is truly deserving of its title as the king of marbling.
| Ribeye Steak | Rare | Medium | Well Done |
|---|---|---|---|
| Safe Internal Temperature (°F / °C) | 125°F / 52°C | 145°F / 63°C | 160°F / 71°C |
| Suggested Seasonings | Coarse salt, freshly ground black pepper, garlic powder, onion powder, and/or paprika | ||
| Estimated Cooking Times* (per side) | 3-4 minutes | 4-6 minutes | 6-8 minutes |
| When to Flip (Total Cook Time) | 6-8 minutes | 8-12 minutes | 12-16 minutes |
*Estimated cooking times are for steaks 1 to 1.5 inches thick and may vary depending on the thickness of the steak and the heat of the grill.
Note: Always use a meat thermometer to check the internal temperature of your steak for an accurate gauge of doneness. Cooking times provided are approximate and can vary based on the specific grill, temperature, and steak thickness.
New York Strip: A Balance of Flavor and Tenderness
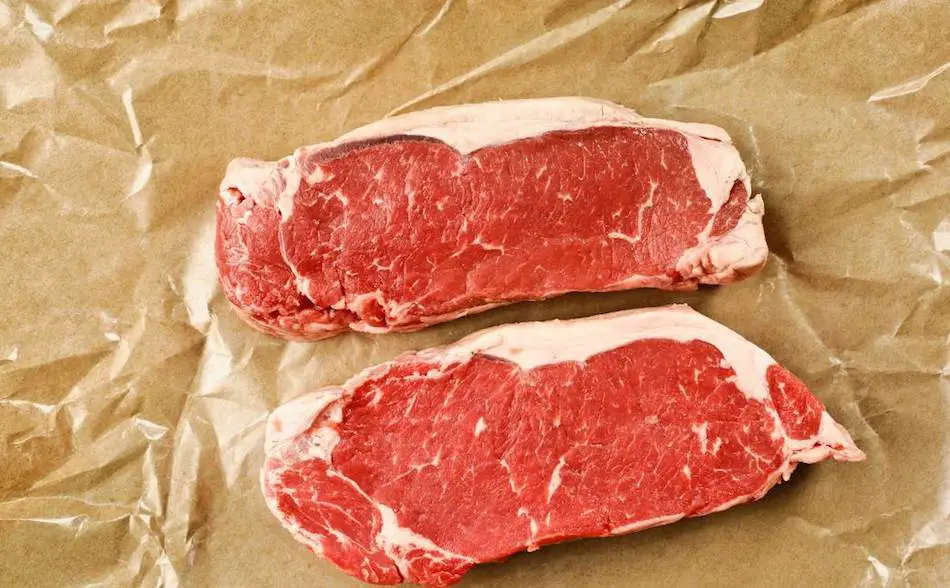
The New York Strip steak, also known as the strip loin or strip steak, is a popular choice for grilling due to its excellent balance of flavor and tenderness. This cut comes from the short loin section of the cow, which is a relatively less worked muscle area, resulting in a more tender and succulent steak.
New York Strip steaks have a moderate level of marbling, providing a satisfying juiciness and robust beef flavor. They are characterized by a thick strip of meat with a narrow layer of fat running along one side. This fat can be left on during grilling to add extra flavor and then trimmed off before serving if desired.
The secret to cooking a perfect New York Strip is to sear it in a hot pan with a touch of oil. Season the steak generously with salt and pepper, then place it in the pan and let it develop a beautiful crust.
After flipping it, add butter, garlic, and fresh herbs like thyme or rosemary, and baste the steak with the melted butter. Finish the steak in the oven or on the grill to your desired doneness. Rest it for a few minutes before serving, and you’ll have an amazing New York Strip.
Gordon Ramsay
To grill a New York Strip, it’s best to use medium-high heat. Searing the steak over direct heat creates a nice crust on the surface, while moving it to indirect heat allows the interior to cook evenly without overcooking. Depending on your desired level of doneness, cooking times may vary, but using a meat thermometer is always a good idea to ensure the perfect result.
| New York Strip Steak | Rare | Medium | Well Done |
|---|---|---|---|
| Safe Internal Temperature (°F / °C) | 125°F / 52°C | 145°F / 63°C | 160°F / 71°C |
| Suggested Seasonings | Coarse salt, freshly ground black pepper, garlic powder, onion powder, and/or paprika | ||
| Estimated Cooking Times* (per side) | 3-4 minutes | 4-6 minutes | 6-8 minutes |
| When to Flip (Total Cook Time) | 6-8 minutes | 8-12 minutes | 12-16 minutes |
*Estimated cooking times are for steaks 1 to 1.5 inches thick and may vary depending on the thickness of the steak and the heat of the grill.
T-Bone: Two Steaks in One
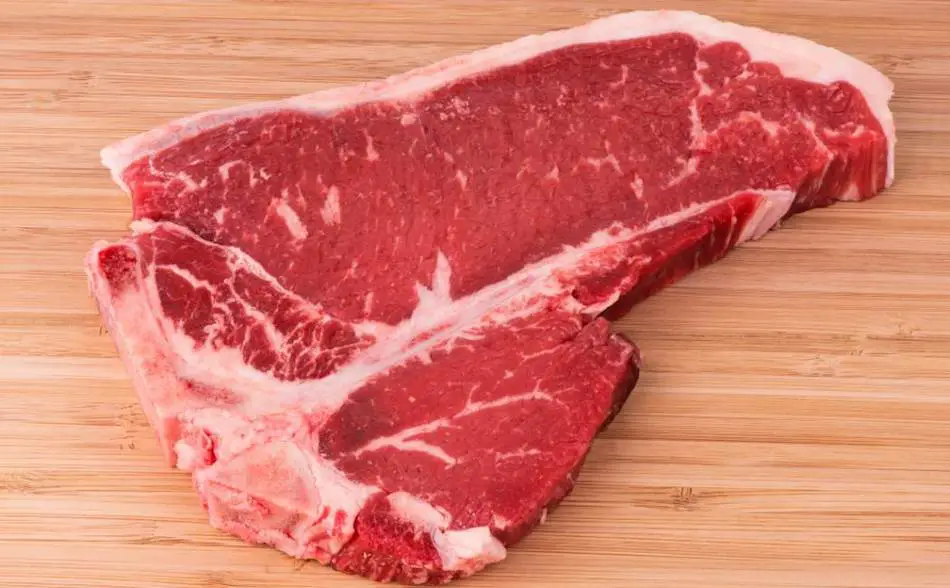
The T-Bone steak is a unique and highly sought-after cut due to its composition of two distinct types of meat on either side of the characteristic T-shaped bone. This cut comes from the front portion of the short loin section of the cow, where the tenderloin and the top loin muscles meet.
On one side of the T-shaped bone, you’ll find the New York Strip, which is known for its balance of flavor and tenderness. On the other side of the bone, there’s the filet mignon, prized for its incredible tenderness and subtle flavor. The bone itself also adds extra flavor to the meat during the grilling process.
A T-Bone steak gives you the best of both worlds: the meaty, robust flavor of the strip steak and the tender delicacy of the filet. When grilling a T-Bone, I recommend using a two-zone cooking method. Start by searing the steak over high heat to create a nice crust.
Then, move it to indirect heat to finish cooking. This way, you can cook the steak evenly without overcooking the tender filet. Use a meat thermometer to ensure the perfect doneness, and let the steak rest for a few minutes before serving. That’s the secret to a great T-Bone.
Alton Brown
Grilling a T-Bone steak can be a bit more challenging than other cuts, as each side of the bone cooks at a slightly different rate due to the differences in thickness and composition of the two steaks. To ensure even cooking, it’s best to start by searing the steak over high heat, then moving it to indirect heat to finish cooking.
Again, use a meat thermometer to monitor the internal temperature will help you achieve the desired level of doneness for both the strip and filet portions.
| T-Bone Steak | Rare | Medium | Well Done |
|---|---|---|---|
| Safe Internal Temperature (°F / °C) | 125°F / 52°C | 145°F / 63°C | 160°F / 71°C |
| Suggested Seasonings | Coarse salt, freshly ground black pepper, garlic powder, onion powder, and/or rosemary | ||
| Estimated Cooking Times* (per side) | 3-4 minutes | 4-6 minutes | 6-8 minutes |
| When to Flip (Total Cook Time) | 6-8 minutes | 8-12 minutes | 12-16 minutes |
*Estimated cooking times are for steaks 1 to 1.5 inches thick and may vary depending on the thickness of the steak and the heat of the grill.
Filet Mignon: The Epitome of Tenderness
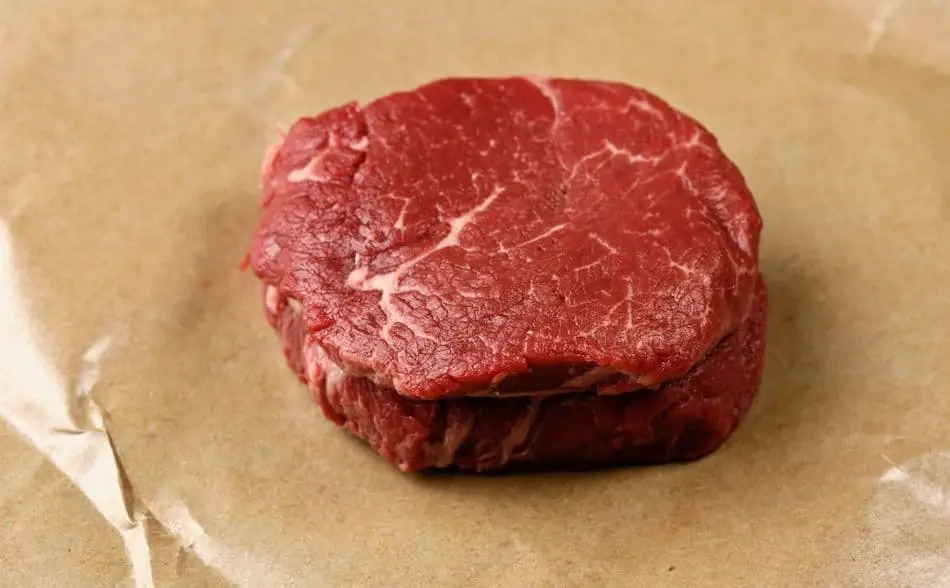
Filet mignon, often considered the most tender and luxurious of all steaks, is a cut that comes from the smaller end of the tenderloin muscle. This muscle is located in the central portion of the cow’s back, where it performs minimal work, resulting in an extremely tender and delicate texture.
This cut is characterized by its small, round shape and the absence of any bone or excess fat. While filet mignon may not have the same level of marbling as other cuts, such as the ribeye, its buttery tenderness more than makes up for it. Due to its mild flavor, filet mignon is often served with rich sauces or wrapped in bacon to enhance its taste.
Filet mignon is the epitome of tenderness, so when grilling it, you want to be gentle and take extra care not to overcook it. I suggest seasoning the filet with just salt and pepper to let the natural flavors shine through.
Sear the steak on high heat to create a beautiful crust, and then lower the heat or move the steak to indirect heat to finish cooking. Use a meat thermometer to ensure the perfect doneness. And always let the steak rest for a few minutes before cutting into it. That’s how you get the most tender and juicy filet mignon.
Wolfgang Puck
Grilling filet mignon requires a gentle touch and attention to detail, as its delicate texture can be easily overcooked. It’s best to use a medium-high heat for grilling this cut. Start by searing the filet over direct heat to create a nice crust, and then move it to indirect heat to finish cooking.
Using a meat thermometer will help you achieve the desired level of doneness without compromising the steak’s tenderness.
| Filet Mignon | Rare | Medium | Well Done |
|---|---|---|---|
| Safe Internal Temperature (°F / °C) | 125°F / 52°C | 145°F / 63°C | 160°F / 71°C |
| Suggested Seasonings | Coarse salt, freshly ground black pepper, garlic powder, and/or fresh herbs (like thyme or rosemary) | ||
| Estimated Cooking Times* (per side) | 3-4 minutes | 4-6 minutes | 6-8 minutes |
| When to Flip (Total Cook Time) | 6-8 minutes | 8-12 minutes | 12-16 minutes |
*Estimated cooking times are for filets 1 to 1.5 inches thick and may vary depending on the thickness of the steak and the heat of the grill.
Skirt Steak: A Flavorful Favorite for Fajitas
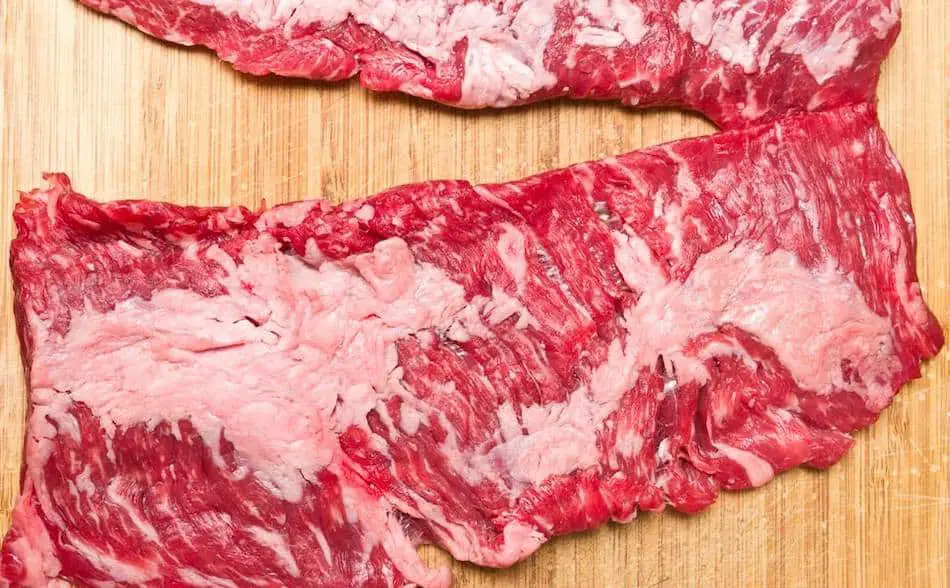
Skirt steak is a long, thin cut of beef that comes from the diaphragm muscles of the cow, specifically the plate and the flank regions. This cut is known for its intense beefy flavor and relatively loose, fibrous texture. While it’s not as tender as some other cuts, its robust flavor and unique texture make it a popular choice for dishes like fajitas, stir-fries, and salads.
There are two types of skirt steak: inside skirt, which comes from the cow’s plate section, and outside skirt, which comes from the flank section. Outside skirt is typically more tender and considered to be of higher quality, but both types are suitable for grilling.
Skirt steak is all about the flavor, and it’s perfect for dishes like fajitas and tacos. The key to getting the most out of this cut is to marinate it to help tenderize the meat and add even more flavor.
When grilling skirt steak, you want to use high heat and cook it quickly to get a nice sear on the outside while keeping the inside juicy. After grilling, let it rest for a few minutes, then slice it against the grain to make it more tender. Skirt steak may not be the most tender cut, but its flavor is unbeatable.
Guy Fieri
When grilling skirt steak, it’s essential to marinate the meat for at least 30 minutes or up to several hours to help tenderize it and enhance its natural flavors. Due to its thin nature, skirt steak cooks quickly over high heat, usually requiring just 2-4 minutes per side.
After grilling, it’s crucial to let the steak rest for a few minutes and then slice it against the grain to maximize its tenderness.
| Skirt Steak | Rare | Medium | Well Done |
|---|---|---|---|
| Safe Internal Temperature (°F / °C) | 125°F / 52°C | 145°F / 63°C | 160°F / 71°C |
| Suggested Seasonings/Marinade | Lime juice, soy sauce, minced garlic, chili powder, cumin, and/or brown sugar | ||
| Estimated Cooking Times* (per side) | 2-3 minutes | 3-4 minutes | 4-5 minutes |
| When to Flip (Total Cook Time) | 4-6 minutes | 6-8 minutes | 8-10 minutes |
*Estimated cooking times are for skirt steaks approximately 0.5 inches thick and may vary depending on the thickness of the steak and the heat of the grill.
Flank Steak: Lean and Versatile
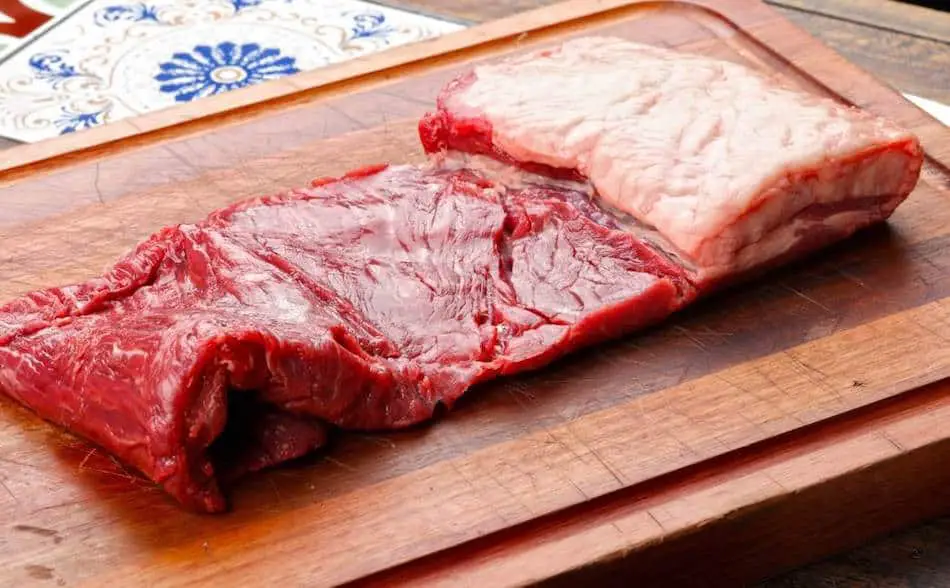
Flank steak is a lean, flat cut of beef that comes from the abdominal muscles of the cow, located in the lower chest or flank area. This cut is known for its strong beefy flavor and relatively lean composition, making it a popular choice for those looking for a healthier option without sacrificing taste. Flank steak is often used in dishes like stir-fries, salads, and fajitas, as well as being served on its own after being marinated and grilled.
Flank steak is a versatile and flavorful cut that’s perfect for grilling. To get the most out of it, start by marinating it with your favorite ingredients, which will help tenderize the meat and add even more flavor.
When grilling, use high heat and cook it quickly to achieve a nice crust while keeping the inside juicy. After letting the steak rest, be sure to slice it against the grain, which will make it more tender and easier to enjoy. Flank steak is a great option for those who want a lean, flavorful cut of beef.
Bobby Flay
When grilling flank steak, it’s important to marinate the meat for at least an hour or up to overnight to help tenderize it and enhance its natural flavors. Due to its lean nature, flank steak is best cooked over high heat to develop a nice crust while keeping the inside juicy.
It typically takes about 4-6 minutes per side, depending on the desired level of doneness. After grilling, let the steak rest for a few minutes and then slice it against the grain to maximize tenderness.
| Flank Steak | Rare | Medium | Well Done |
|---|---|---|---|
| Safe Internal Temperature (°F / °C) | 125°F / 52°C | 145°F / 63°C | 160°F / 71°C |
| Suggested Seasonings/Marinade | Soy sauce, Worcestershire sauce, garlic, honey, and/or red pepper flakes | ||
| Estimated Cooking Times* (per side) | 4-5 minutes | 5-6 minutes | 6-7 minutes |
| When to Flip (Total Cook Time) | 8-10 minutes | 10-12 minutes | 12-14 minutes |
Grilling Techniques for Different Cuts of Meat
Grilling is one of my favorite ways to enjoy the rich and diverse flavors of different cuts of meat. The process not only imparts a delightful smoky aroma but also enhances the natural flavors and textures of the meat. In this section, we’ll explore the various grilling techniques that work best for different cuts of meat.
From mastering the art of the perfect sear to understanding the benefits of indirect heat, these tips and tricks will help you elevate your grilling game and ensure that each cut reaches its full potential on the grill.
So, whether you’re a seasoned grill master or just starting your grilling journey, let’s dive into the world of grilling techniques and make the most out of each delicious cut of meat.
Mastering the art of direct and indirect heat is the single most important lesson you can learn in grilling. Direct heat is perfect for quickly cooking thin cuts of meat and achieving a beautiful sear, while indirect heat allows you to cook larger, thicker cuts slowly and evenly without burning the outside. Knowing when to use each technique, or even combining them, can be the difference between a mediocre meal and an unforgettable grilling experience. So, take the time to understand the nuances of direct and indirect heat and watch your grilling skills soar.
Steven Raichlen
Direct vs. Indirect Heat Grilling
“The science of direct and indirect heat grilling lies in understanding heat transfer and how it affects the cooking process. Direct heat grilling exposes the meat to intense radiant heat, which rapidly sears the surface, creating flavorful crusts and grill marks. On the other hand, indirect heat grilling relies on convection, which is the circulation of hot air around the food, resulting in a slower, more gentle cooking process. This method is ideal for larger, thicker cuts that require more time to cook through without overcooking the exterior. By understanding the principles of heat transfer in grilling, you can harness the power of both direct and indirect heat to create perfectly cooked, flavorful dishes every time.” – Harold McGee
When it comes to grilling, understanding the difference between direct and indirect heat is crucial for achieving the perfect cook on your meat. Both methods have their unique advantages, and knowing when and how to use them will significantly improve your grilling skills. Let’s take a closer look at direct and indirect heat grilling and how they can be applied to various cuts of meat.
Direct Heat Grilling
Direct heat grilling involves placing the meat directly over the heat source, such as burning charcoal or gas burners. This method cooks the meat quickly by exposing it to high temperatures, often resulting in a beautiful sear with attractive grill marks. Direct heat grilling is ideal for thinner cuts of meat, such as steaks, burgers, and kebabs, which cook quickly and benefit from a nice crust on the outside.
Advantages of direct heat grilling:
- Fast cooking times
- Searing the meat locks in juices and flavors
- Ideal for thin cuts and quick-cooking items
Indirect Heat Grilling
Indirect heat grilling, on the other hand, involves cooking the meat away from the direct heat source. This method uses the heat circulating within the grill to cook the meat more slowly and evenly, much like an oven. Indirect heat grilling is ideal for larger, thicker cuts of meat or those with a higher fat content, such as roasts, whole chickens, and ribs. It allows the meat to cook through without burning the outside.
Advantages of indirect heat grilling:
- Even, slow cooking for larger or thicker cuts
- Reduces the risk of burning or overcooking the exterior
- Ideal for meats that need longer cooking times or those with a high fat content
In many cases, a combination of direct and indirect heat grilling is the key to success. For instance, searing a thick steak over direct heat to create a crust, and then moving it to indirect heat to finish cooking, ensures a perfectly cooked and juicy steak.
| Searing Zone | Finishing Zone | |
|---|---|---|
| Heat source | Hot (400°F to 700°F) | Cooler (225°F to 350°F) |
| Cooking time | Short (minutes) | Long (minutes to hours) |
| Ideal for | Thicker cuts of meat | All cuts of meat |
| Advantages | Creates flavorful crust | Reduces the risk of burning |
| Locks in juices and flavors | Allows for more precise cooking | |
| Achieves perfect balance of flavor and texture | Ensures even cooking throughout |
Two-Zone Cooking: Searing and Finishing
Two-zone cooking is a grilling technique that involves creating two temperature zones on your grill: a hot zone for searing and a cooler zone for finishing the cook. This method is particularly useful for thicker cuts of meat, such as steaks, pork chops, and chicken breasts, that require high heat to create a crust and a lower heat to cook the center without burning the exterior.
To set up a two-zone grill, you’ll need to arrange your charcoal or gas burners so that one half of the grill is hot and the other half is cooler. On a charcoal grill, this can be achieved by piling the coals on one side and leaving the other side empty. On a gas grill, you can adjust the burners to create different temperature zones.
Two-zone cooking is the secret to perfectly cooked meat every time. The high heat of the searing zone creates that beautiful crust on the outside, while the cooler zone allows the meat to cook through without burning. It’s all about controlling the cooking process to achieve the perfect balance of flavor and texture. So, take the time to set up your grill for two-zone cooking and watch your grilled meats shine.
Myron Mixon
Searing
Once your grill is set up for two-zone cooking, you’ll start by searing the meat over the hot zone. This step creates a flavorful crust on the outside while locking in the juices and flavors. Sear the meat for a few minutes on each side, then move it to the cooler side of the grill to finish cooking.
Finishing
The second step of two-zone cooking involves moving the meat to the cooler side of the grill to finish cooking. This allows the meat to cook through without burning the exterior. The time required to finish cooking will depend on the thickness of the meat and the desired level of doneness. Use a meat thermometer to check the internal temperature of the meat and ensure that it has reached a safe temperature.
Advantages of two-zone cooking:
- Creates a flavorful crust while keeping the inside juicy and tender
- Reduces the risk of burning the exterior of thicker cuts
- Allows for more precise control over the cooking process
Temperature Monitoring and Meat Doneness
One of the most critical aspects of grilling is ensuring that your meat reaches the proper internal temperature to ensure food safety and the desired level of doneness. While there are several methods for monitoring meat temperature, using a meat thermometer is the most reliable and accurate way to determine when your meat is fully cooked.
I always recommend using a meat thermometer to my friends and family when they ask for grilling advice. It’s an easy way to ensure that your meat is cooked to perfection, and it gives me peace of mind knowing that I’m serving safe and delicious food.
Don’t rely on guesswork or sight alone to determine when your meat is done. Invest in a good quality meat thermometer, and you’ll never have to worry about undercooked or overcooked meat again.
When grilling, it’s essential to know the target internal temperature for the cut of meat you’re cooking. This varies depending on the type of meat and the desired level of doneness. For instance, a medium-rare steak will have a lower target internal temperature than a well-done steak.
To use a meat thermometer, insert the probe into the thickest part of the meat, being careful not to touch any bones or the grill grate.
Wait a few seconds for the reading to stabilize, then check the temperature on the display. Once the meat has reached the target temperature, remove it from the grill and let it rest for a few minutes before slicing and serving.
Meat Doneness Temperature Guide
Here is a guide to the target internal temperatures for different levels of meat doneness:
- Rare: 120°F to 130°F
- Medium-rare: 130°F to 135°F
- Medium: 135°F to 145°F
- Medium-well: 145°F to 155°F
- Well-done: 155°F to 165°F
It’s essential to note that ground meat, such as burgers and sausages, should be cooked to an internal temperature of at least 160°F to ensure food safety.
Using a meat thermometer to monitor the internal temperature of your meat ensures that it’s cooked to perfection and safe to eat. It’s a small investment that can make a big difference in your grilling results.
Preparing Your Meat for Grilling: Marinating, Seasoning, and Tenderizing
If you want to take your grilling to the next level, then preparing your meat properly is the key. A good marinade, seasoning, or tenderizing can make all the difference in the taste and texture of your grilled meats. Below are some of my favorite tips and techniques for preparing meat for grilling.
- Selecting the right marinade is important for complementing the flavor of your cut of meat.
- For tough cuts of meat, like flank steak or brisket, acidic marinades can help to break down the connective tissue and make the meat more tender.
- Common acidic marinade ingredients include vinegar, citrus juice, and wine, along with oil and spices for added flavor.
- For tender cuts of meat, like filet mignon or ribeye, a sweet and savory marinade can complement the natural flavors without overpowering them.
- Honey, brown sugar, soy sauce, and garlic are great ingredients for a sweet and savory marinade.
- Remember that tender cuts of meat don’t need to marinate for very long, while tough cuts should be marinated for several hours or overnight for best results.
- Don’t be afraid to experiment with different marinades and flavor combinations to find your perfect match!
Selecting the Right Marinade for Your Cut
As a butcher and grilling enthusiast, I love experimenting with different marinades to create unique flavor profiles. One of my favorite marinades for steak is a simple mixture of olive oil, garlic, and herbs. For pork or chicken, I like to use a honey mustard marinade with a touch of cayenne pepper for some heat.
Marinades are a great way to add flavor and tenderness to your meat before grilling, but selecting the right marinade can be a daunting task. With so many different types of marinades available, it’s important to choose the one that best complements the cut of meat you’re grilling.
Acidic Marinades for Tough Cuts
If you’re grilling a tough cut of meat, such as flank steak or brisket, an acidic marinade can be your best friend. The acid in the marinade helps to break down the connective tissue in the meat, making it more tender and flavorful.
Common acidic marinade ingredients include vinegar, citrus juice, and wine. You can also add oil and spices to the marinade for added flavor. The longer you marinate the meat, the more tender and flavorful it will become. For tough cuts of meat, marinate for at least several hours or overnight.
Sweet and Savory Marinades for Tender Cuts
For tender cuts of meat, such as filet mignon or ribeye, a sweet and savory marinade can complement the natural flavors of the meat without overpowering it. You can use ingredients like honey, brown sugar, soy sauce, and garlic to create a flavorful marinade.
Since tender cuts of meat are already naturally tender, you don’t need to marinate them for very long. Just a few hours is enough to infuse the meat with flavor.
Dry Rubs and Seasoning Blends for Grilling
Dry rubs and seasoning blends are an easy and delicious way to add flavor to your grilled meats. Whether you prefer spicy or savory, there’s a seasoning blend out there that’s perfect for you.
In this section, I’ll share some tips and techniques for creating your own dry rubs and seasoning blends, as well as some of my personal favorites.
Creating Your Own Dry Rubs
Creating your own dry rubs is easy and allows you to customize the flavor profile to your taste. Dry rubs typically consist of a mixture of herbs, spices, and salt that are rubbed directly onto the meat before grilling.
To create your own dry rub, start with a base of salt and then add your preferred herbs and spices. Some common herbs and spices used in dry rubs include paprika, cumin, chili powder, garlic powder, onion powder, and black pepper.
My Personal Favorite Dry Rub
| Ingredient | Amount |
|---|---|
| Paprika | 2 tbsp |
| Cumin | 1 tbsp |
| Chili Powder | 1 tbsp |
| Garlic Powder | 1 tbsp |
| Onion Powder | 1 tbsp |
| Black Pepper | 1 tbsp |
| Salt | 1 tsp |
Techniques for Tenderizing Tougher Cuts
Tougher cuts of meat, like flank steak and brisket, can be challenging to cook because they tend to be less tender than other cuts. However, with the right techniques, you can make even the toughest cuts of meat deliciously tender and juicy.
In this section, I’ll share some techniques for tenderizing tougher cuts of meat, including marinating, pounding, and using a meat tenderizer.
Marinating
As I mentioned earlier, marinating is a great way to tenderize tougher cuts of meat. The acid in the marinade helps to break down the connective tissue and make the meat more tender. For best results, marinate your meat for several hours or overnight.
Pounding
Pounding is another effective technique for tenderizing tougher cuts of meat. To pound your meat, use a meat mallet or the bottom of a heavy pan to gently pound the meat until it’s evenly thin. This breaks down the fibers in the meat and makes it more tender.
Using a Meat Tenderizer
A meat tenderizer is a handy tool that can help you tenderize your meat quickly and easily. There are two types of meat tenderizers: manual and electric. Manual meat tenderizers look like a mallet with small blades on the end, while electric meat tenderizers use small needles to penetrate the meat and break down the fibers.
To use a meat tenderizer, simply pierce the meat all over with the blades or needles. This will help to break down the fibers and make the meat more tender.
My Favorite Meat Smoking Tools
Thanks for checking out this article. I hope you learned a few things. Here are some of my favorite tools I use when smoking brisket that may be useful to you. These are affiliate links, so if you decide to purchase any of these products, I’ll earn a commission. But in all honesty, these are the tools I recommend to my family and friends who are just starting out.
Meat Thermometer: There are dozens of fancy thermometers on the market, but I still use my trusty TP20. For around $50, I have a high-quality meat thermometer with two probes, and can track the temperature of my smoker with one probe, and my meat with the other probe. The ThermoPro TP20 is an Amazon Best Seller because it’s the easiest thermometer to operate, is durable, highly accurate, and comes with pre-programmed meat settings.
Instant Read Thermometer: Arguably, the second most important tool you need is a fast and accurate instant-read thermometer. These tools play an important role in the latter stages of the cook when the meat needs regular checking in multiple areas. I use the ThermoPro TP19 because it can do everything a ThermaPen can do, but for a fraction of the cost. You can check out the TP19 on Amazon here.
Wireless Thermometer: The latest thermometers on the market have no wires and can be controlled by wi-fi via your phone. Airprobe 3 is the best of this technology.
Butcher Paper: Wrapping brisket in butcher paper has become a huge trend in barbeque thanks to Aaron Franklin. Wrapping your brisket in paper will give you a nice brisket bark. However, you can’t just use any old paper, it has to be unwaxed, food grade paper. You can find it on Amazon here.
Advanced Thermometer and Automatic Temperature Controller: Once you’re ready to take things seriously, the FireBoard 2 Drive is a six-channel Bluetooth/Wi-Fi thermometer that can monitor up to 6 pieces of meat, control and graph your cook sessions on your smartphone, and attaches to an an automatic blower that will convert your charcoal smoker to a set-and-forget. This is one of the most advanced meat thermometers on the market. You can check it out on the FireBoard website here.