We all know that processed meats aren’t the healthiest option out there, but if you’re a fan of bacon, you might be wondering if it’s worth the effort to make your own at home. In my opinion, the answer is definitely yes! One of the main benefits of making your own bacon is that you can control the ingredients. When you buy bacon from the store, you often don’t know exactly what’s in it. But when you make your own bacon at home, you can choose the best quality pork and seasoning to use. Not only is this better for your health, but it also tastes so much better! Making your own bacon may take a little bit more time and effort, but it’s totally worth it in the end. Plus, it’s a fun and rewarding project to try. So go ahead and give it a shot – you won’t be disappointed!
Smoking bacon in a smoker is a delicious and rewarding way to make your own bacon at home. The process is fairly simple and only requires a few key steps. First, start by preparing a pork belly with a liquid brine made with curing salts. Soak the belly in the brine in the refrigerator for a week to ensure that it is fully cured. Once the curing process is complete, it’s time to smoke the bacon. You can either cold smoke the belly at a low temperature (80°F – 100°F) or hot smoke it at a higher temperature (220°F). If you cold smoke the pork belly, you’ll need to fry the bacon before eating it, but hot smoked bacon can be eaten as is. When it comes to choosing the wood to use for smoking, hickory is the most common choice, but you can also try a combination of hickory and fruit wood such as apple or cherry for a different flavor.
Hot Smoking vs Cold Smoking: Which Method is Right for You?
Hot smoking and cold smoking are two different methods of smoking bacon.
In hot smoking, the bacon is cooked while it is being smoked. The temperature of the smoker is typically around 225°F, and the bacon is cooked until it reaches an internal temperature of 150°F. Once the bacon is fully cooked, it is ready to be eaten. In cold smoking, the bacon is not cooked while it is being smoked. The temperature of the smoker is usually around 80°F to 100°F, and the bacon is smoked for several hours. The bacon is not fully cooked during the cold smoking process, so it needs to be cooked before it is eaten. Cold smoking is often used to add flavor to the bacon, rather than to cook it fully.
| Ingredients | Instructions |
|---|---|
| Whole pork belly | 1. Remove the rind (skin) from the pork belly. |
| Curing salts (Prague Powder #1) | 2. Cut the pork belly into large squares so it can fit inside a zip-lock bag. |
| Brown sugar | 3. Weigh the pork belly and use the curing calculator to measure exact quantities of curing salt, kosher salt, brown sugar and distilled water (if wet brining). |
| Kosher salt | Brining Option 1 – Dry Brine: 1. Dry the pork belly with a paper towel. 2. Rub curing salts (Prague Powder #1) and brown sugar over every part of the pork belly. 3. Place the pork belly into a zip-lock bag or on a rack. 4. Refrigerate and leave the pork belly to cure for 8-10 days. 5. Rotate and massage the pork belly every day. |
| Distilled water (if wet brining) | Brining Option 2 – Wet Brine: 1. Mix the curing salts, kosher salt, brown sugar and distilled water into a zip-lock bag or a deep container. 2. Lay the pork belly into the brine solution, making sure the meat is fully submerged. 3. Leave the meat to soak in the refrigerator for 3-5 days. 4. After the meat has cured, rinse the pork belly but keep it chilled. Some people like to |
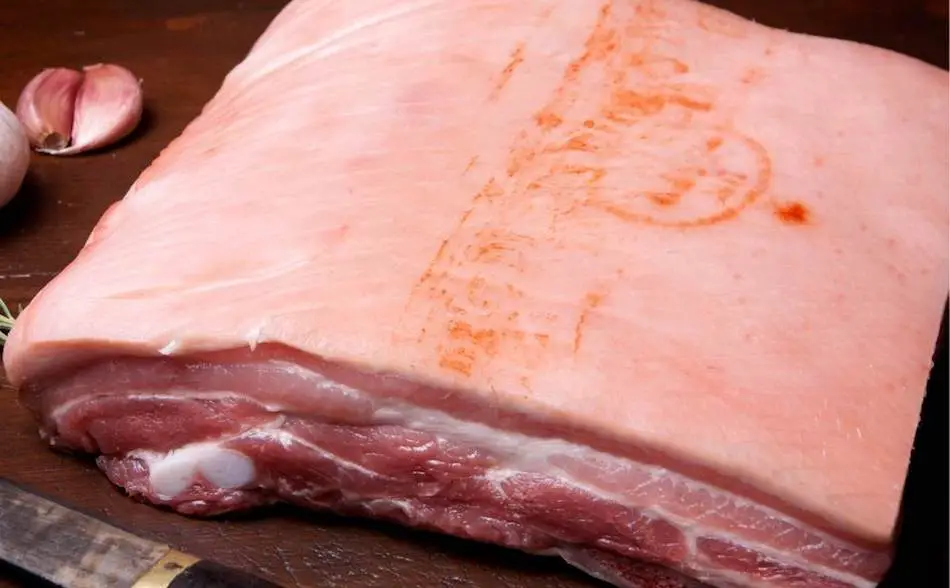
Choose the Right Pork Belly for the Best Bacon
- Start with a whole, fresh pork belly from the butcher, not sliced.
- Skin (rind) can be left on or removed based on preference.
- Removing rind allows for better smoke absorption, leaving it on may result in better bacon and extra strength for hanging.
- Remove rind if laying belly on racks instead of hanging.
- Cut pork belly into large, square pieces that fit in zip-lock bags or storage containers.
- Use zip-lock bags for wet brining, dry brining, and squeezing out air for perfect bacon.
When you’re making bacon at home, you’ll need to start with a whole pork belly from the butcher. Make sure to get it fresh and not sliced. It’s optional whether you leave the skin (rind) on or not, but some people like to remove it because it allows for better smoke absorption. On the other hand, leaving the rind on can make for better bacon and provide extra strength if you want to hang the pork belly in your smoker. If you’re planning to lay the belly on racks instead of hanging it, it’s probably a good idea to remove the rind.
When you get your pork belly home, cut it into large, square pieces that will fit in zip-lock bags or storage containers. Zip-lock bags are a good choice because you can use them for wet brining, dry brining, and squeezing out the air. This will help ensure that your bacon turns out perfectly.
The Brining Process for Bacon
- Curing meat safely is important to avoid health risks.
- There are three methods of curing: wet brining, dry brining, and injecting.
- Wet brining is the safest method as salt evenly penetrates the meat.
- Dry brining may miss some areas, leading to under-cured meat.
- Weighing pork belly and calculating salt and sugar quantities is important for making bacon.
- Weigh each piece of pork belly to determine correct brine solution quantities.
- Use a calculator to determine the right curing quantities for accuracy.
When it comes to curing meat, it’s important to do it safely to avoid any health risks. There are three main methods of curing meat: wet brining, dry brining, and injecting. Wet brining is generally considered the safest option because the salt is able to evenly penetrate every part of the meat. Dry brining can sometimes miss certain areas, which means some parts of the meat aren’t fully cured.
One of the most important steps in making bacon is weighing the pork belly and calculating the right amounts of salt and sugar. It’s essential to weigh each piece of pork belly so you can figure out the correct quantities for your brine solution. If you want to make sure you get it right, you can use a special calculator to help you determine the right curing quantities.
How to Wet Brine Bacon
- Wet brine pork belly for 3-5 days in a brine solution of curing salts, brown sugar, and distilled water.
- Use Prague Powder #1, a pre-mixed curing salt that doesn’t contain nitrates and is mostly salt with a small percentage of sodium nitrite.
- Find Prague Powder #1 on Amazon.
- Don’t confuse Prague Powder #1 with Prague Powder #2.
- Soak pork belly in brine solution using a container or zip-lock bags.
- If using a container, fully submerge pork belly in a deep tub of brine solution.
- If using zip-lock bags, put pork belly in the bag, fill with brine solution, and squeeze out excess air before sealing the bag.
Wet brining is the safest method for curing pork belly for bacon. This involves soaking the pork belly in a brine solution for 3-5 days. The brine should be made with curing salts, brown sugar, and distilled water. To properly cure meat, it’s important to use specific curing salts like Prague Powder #1. This is the kind of curing salt that professionals use and it doesn’t contain nitrates. Prague Powder #1 is mostly salt, with a small percentage of sodium nitrite. Amazon is the best place to buy Prague Powder #1 (you can find it here). Don’t confuse Prague Powder #1 with Prague Powder #2, which is a different product altogether.
If you’re using a container, mix the brine solution in a deep tub, and fully submerge the pork belly in the brine solution. The other way is to use zip-lock bags. I follow the bacon recipe from amazingribs.com because it’s a trusted website and everything they do is backed up by food science adviser Professor Blonder. The recipe is as follows:
Wet Brining Method – Step-By-Step
To wet brine pork belly, you’ll need to mix together some brown sugar, distilled water, kosher salt, and Prague Powder #1. To ensure you have the right amounts of each ingredient, it’s a good idea to use a tool called the Prof. Blonder’s Wet Curing Calculator Version 3.0. It’s free to use and will tell you exactly how much of each ingredient you need based on the weight of your pork belly. After mixing everything together, put the pork belly in a zip-lock bag or a tub, making sure it’s fully submerged in the brine. Leave it in the brine for 3-5 days, then remove it, rinse it off, and put it in the smoker.
| Wet Brine Steps | Description |
|---|---|
| 1 | Add brown sugar, distilled water, kosher salt and Prague Powder #1 into a zip-lock bag or a tub using the Prof. Blonder’s Wet Curing Calculator Version 3.0 to calculate the quantities |
| 2 | Place the pork belly in the liquid brine container or zip-lock bag, making sure it is fully submerged |
| 3 | Leave the pork belly soaking in the brine for 3-5 days |
| 4 | Remove from the brine after 3-5 days and rinse |
| 5 | Place the pork belly in the smoker |
How to Dry Brine Bacon
- Dry brining bacon involves using pre-made curing salts like Tender Quick or Prague Powder #1
- It’s important to follow the instructions and measure out the exact amount of curing salts for each piece of pork belly (which should be weighed beforehand)
- Dry brining is best done on a rack to allow air circulation, but zip-lock bags can also be used
- Massaging the pork belly daily during the curing process helps the curing salts penetrate evenly
Dry brining bacon is a common method that involves using pre-made curing salts like Tender Quick or Prague Powder #1. When using these curing salts, be sure to follow the instructions and measure out the exact amount for each piece of pork belly (which you should have weighed beforehand).
It’s usually best to dry brine the pork belly on a rack so that air can circulate around the meat. This helps ensure that the curing process is effective. However, not everyone has access to a rack, so another option is to place the pork belly in zip-lock bags. This can work well, but it’s important to make sure the curing salts are evenly distributed on all sides of the meat. Another tip is to massage the pork belly daily while it’s curing to help the curing salts penetrate the meat evenly. You can buy Tender Quick or Prague Powder #1 on Amazon by clicking the links.
Dry Brine Pork Belly in 8 Steps:
To dry brine pork belly, you’ll need to start by drying the pork with a paper towel to remove as much moisture as possible. Then, take a curing salt like Prague Powder #1 and rub it into the pork, using the amount that you measured out based on the weight of the pork belly. You can also rub brown sugar into the pork belly if you’d like. Once the pork belly is coated with the curing salt and sugar, place it in a zip-lock bag or lay it on a rack uncovered. The pork belly should cure in the refrigerator for 8-10 days, during which time you should rotate it in the bag every few days and give it a shake to make sure it’s curing evenly. After about a week, remove the pork from the refrigerator, rinse it off, dry it with a paper towel, and apply any extra spices or seasonings you’d like. Let the seasonings work for a few hours or overnight before cooking.
| Dry Brine Steps | Description |
|---|---|
| 1 | Dry each piece of pork belly with a paper towel and remove as much moisture as possible |
| 2 | Rub the curing salt (such as Prague Powder #1) into the pork belly, using the amount measured out based on the weight of the pork belly |
| 3 | Rub brown sugar into the pork belly (optional) |
| 4 | Place each piece of pork belly in a zip-lock bag or on a rack uncovered |
| 5 | Cure in the refrigerator for 8-10 days, rotating and shaking the pork belly every few days to ensure even curing |
| 6 | Remove from the refrigerator and rinse off |
| 7 | Dry with a paper towel and apply any extra spices or seasonings |
| 8 | Let the seasonings work for a few hours or overnight before cooking |
How to Smoke Bacon in a Smoker: A Step-by-Step Guide
- There are several ways to smoke bacon, depending on the type of smoker you’re using and whether you’re hot smoking or cold smoking
- If you’re cold smoking, the bacon will still be raw and need to be cooked afterwards
- If you’re hot smoking, the bacon will be safe to eat straight out of the smoker
- Electric, gas, and pellet smokers are the easiest to use, but they may not produce as much smoke as a charcoal smoker, which can give the bacon a distinct flavor
- You can use a smoking tube to add extra smoke to an electric smoker
- Pellet smokers are also easy to use, just fill the hopper with wood pellets and set the temperature
- The best wood pellets for smoking bacon are hickory blended with apple or cherry wood
- When cold smoking on a pellet smoker, set the temperature between 80°F and 100°F and smoke for about 6 hours
- When hot smoking on a pellet grill, bring the temperature up to 225°F and cook until the internal temperature reaches 150°F
- Charcoal smokers are a bit more work, but they can produce the best-tasting bacon
- When hot smoking on a charcoal smoker, set up for indirect cooking with the coals on one side and the meat on the other
- Bring the temperature up to 225°F and add wood for smoke
- Cook until the internal temperature reaches 150°F
- When cold smoking on a charcoal smoker, hold the temperature between 80°F and 100°F for about 6 hours, keeping a consistent flow of smoke the entire time
Cold Smoking Bacon: The Techniques and Tips You Need to Know
- Smoke the bacon at a low temperature, usually between 80°F and 100°F
- The process should take anywhere from 6 to 8 hours, depending on the size of the pork belly and the setup of your smoker
- Keep in mind that cold smoking does not fully cook the bacon, so it will need to be cooked before it is safe to eat
- According to the USDA, all pork products should be cooked to an internal temperature of 145°F, followed by a 3-minute rest time
- Use a meat thermometer to ensure that the bacon has reached this temperature before serving
- Cold smoking is often used to add flavor to the bacon, rather than to cook it fully
Cold smoking bacon involves smoking the bacon at a low temperature, usually between 80°F and 100°F. The process should take anywhere from 6 to 8 hours, depending on the size of the pork belly and the setup of your smoker. It’s important to keep in mind that cold smoking does not fully cook the bacon, so it will need to be cooked before it is safe to eat. According to the USDA, all pork products should be cooked to an internal temperature of 145°F, followed by a 3-minute rest time. Be sure to use a meat thermometer to ensure that the bacon has reached this temperature before serving. Cold smoking is often used to add flavor to the bacon, rather than to cook it fully.
| Step | Cold Smoking Bacon |
|---|---|
| 1 | Prepare your smoker according to the manufacturer’s instructions, making sure that the temperature is set to between 80°F and 100°F. |
| 2 | Place the pork belly in the smoker, making sure that it is positioned so that it is receiving an even amount of smoke. |
| 3 | Smoke the bacon for 6 to 8 hours, depending on the size of the pork belly and the setup of your smoker. |
| 4 | Keep an eye on the temperature of the smoker to ensure that it stays within the desired range. Add more wood or charcoal as needed to maintain the smoke. |
| 5 | After the bacon has finished smoking, remove it from the smoker and allow it to cool. |
| 6 | Preheat your oven to 400°F. |
| 7 | Place the bacon on a baking sheet and cook it in the oven until it reaches an internal temperature of 145°F. Use a meat thermometer to check the temperature. |
| 8 | Allow the bacon to rest for 3 minutes before slicing and serving. |
What Are the Best Smokers for Bacon?
- Bacon can be smoked using electric, gas, or pellet smokers
- Charcoal smokers produce a distinct flavor due to a combination of coal and wood smoke
- Electric and gas smokers produce smoke from wood only
- Charcoal smokers can be harder to control temperature
- Electric and gas smokers are easier to control temperature
- Choice of smoker depends on personal preference and resources available
Smoking bacon can be done using a variety of different types of smokers, including electric, gas, and pellet smokers. These types of smokers are generally considered to be the easiest to use, as they function much like a conventional oven. However, many people believe that bacon tastes the best when it is smoked in a charcoal smoker. This is because the smoke produced by a charcoal smoker is a combination of both coal and wood, which gives the bacon a distinct flavor. In contrast, electric and gas smokers only produce smoke from wood, which may result in a less intense flavor.
One downside to using a charcoal smoker for bacon is that it can be more difficult to control the temperature. It is important to carefully monitor the temperature of the smoker to ensure that the bacon is being smoked at the desired temperature. On the other hand, electric and gas smokers are often more precise and easier to control, which can be helpful for those who are new to smoking bacon.
Ultimately, the type of smoker you choose will depend on your personal preference and the resources available to you. Both charcoal and electric/gas smokers can produce delicious, flavorful bacon, and it is worth trying out both methods to see which one you prefer.
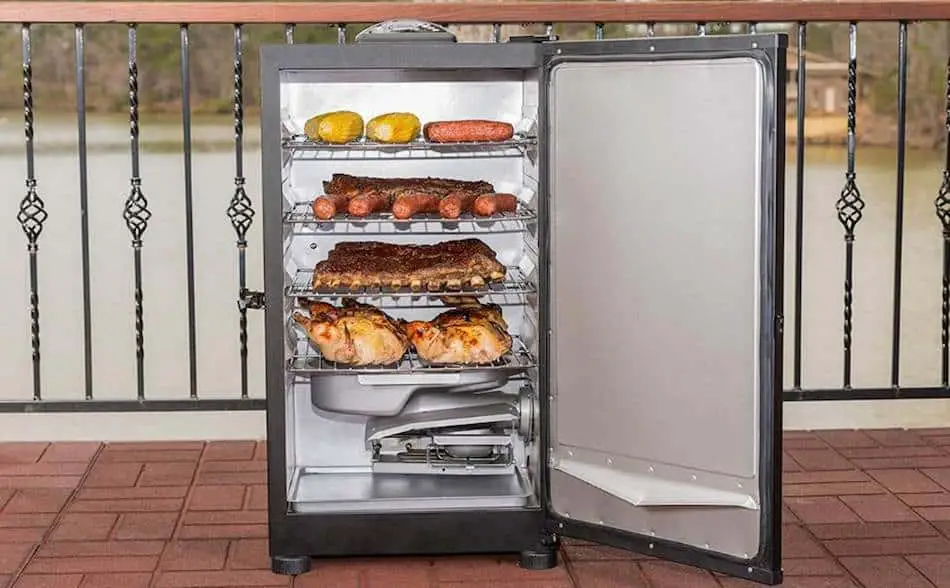
How To Smoke Bacon in an Electric Smoker
What you will need:
- An electric smoker
- Bacon (already prepared and cured)
- Wood chips or chunks (whatever kind of wood you prefer for smoking, such as hickory, oak, or apple)
- A pan or tray to catch drips (optional)
Here’s the process:
- Set up your electric smoker according to the manufacturer’s instructions. Make sure it is clean and ready to use.
- Fill the wood chip tray or box with your chosen wood chips or chunks.
- Preheat the smoker to the desired temperature, usually between 225 and 250 degrees Fahrenheit.
- While the smoker is heating up, prepare the bacon. If necessary, slice it into smaller pieces.
- When the smoker is heated to the desired temperature, place the bacon in the smoker. You can place it directly on the racks or on a pan or tray to catch any drips.
- Close the smoker and let the bacon smoke for 2-3 hours, or until it reaches your desired level of smoke flavor and doneness. You may need to add more wood chips or chunks during the smoking process to maintain a consistent level of smoke.
- When the bacon is finished smoking, remove it from the smoker and let it cool for a few minutes before serving or storing.
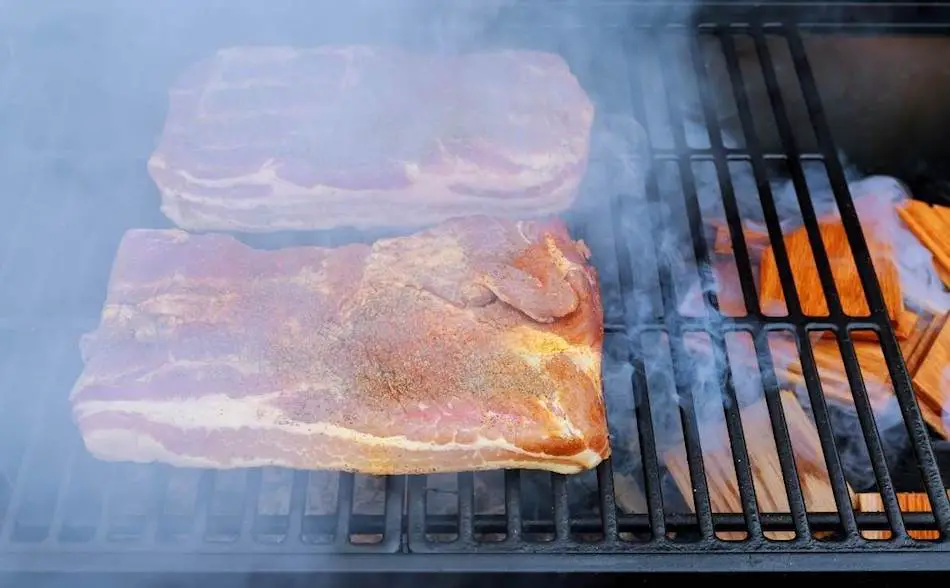
Hot Smoked Bacon On A Pellet Grill
- Preheat your pellet grill to 225-250°F. This is a low and slow temperature that will allow the bacon to smoke slowly and evenly.
- While the grill is preheating, prepare your bacon by laying it out on a wire rack or in a pan. If you are using a wire rack, place a sheet of foil or a drip pan underneath to catch any excess fat.
- Once the grill has preheated, place the bacon on the grill grates and close the lid.
- Smoke the bacon for 2-4 hours, depending on the thickness of the bacon and the desired level of smokiness. You can check the internal temperature of the bacon using a meat thermometer to ensure that it has reached at least 145°F.
- When the bacon is done, remove it from the grill and let it cool before slicing and serving.
Preheat your pellet grill to 225-250°F. Lay the bacon out on a wire rack or in a pan and place it on the grill grates. Use a drip pan or tray to catch any excess fat. Close the lid and smoke the bacon for 2-4 hours, until the internal temperature reaches at least 145°F.
To add more flavor, try using different types of wood chips or pellets in the pellet grill. Just be sure to follow the manufacturer’s instructions for adding them. Check the temperature periodically and make any necessary adjustments.
When the bacon is done, remove it from the grill and let it cool before slicing and serving. You can also store the smoked bacon in the refrigerator for up to a week or in the freezer for longer storage.
For more information, check out: How To Smoke Bacon In A Pellet Grill
Cold Smoking Bacon on a Pellet Grill
- Make sure that your bacon is properly cured. Curing the bacon helps to preserve it and gives it that characteristic salty flavor.
- Preheat your pellet grill to a temperature between 70-90°F. This is a lower temperature than you would use for hot smoking, and it is important to maintain a consistent temperature while cold smoking to prevent the bacon from spoiling.
- Place trays of ice in the pellet grill if the temperature can’t drop to 90°F.
- While the grill is preheating, prepare your bacon by laying it out on a wire rack or in a pan. If you are using a wire rack, place a sheet of foil or a drip pan underneath to catch any excess fat.
- Once the grill has preheated, place the bacon on the grill grates and close the lid.
- Cold smoke the bacon for 4-8 hours, depending on the thickness of the bacon and the desired level of smokiness. You can check the internal temperature of the bacon using a meat thermometer to ensure that it has reached at least 145°F.
- When the bacon is done, remove it from the grill and let it cool before slicing and serving.
Cold smoking bacon is a process of smoking the bacon at a lower temperature, between 70-90°F, to give it a smoky flavor without cooking it. Place trays of ice on the racks if the temperature can’t get low enough. It is important to maintain a consistent temperature while cold smoking to prevent the bacon from spoiling. The United States Department of Agriculture (USDA) recommends that you use a separate refrigerator or cold smoker for cold smoking, as it is not safe to cold smoke in a regular refrigerator or freezer.
To cold smoke bacon on a pellet grill, start by making sure that your bacon is properly cured. Curing the bacon helps to preserve it and gives it that characteristic salty flavor. You can cure your bacon by rubbing it with a mixture of salt, sugar, and other seasonings and then refrigerating it for several days.
Preheat your pellet grill to a temperature between 70-90°F. While the grill is preheating, prepare your bacon by laying it out on a wire rack or in a pan. If you are using a wire rack, place a sheet of foil or a drip pan underneath to catch any excess fat. Once the grill has preheated, place the bacon on the grill grates and close the lid.
Cold smoke the bacon for 4-8 hours, depending on the thickness of the bacon and the desired level of smokiness. You can check the internal temperature of the bacon using a meat thermometer to ensure that it has reached at least 145°F. When the bacon is done, remove it from the grill and let it cool before slicing and serving.
Smoking Bacon on a Charcoal Smoker
Charcoal smoked bacon probably tastes the best, but is more work than the ‘set-and-forget’ smokers. Always set up your charcoal smoker for indirect, two-zone cooking. This indirect method is where the charcoal is to one side of the smoker and the meat on the other side of the grill in the ‘cool-zone’.
Hot Smoking Bacon on a Charcoal Smoker
- Start by lighting a fire in the smoker and allowing the coals to burn down until they are covered in a thin layer of ash.
- Place a drip pan in the center of the smoker, and then place the bacon on the grill grates over the drip pan.
- Add wood chips to the coals to create smoke.
- Close the lid of the smoker and let the bacon cook for about 2 hours, or until it reaches an internal temperature of 150-155 degrees Fahrenheit.
- Remove the bacon from the smoker and let it cool before slicing and serving.
Keep in mind that hot smoking involves cooking the bacon, so it is safe to eat without further cooking. The process of hot smoking also adds flavor to the bacon as it cooks. Make sure to monitor the temperature of the bacon as it smokes to ensure that it is cooked to a safe internal temperature.
To hot smoke bacon using a charcoal smoker, start by lighting a fire and allowing the coals to burn down until they are covered in ash. Place a drip pan in the center of the smoker and place the bacon on the grill grates over the drip pan. Add wood chips to the coals to create smoke, and then close the lid of the smoker. Let the bacon cook for about 2 hours, or until it reaches an internal temperature of 150-155 degrees Fahrenheit. Remove the bacon from the smoker and let it cool before slicing and serving. Hot smoking involves cooking the bacon, so it is safe to eat without further cooking. The process of hot smoking also adds flavor to the bacon as it cooks. Remember to monitor the temperature of the bacon as it smokes to ensure it is cooked to a safe internal temperature.
Once the temperature of the smoker has stabilized at 225°F, lay the pork belly on the grill and cook until the internal meat temperature reaches 150°F.
Cold Smoking Bacon on a Charcoal Smoker
- Start a fire in the smoker and let the coals burn down until they are covered in ash.
- Place a drip pan in the center of the smoker and place the bacon on the grill grates over the drip pan.
- Add wood chips to the coals to create smoke.
- Close the lid of the smoker and let the bacon smoke for about 6 hours, making sure to keep the temperature of the smoker between 80°F and 100°F.
- Check the temperature inside the smoker with a meat thermometer. The bacon is done when it reaches an internal temperature of 150-155 degrees Fahrenheit.
- Add more wood chips to the coals as needed to maintain a consistent flow of smoke.
To cold smoke bacon on a charcoal smoker, start by lighting a fire in the smoker and letting the coals burn down until they are covered in ash. Place a drip pan in the center of the smoker and put the bacon on the grill grates over the drip pan. Add wood chips to the coals to create smoke, and then close the lid of the smoker. Keep the temperature of the smoker between 80°F and 100°F for about 6 hours, making sure to maintain a consistent flow of smoke. Check the temperature inside the smoker with a meat thermometer and add more wood chips to the coals as needed. The bacon is done when it reaches an internal temperature of 150-155 degrees Fahrenheit. Cold smoking bacon on a charcoal smoker requires a lower temperature and a good understanding of your smoker to control the temperature.
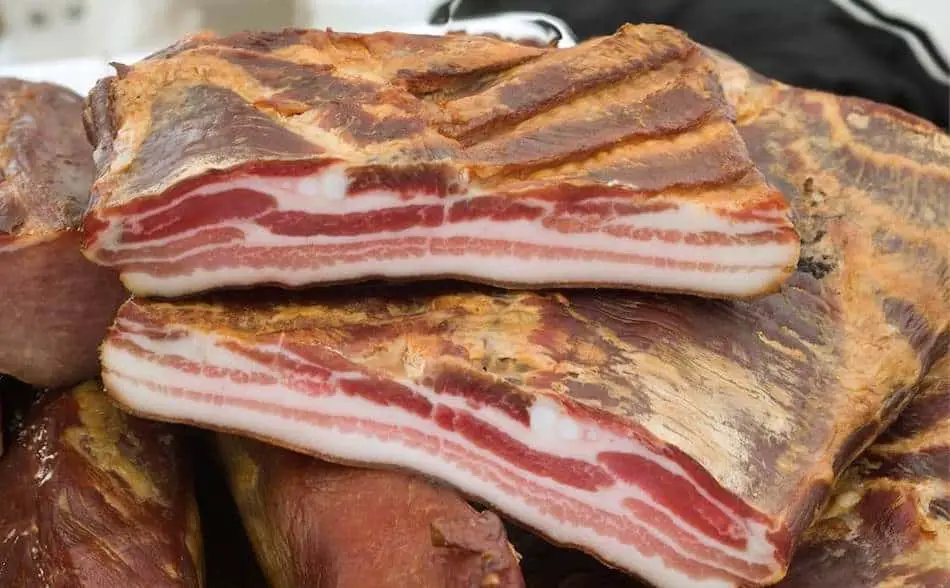
Smoked Bacon

Homemade bacon in an electric smoker is one of the easiest, and healthier ways to make this delicious smoked pork belly.
Ingredients
- Whole pork belly
- Curing salts (Prague Powder #1)
- Brown sugar
- Kosher salt
- Distilled water (if wet brining)
Instructions
1. Remove the rind (skin) from the pork belly.
2. Cut the pork belly into large squares so it can fit inside a zip-lock bag.
3. Weigh the pork belly and use the curing calculator to measure exact quantities of curing salt, kosher salt, brown sugar and distilled water (if wet brining).
Brining Option 1 - Dry Brine:
1. Dry the pork belly with a paper towel.
2. Rub curing salts (Prague Powder #1) and brown sugar over every part of the pork belly.
3. Place the pork belly into a zip-lock bag or on a rack.
4. Refrigerate and leave the pork belly to cure for 8-10 days.
5. Rotate and massage the pork belly every day.
Brining Option 2 - Wet Brine:
1. Mix the curing salts, kosher salt, brown sugar and distilled water into a zip-lock bag or a deep container.
2. Lay the pork belly into the brine solution, making sure the meat is fully submerged.
3. Leave the meat to soak in the refrigerator for 3-5 days.
4. After the meat has cured, rinse the pork belly but keep it chilled. Some people like to add seasoning at this stage. You can smother the pork belly with garlic powder, onion powder, black pepper, or whatever seasoning you like. Give the seasoning time to penetrate the meat, so allow between 2-12 hours.
Smoking Option 1 - Cold Smoking:
1. Set the temperature of your smoker between 80°F - 100°F.
2. Add your smoking wood.
3. Smoke the pork belly for 6-hours.
4. After 6-hours of smoking, remove the bacon and slice. Keep in mind the cold smoked bacon is partially raw and will need to be cooked before it can be consumed.
Smoking Option 2 - Hot Smoking:
1. Set the temperature of your smoker to 220°F.
2. Add the smoking wood
3. Smoke the pork belly for as long as it takes for the internal meat temperature to reach 150°F.
4. Slice the bacon and eat straight out of the smoker.
Nutrition Information:
Yield:
8 to 12 servingsServing Size:
3 slicesAmount Per Serving: Calories: 161Total Fat: 12gSodium: 581mgProtein: 12g
My Favorite Meat Smoking Tools
Thanks for checking out this article. I hope you learned a few things. Here are some of my favorite tools I use when smoking brisket that may be useful to you. These are affiliate links, so if you decide to purchase any of these products, I’ll earn a commission. But in all honesty, these are the tools I recommend to my family and friends who are just starting out.
Meat Thermometer: There are dozens of fancy thermometers on the market, but I still use my trusty TP20. For around $50, I have a high-quality meat thermometer with two probes, and can track the temperature of my smoker with one probe, and my meat with the other probe. The ThermoPro TP20 is an Amazon Best Seller because it’s the easiest thermometer to operate, is durable, highly accurate, and comes with pre-programmed meat settings.
Instant Read Thermometer: Arguably, the second most important tool you need is a fast and accurate instant-read thermometer. These tools play an important role in the latter stages of the cook when the meat needs regular checking in multiple areas. I use the ThermoPro TP19 because it can do everything a ThermaPen can do, but for a fraction of the cost. You can check out the TP19 on Amazon here.
Wireless Thermometer: The latest thermometers on the market have no wires and can be controlled by wi-fi via your phone. Airprobe 3 is the best of this technology.
Butcher Paper: Wrapping brisket in butcher paper has become a huge trend in barbeque thanks to Aaron Franklin. Wrapping your brisket in paper will give you a nice brisket bark. However, you can’t just use any old paper, it has to be unwaxed, food grade paper. You can find it on Amazon here.
Advanced Thermometer and Automatic Temperature Controller: Once you’re ready to take things seriously, the FireBoard 2 Drive is a six-channel Bluetooth/Wi-Fi thermometer that can monitor up to 6 pieces of meat, control and graph your cook sessions on your smartphone, and attaches to an an automatic blower that will convert your charcoal smoker to a set-and-forget. This is one of the most advanced meat thermometers on the market. You can check it out on the FireBoard website here.
Meat Thermometers – Your Most Important Tool
The Beginner’s Guide To Meat Thermometers
The Best Meat Thermometers Under $50 (We List the Top 8 Choices)
The Best Thermometers for Smoking Meat
Best Wi-Fi Meat Thermometers (We Review the 5 Top Models)
Best Instant-Read Thermometers for Smoking (Top 6 Picks)
What Are Automatic Barbeque Temperature Controllers? The Complete Buyers Guide