If you’re looking to make delicious, tender pulled pork using an electric smoker, look no further! In this article, we’ll guide you through the process of preparing and cooking a pork butt in an electric smoker like a true barbecue pitmaster. From choosing the perfect cut of meat and applying the perfect rub to spritzing and wrapping the pork butt at just the right times, we’ve got all the tips and tricks you need to make the most mouthwatering pulled pork imaginable.
To make pulled pork in an electric smoker, set the temperature between 220°F and 250°F and apply a generous layer of rub to the pork butt. Place the meat in the smoker and leave it untouched for the first 3 to 4 hours, then spritz it every 30 minutes. When the internal temperature reaches 165°F, wrap the pork butt in foil and continue cooking until it reaches 200°F to 205°F or is probe tender. Allow the pork to rest for 30 to 60 minutes before slicing or pulling. Choose a pork butt with a large money muscle and the bone intact, and consider brining the meat to add flavor and help it retain moisture. Use wood chips to add smoke flavor and be sure to apply a thick layer of rub to the outside of the pork butt before cooking.
What You Need To Know About Pork Butt On An Electric Smoker
- Set the temperature of your electric smoker between 220°F and 250°F
- Apply a generous layer of rub to the pork butt and place it in the smoker
- Leave the meat untouched for the first 3 to 4 hours, then spritz it every 30 minutes
- Wrap the pork butt in foil once the internal temperature reaches 165°F and cook until it reaches 200°F to 205°F or is probe tender
- Allow the pork to rest for 30 to 60 minutes before slicing or pulling
- Select a pork butt with a large money muscle and the bone intact
- Pork butt has a lot of fat and connective tissue, so it needs to be cooked low and slow to break down the connective tissue
- Fat in the pork butt helps prevent the meat from drying out during cooking
- Hickory and pork are a good wood combination for the smoker, but you can choose other woods to your taste
- Remove thick lumps of fat from the pork butt, but leave most of the fat intact for insulation and to render down during cooking
- Check the underside of the pork butt for organ remains and remove any glands or arteries with a sharp knife
- Inject the pork butt with liquid for added flavor and moisture, if desired
- Brine the pork butt to add flavor and help retain moisture, using either a wet brine or dry brine
- Apply a thick layer of rub to the outside of the pork butt, making sure not to leave any gaps
- Place the pork butt in the smoker and smoke until the internal temperature reaches 165°F
- Wrap the pork butt in foil and return it to the smoker until the internal temperature reaches 200°F to 205°F or it is probe tender
- Allow the pork to rest for 30 to 60 minutes before slicing or pulling
Key Moments Of The Cook
| Step | Instruction |
|---|---|
| 1 | Set the temperature of your electric smoker between 220°F and 250°F and apply a generous layer of rub to the pork butt |
| 2 | Place the meat in the smoker and leave it untouched for the first 3 to 4 hours |
| 3 | Begin spritzing the pork butt every 30 minutes after the bark has set |
| 4 | Wrap the pork butt in foil once the internal temperature reaches 165°F, then cook until the internal temperature reaches between 200°F and 205°F or is probe tender |
| 5 | Allow the pork to rest for 30 to 60 minutes before slicing or pulling |
“The Complete Guide To Injecting Pork Butt”
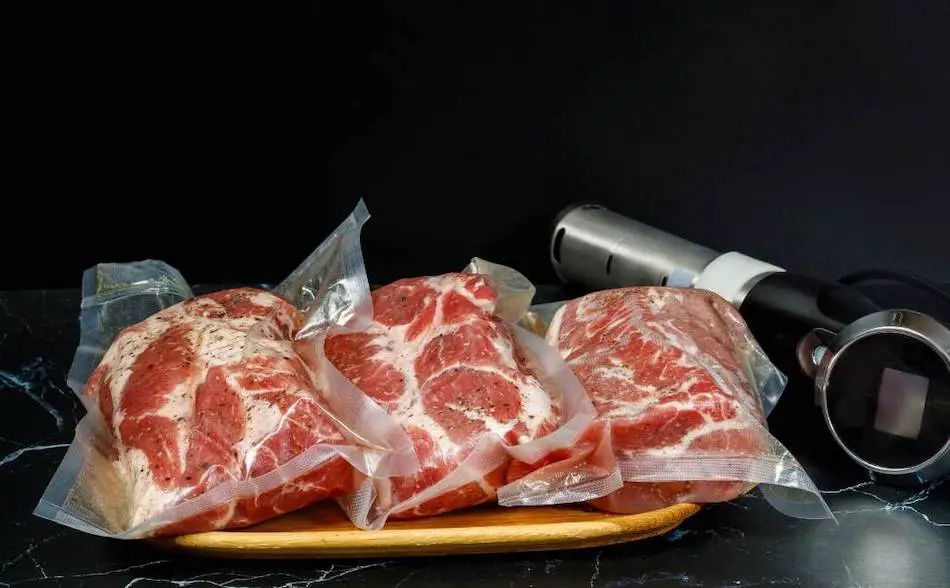
Choosing The Perfect Pork Butt
When shopping at the butcher, select a pork butt with a large money muscle because this is the best part of the pork shoulder. If you don’t know how to identify the money muscle, ask your butcher. Also, buy a piece of meat with the bone intact because this will help hold the pork together and will even help the meat retain moisture while cooking.
The pork butt is also known as Boston butt and is a part of the pork shoulder. Pork butt has a lot of fat and connective tissue, which is why this part of the animal needs to be cooked low and slow. A butt’s connective tissue needs lots of time at low temperature in order to break down, otherwise the meat will be chewy. The advantage of the high fat content in the pork butt is the meat is less likely to dry out during the cook because the fat works as a lubricant. Pork legs, on the other hand, are very lean and can dry out easily.
Woodchips
Don’t overthink wood selection. Pork butt is a robust cut of meat and can handle just about anything. Just keep the smoke rolling by refilling the wood tray during the first stage of the cook when the meat is unwrapped. Hickory and pork are a wonderful combination, but you can mix-and-match wood to your own taste.
Prepare The Butt
Pork butt doesn’t require much preparation and shouldn’t need trimming in most cases. Take off the really thick lumps of fat, but leave most of the fat intact. Fat works as good insulation and will render down over the cook. Since the pork butt is part of the animal’s chest area, check the underside for organ remains and remove and glands or arteries with a sharp knife.
Competition Style- Inject?
If you just want a quick and easy pork butt for pulled pork, then don’t bother with this step. However, if you want to wow your dinner guests, follow this step for competition style pork butt. If you have a meat injector, pump the pork but with some extra liquid to boost the flavor and provide some extra moisture into the meat. You can pump the pork with homemade broth recipes or buy a competition formula. Butcher BBQ is one of the most well-known injection products and is available on Amazon. Check the latest price here. If you don’t have a meat injector, Amazon also sells affordable stainless steel injectors or a more professional injector gun.
Brine
Brining in simple terms is just adding salt to the meat. Salt is enormously beneficial to meat, and will not only add flavor but also help the pork retain moisture. The pork butt will lose a lot of fluid while cooking, but salt will help the pork hold in the moisture.
The two most common methods of brining are wet brining or dry brining. A wet brine involves soaking the meat in a liquid made up of mostly salt and sugar, while a dry brine is more straightforward and involves simply rubbing kosher salt into the meat, and then leaving overnight in the refrigerator.
Brining pork butt isn’t absolutely necessary because you can add salt to the pork butt with the rub. However, be careful not to use a salty rub after brining, otherwise you will give the pork butt a double dose of salt.
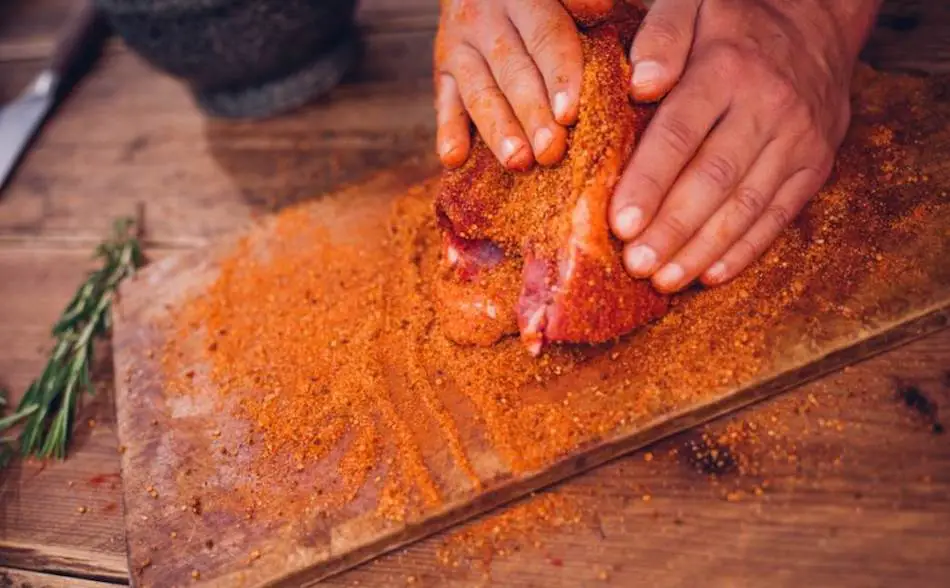
The Rub
Apply a thick layer of rub to the outside of the pork butt, making sure not to leave any gaps, and press the rub into the meat. The rub plays an important role in bark formation, so make sure there are no gaps. If the rub won’t stick, apply a binder to the meat using either olive oil or yellow mustard. The binder, or slather, won’t flavor the meat in any way, but it will also add a nice color to the pork butt.
There are dozens of rub recipes online and even more pre-made rubs on the market. The most basic homemade rub is a simple 50/50 volume of coarse black pepper and kosher salt with a little paprika mixed in for color. If you want a little more, add in some sweetness with brown sugar or give the rub more of a savory flavor by adding onion powder or garlic powder.
If you want a good store-bought rub for pork, I recommend Killer Hogs produced by barbeque guru Malcolm Reed or Slap Yo Daddy rubs by barbeque world champion Harry Soo.
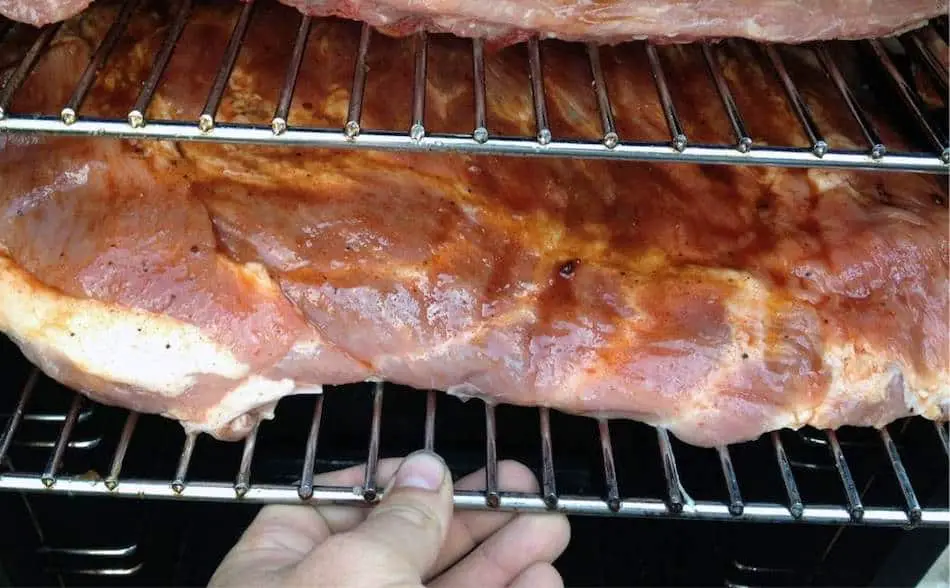
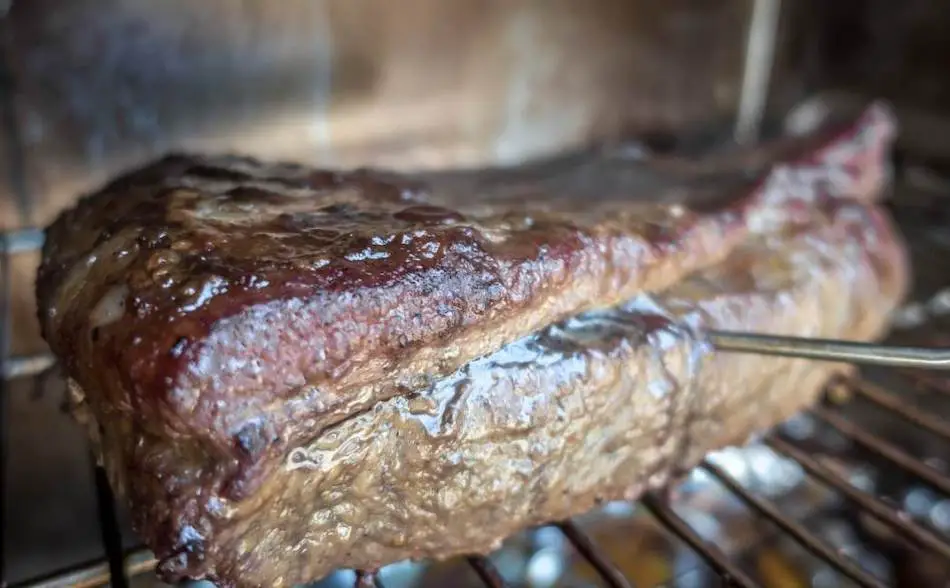
Developing The Bark
For the first 3 to 4 hours of the cook, leave the pork butt alone. Don’t mop or spritz the meat until the bark has formed, which is can be several hours into the cook. During this first phase, the meat will absorb smoke and the bark will begin to form.
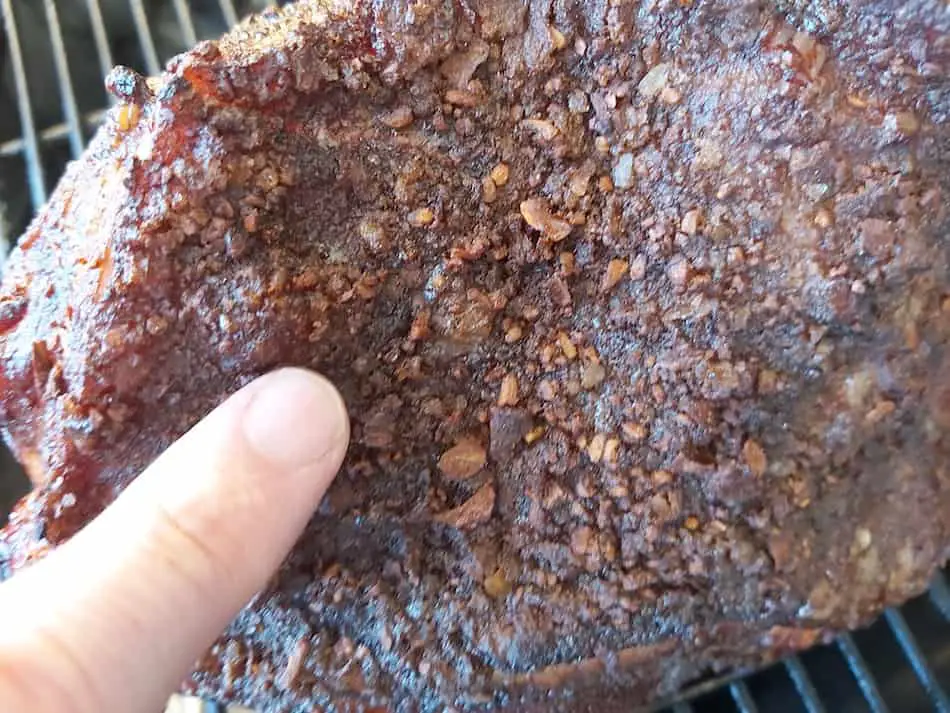
The bark is one of the tastiest parts of the pork butt, so it is worthwhile nurturing. The outer crust is basically dehydrated meat, smoke and the rub or seasoning. It’s important not to wrap or spritz the meat too early, otherwise you will end up with a soft bark. The best way to see if the bark has formed is to touch the pork butt with your finger. If the rub sticks to your finger, then it’s too early to spritz. If you were to mop or spritz too early, the rub will get washed away, leaving a gap in the rub. Wrapping will soften the bark so it’s important to form a hard bark before wrapping the butt in foil. If the bark is too soggy after being wrapped for several hours, you can return the pork butt to the grill or oven for a brief while to dry out the bark.
Smoke Tubes
Smoking tubes are an amazing invention that works well with electric smokers. The downside of electrics is they don’t produce as much smoke as charcoal or wood smokers. Smoke tubes solve this problem by providing a consistent flow of smoke throughout the cook. Most smoke tubes take wood pellets and the idea is to have them smolder rather than burn fast. When using smoke tubes, you need to let oxygen into the smoker, otherwise the tube will just burn out. To do this, remove the chip tray and place the smoke tube next to the tray insert.
Spritzing or Mopping
Once the pork butt has been cooking in your electric smoker for several hours, begin spritzing the meat. You can use either apple juice, apple cider vinegar or plain water to spritz the butt. If you prefer to mop, there are dozens of mop sauce recipes online, but I prefer to spritz because it’s easier.
Spritzing will cool the meat and therefore slow down the cook, which is what we want. Remember, pork butt needs time at low temperature in order to break down all the connective tissue for the meat to be tender. Spritzing also helps form a better smoke ring and replaces lost moisture.
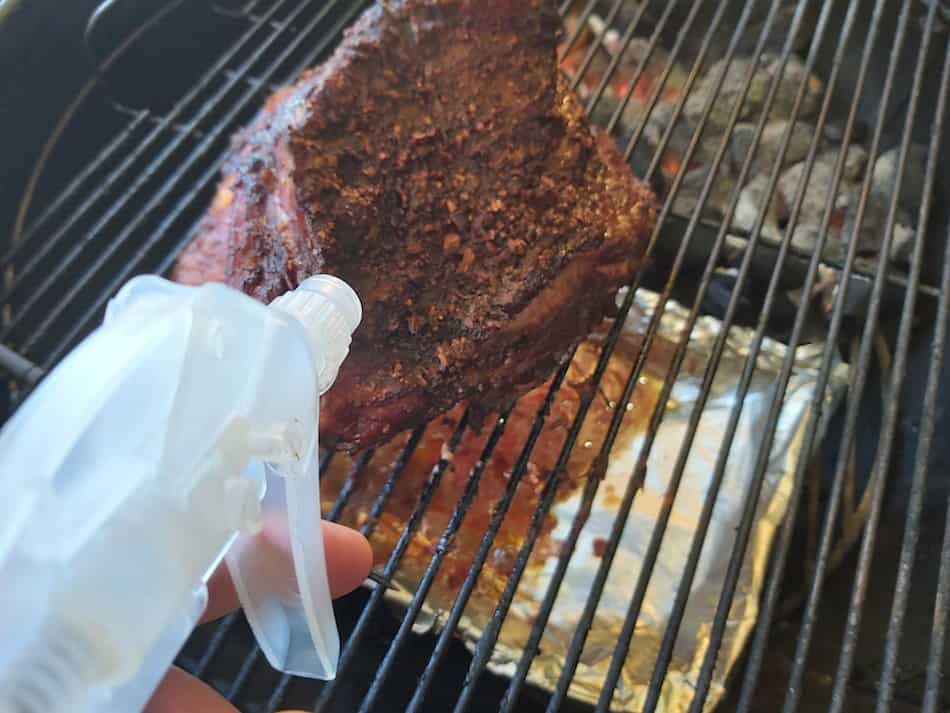
Be careful not to spritz the pork butt too soon. If the rub hasn’t set to the meat, it will wash off with the spritz. Touch the pork with your finger. If the rub sticks to your finger, then it’s too soon to spritz. When you can touch the meat without the rub sticking to your finger, then it’s safe to begin spritzing.
When To Wrap Pork Butt
Once your pork has reached an internal temperature of 160°F to 165°F, then it’s time to wrap. Before wrapping, make sure the pork butt has developed a nice firm bark. If you notice the bark cracking, then it’s time to wrap.
Lay out two sheets of heavy duty aluminium foil, give the butt one last spritz, then seal the package tightly. For a better bark, use butcher paper rather than foil.
For next-level competition style pork butt, before closing the foil, sprinkle some brown sugar on the meat and place a few sticks of butter on top. You can also pour your favorite barbeque sauce. This will give the meat an enormous flavor boost.
Why Wrap?
Wrapping the pork butt will help keep the meat moist, will speed up the cook, but most of all, it will protect the meat from being overexposed to smoke. The pork will probably stall anywhere after 150°F, so the wrap will help push the meat through this period.

How Long Will It Take?
The total cook time will depend on the size of the pork butt and the temperature of your electric smoker. See the table below for a rough guide on times and temperatures.
Pork Butt Done Temp
In order for the pork butt to be tender and juicy, 200°F to 205°F is the ideal internal meat temperature. Experienced pitmasters will mostly go by feel rather than internal temperature, but checking the temperature is important so you know if the pork is close to done. Use the temperature as a guide, but know how to test the meat for tenderness using a toothpick or a thermometer probe. When the pork butt is perfect, it should feel like sticking a toothpick in butter, and when you insert the thermometer probe, there should be no resistance. Start checking the pork once the internal temperature reaches about 195°F.
Resting
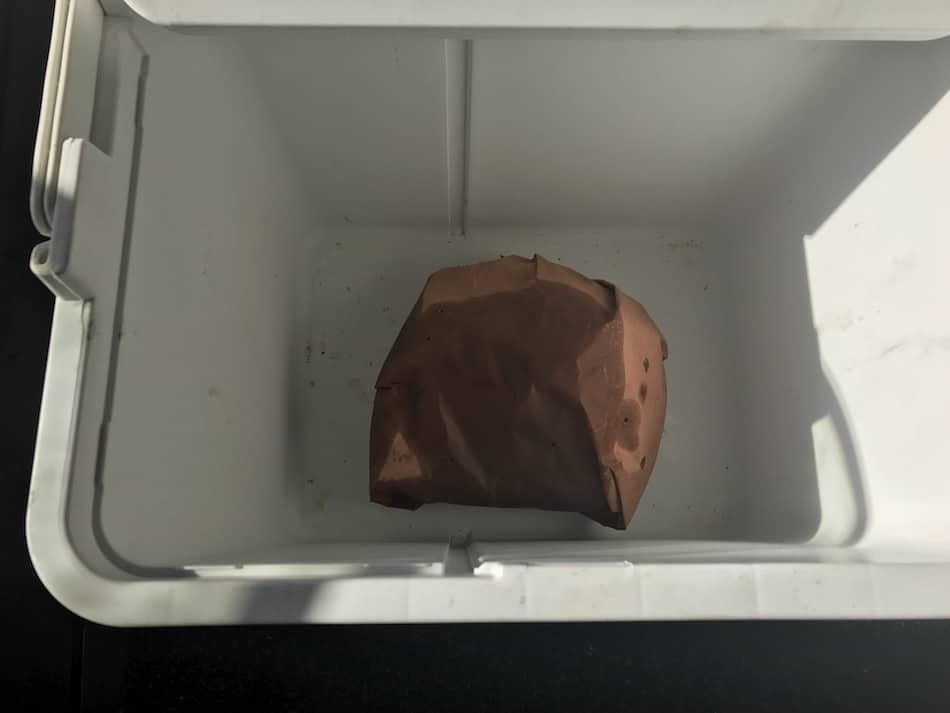
Once the pork is done, remove it from the heat and open the foil to allow some of the steam to escape. Once you have vented the pork, allow the meat to rest for 30 minutes before slicing. Resting will give the meat a chance to redistribute some of than moisture. Also, if you’re making pulled pork, the meat will be too hot to shred if you don’t allow about an hour to cool. Bear Claws are super handy for shredding hot pork. I use mine all the time. If you’re not ready to serve, place the pork into holding by placing the butt in a dry cooler for up to 4 hours.
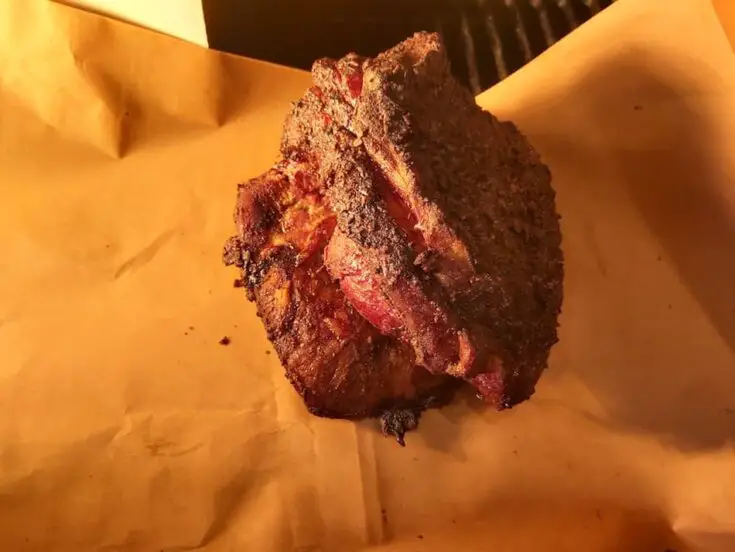
Shredding Pulled Pork
Once the pork butt has had enough resting time, shred the meat with heat proof gloves or Bear Paws. To ensure your pulled pork remains juicy, only shred once you are ready to serve, and only shred what you need.
Pork Butt (pork shoulder) in an Electric Smoker
Slow smoked pork butt (shoulder) is the perfect way to make tender, juicy pulled pork.
Ingredients
- Pork butt
- Barbecue rub
- salt
- olive oil or yellow mustard
Instructions
- Trim excess lumps of fat underneath, then score the pork fat on the top.
- Apply a binder of olive oil or yellow mustard.
- Sprinkle a decent layer of rub over all parts of the meat.
- Leave the pork in the refrigerator for a few hours so the salt and seasonings can work its way into the meat.
- Set your electric smoker between 220°F and 250°F
- Place the pork butt on the middle rack of your smoker.
- Insert a thermometer probe into the middle of the pork butt.
- Place a water pen underneath the pork butt.
- * Optional: Fill your smoking tube or AMNPS with your wood of choice and light one end.
- Smoke the meat for about 5 hours.
- After 5 hours, begin assessing the bark. Touch the pork butt until the rub doesn’t stick to your finger.
- Increase the temperature of your electric smoker but don’t go over 275°F.
- Begin spritzing the pork butt every 30 to 40 minutes.
- Continue until the butt reaches an internal temperature of 165°F.
- Wrap the pork butt in aluminium foil, or place the meat in a foil pan with some broth or apple juice, then foil the top.
- Cook until the internal meat temperature reaches 200°F to 205°F.
Nutrition Information:
Serving Size:
85 gramsAmount Per Serving: Calories: 229
My Favorite Meat Smoking Tools
Thanks for checking out this article. I hope you learned a few things. Here are some of my favorite tools I use when smoking brisket that may be useful to you. These are affiliate links, so if you decide to purchase any of these products, I’ll earn a commission. But in all honesty, these are the tools I recommend to my family and friends who are just starting out.
Meat Thermometer: There are dozens of fancy thermometers on the market, but I still use my trusty TP20. For around $50, I have a high-quality meat thermometer with two probes, and can track the temperature of my smoker with one probe, and my meat with the other probe. The ThermoPro TP20 is an Amazon Best Seller because it’s the easiest thermometer to operate, is durable, highly accurate, and comes with pre-programmed meat settings.
Instant Read Thermometer: Arguably, the second most important tool you need is a fast and accurate instant-read thermometer. These tools play an important role in the latter stages of the cook when the meat needs regular checking in multiple areas. I use the ThermoPro TP19 because it can do everything a ThermaPen can do, but for a fraction of the cost. You can check out the TP19 on Amazon here.
Wireless Thermometer: The latest thermometers on the market have no wires and can be controlled by wi-fi via your phone. Airprobe 3 is the best of this technology.
Butcher Paper: Wrapping brisket in butcher paper has become a huge trend in barbeque thanks to Aaron Franklin. Wrapping your brisket in paper will give you a nice brisket bark. However, you can’t just use any old paper, it has to be unwaxed, food grade paper. You can find it on Amazon here.
Advanced Thermometer and Automatic Temperature Controller: Once you’re ready to take things seriously, the FireBoard 2 Drive is a six-channel Bluetooth/Wi-Fi thermometer that can monitor up to 6 pieces of meat, control and graph your cook sessions on your smartphone, and attaches to an an automatic blower that will convert your charcoal smoker to a set-and-forget. This is one of the most advanced meat thermometers on the market. You can check it out on the FireBoard website here.