Smoking a whole chicken on a pellet grill can be a quick and delicious way to add a dose of smoke flavor to your meal. Not only is it tasty, it is also one of the most affordable meats to cook on a pellet grill. In this article, we will outline the steps for smoking a whole chicken on a Traeger grill, including tips for achieving crispy skin and moist meat.
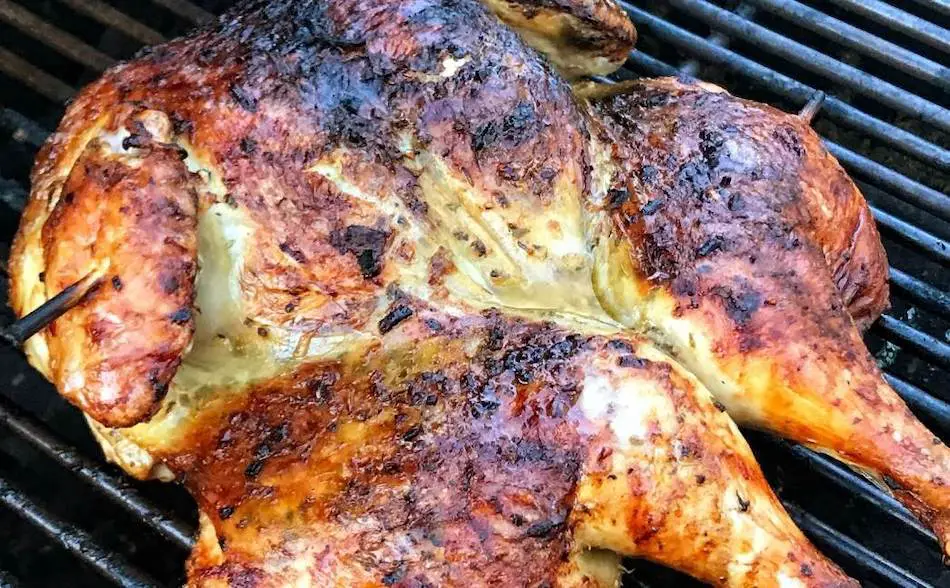
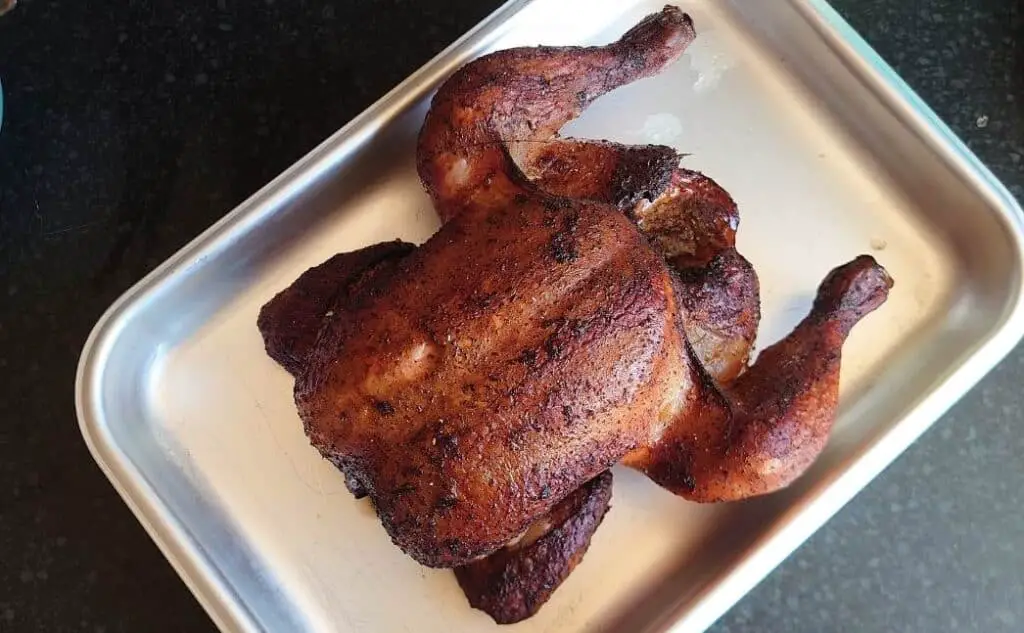
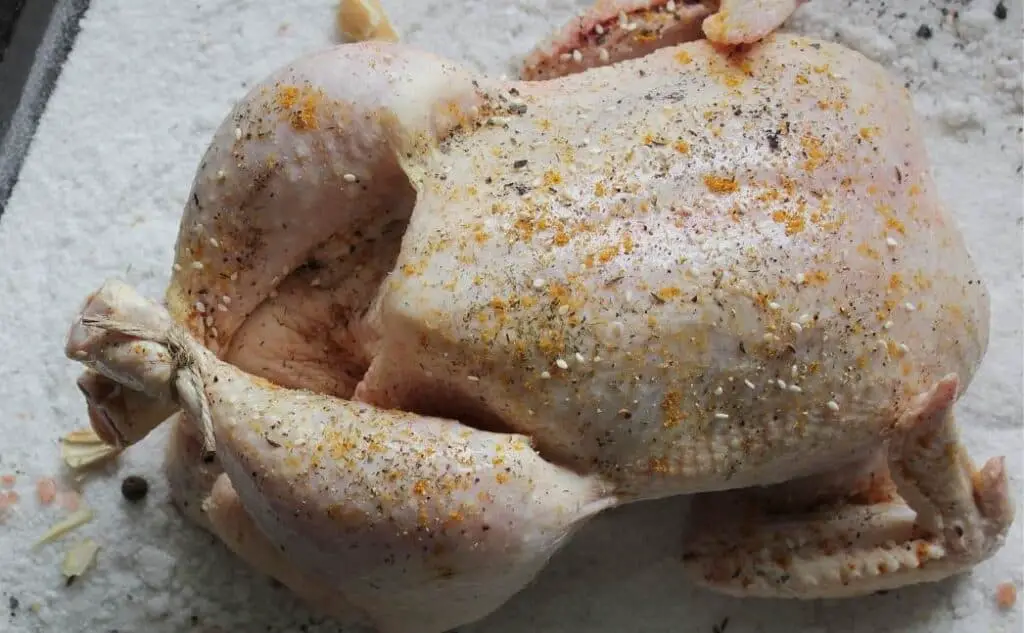
Cooking a whole chicken on a Traeger grill is easy and affordable, and the result is a deliciously smoked bird. To get the best results, set the temperature to 300°F and cook for 1.5-2 hours, spraying the chicken with oil every 30 minutes. Season the chicken with salt, pepper, and garlic powder, and a layer of barbeque rub, and use an oil spray to help the seasonings stick and aid in browning. The chicken is done when the internal temperature is 165°F in the breast and 170°F in the thigh. To keep the chicken moist and juicy, consider wet brining, but make sure to dry out the bird before cooking to avoid rubbery skin. Alternatively, try dry brining the chicken by rubbing salt into it and refrigerating it overnight.
Key Points
- Cook a whole chicken on a Traeger grill by setting the temperature to 300°F and cooking for 1.5-2 hours.
- To get crispy skin, dry the skin as much as possible, keep the temperature above 300°F, and avoid cooking the chicken in a pan or wrapping it in foil.
- Mix in fruit wood pellets such as apple or cherry for poultry, and be cautious with stronger woods like hickory, pecan, or oak.
- Season the chicken with salt, pepper, and garlic powder, and a layer of barbeque rub.
- Use an oil spray to help the seasonings stick and aid in browning.
- The chicken is done when the internal temperature is 165°F in the breast and 170°F in the thigh.
- For moist and juicy chicken, consider wet brining, but make sure to dry out the bird before cooking to avoid rubbery skin. Alternatively, try dry brining the chicken by rubbing salt into it and refrigerating it overnight.
Chicken On A Traeger – Step-By-Step
| Step | Action |
|---|---|
| 1 | Set the temperature of your Traeger to 300°F |
| 2 | Place chicken on the grill |
| 3 | Spray the chicken with cooking oil every 30 minutes |
| 4 | Cook for 1.5 hours and check the internal meat temperature |
| 5 | Remove the chicken once the breast is 165°F and the thigh is 170°F |
| 6 | Allow the chicken to cool for 20 minutes before slicing |
| 7 | Prior to cooking, dry the chicken with a paper towel |
| 8 | Apply a binder to the chicken to help the seasonings bind to the chicken |
| 9 | Apply a layer of salt, pepper, and garlic powder |
| 10 | Apply a layer of barbeque rub |
| 11 | Use a mild wood pellet such as apple or cherry |
How Long Does Chicken Take In A Traeger?
It will take approximately 45 minutes to cook a whole chicken on a Traeger grill if the temperature is set to 375°F. However, if the temperature is set to 300°F, it will take 1.5 to 2 hours to cook the chicken. Spatchcocking the chicken, or splitting it open and flattening it, will reduce the cook time and result in a more evenly cooked bird. It is important to avoid cooking chicken low-and-slow at temperatures below 300°F because the skin will turn out soft and rubbery. For a crispy skin, it is best to keep the temperature above 300°F.
A chicken is considered done when the internal temperature reaches 165°F in the breast and 170°F in the thigh. When using a thermometer to check the temperature, be sure to avoid inserting it into the bone as this will give an inaccurate reading.
When Is It Done? Safe Internal Temperature
It is important to accurately determine the internal temperature of a smoked chicken in order to ensure that it is fully cooked and safe to eat. The internal temperature of the chicken should reach at least 165°F in the breast and 170°F in the thigh to ensure that it is fully cooked.
To measure the internal temperature of the chicken, you can use a meat thermometer. When inserting the thermometer, be sure to avoid the bone, as the temperature of the bone can affect the reading. Instead, insert the thermometer into the thickest part of the breast or thigh, making sure that it is not touching the bone.
It is also a good idea to check the internal temperature of the chicken in multiple places, as the temperature can vary from one part of the chicken to another.
Once the internal temperature of the chicken reaches the recommended temperature, it is safe to remove it from the smoker and serve. Be sure to let the chicken rest for a few minutes before slicing or shredding it, as this will allow the juices to redistribute and prevent the chicken from drying out.
How To Get Crispy Skin
- Dry the skin as much as possible. Pat the chicken with a paper towel until all the moisture has been absorbed.
- Keep the temperature above 300°F. Avoid cooking chicken in the typical low-and-slow range of 220°F to 250°F. These are the standard temperatures for most meat, however chicken is different. If you cook chicken at a low temperature, the skin will be soft and rubbery.
- Avoid sitting the chicken in a pan because this will cause the skin at the bottom of the chicken to become soggy.
- Don’t wrap the chicken in foil because this will create steam and soften the skin.
- Wet brining chicken will add flavor and make the bird tender and juicy, however it can make the skin soft and rubbery. If you use a wet brine, thoroughly dry out the bird on an airing rack and pat with a paper towel. Consider dry brining the chicken by rubbing sea salt or kosher salt into the bird and leave it in the refrigerator overnight.
To achieve crispy skin when smoking a whole chicken on a pellet grill, it is important to start by drying the skin as much as possible. This can be done by patting the chicken with a paper towel until all moisture has been absorbed.
During cooking, it is crucial to keep the temperature above 300°F and avoid the low-and-slow range of 220°F to 250°F that is typical for most meats. Chicken has a different metabolism and cooking it at low temperatures will result in soft and rubbery skin.
In addition to maintaining a high cooking temperature, it is important to avoid sitting the chicken in a pan as this will cause the skin at the bottom to become soggy. Wrapping the chicken in foil should also be avoided as it will create steam and soften the skin.
While wet brining the chicken can add flavor and make it tender and juicy, it can also result in soft and rubbery skin. To avoid this, be sure to thoroughly dry out the bird on an airing rack and pat it with a paper towel before cooking. An alternative to wet brining is dry brining, which involves rubbing sea salt or kosher salt into the bird and leaving it in the refrigerator overnight.
The Best Wood Pellets for Chicken
According to barbecue experts and competition pitmasters, it is recommended to mix in fruit wood pellets for poultry such as apple or cherry, as well as any other fruit wood. These milder woods will provide a subtle smoke flavor that complements the chicken without overpowering it.
Stronger woods like hickory, pecan, or oak can also be used, but they should be used with caution as they have the potential to hijack the flavor and overpower the meat. Chicken has a thin skin compared to beef or pork, so it is not able to hold as much smoke flavor. Therefore, it is important to choose wood pellets that will provide a balance of smoke flavor without overwhelming the chicken.
| Wood Type | Best For | Notes |
|---|---|---|
| Apple | Chicken | Mild, sweet flavor |
| Cherry | Chicken | Mild, slightly sweet flavor |
| Pecan | Chicken | Mild, slightly sweet flavor |
| Oak | Chicken | Strong, bold flavor |
| Hickory | Chicken | Strong, smoky flavor |
According to barbecue experts and competition pitmasters, the best woods for chicken
Rub and Seasonings
According to barbecue experts and competition pitmasters, the best way to season chicken is to layer the flavors by starting with a base of salt, pepper, and garlic, and then adding a layer of barbecue rub. This layering technique will give the skin an enormous amount of flavor, especially when combined with smoke.
To help the seasonings stick to the chicken, it is recommended to use an oil spray to create a binder. Be sure to cover the entire chicken, including the cavity, with the rub. In addition to these basic seasonings, you can also incorporate your favorite herbs and spices that pair well with chicken. Experiment with different seasoning combinations to find the perfect blend for your tastes.
There are several great rubs on the market, but they can be expensive. I prefer to make homemade rubs, and there are some great recipes online. Check out this post I wrote a while back on homemade Rubs. Butcher BBQ is one of my go-to brands when I’m looking for injection solutions for marinades or meat rubs. They make a competition winning formula, and tastes amazing on chicken skin. World BBQ Champion Harry Soo also makes a fantastic Chicken Rub. Check out his Amazon store here.
Oil Spray
I find an oil spray is an essential item when smoking chicken as it helps with browning and aids in the adherence of the rub. To use the oil spray, simply coat the chicken all over when preparing it for cooking, and then spray it every 30 minutes during the cook to help the rub stick and add flavor. Not only does the oil spray help to create a crispy and flavorful crust on the chicken, it also helps to keep the meat moist and juicy.
Be sure to choose a high-quality oil spray that is specifically designed for grilling and smoking to get the best results.
How To Prepare Chicken
It’s important to properly prepare the chicken before smoking it to ensure the best results. The first step is to clean the bird and make sure it is dry. This includes removing any remaining organs from the cavity and taking care to handle the chicken safely to avoid cross contamination and the spread of bacteria.
To spatchcock the chicken, or split it open and flatten it, cut the chicken down both sides of the backbone and then press down on the backbone until it cracks. This will help the meat cook faster and more evenly. It is important to follow proper food safety guidelines when handling and preparing chicken to prevent the risk of illness.
Spatchcock the Chicken for an Even Cook
| Step | Description |
|---|---|
| 1 | Place the chicken breast side down on a cutting board. |
| 2 | Use kitchen shears to cut along both sides of the backbone, starting at the tail end and ending at the neck. |
| 3 | Remove the backbone and discard it (or save it to make chicken stock). |
| 4 | Turn the chicken over so that it is breast side up. |
| 5 | Press down on the breast bone until it cracks and the chicken flattens out. |
| 6 | Season the chicken as desired. |
| 7 | Preheat the smoker to 225-250 degrees Fahrenheit. |
| 8 | Place the spatchcocked chicken in the smoker and cook for 1-2 hours, or until the internal temperature of the thickest part of the thigh reaches 165 degrees Fahrenheit. |
| 9 | Remove the chicken from the smoker and let it rest for 10-15 minutes before serving. |
Spatchcocking a chicken involves removing the backbone of the bird and flattening it out before cooking it. This can be done by using kitchen shears to cut along either side of the backbone and then using your hands to press down on the breast bone until it cracks and the bird flattens out.
This method is often used for smoking chicken on pellet grills because it allows the chicken to cook more evenly and faster than if it were cooked whole. When smoking a spatchcocked chicken, it is important to make sure that the skin is intact and that the meat is well seasoned before placing it in the smoker.
The cook time will depend on the size of the chicken and the desired level of doneness, but it will typically take about 1 to 2 hours to smoke a spatchcocked chicken at a temperature of 225-250 degrees Fahrenheit.
Brine the Bird for Extra Flavor
You can dry brine the chicken a few hours before cooking, or the night before. This will flavor the meat and prevent the chicken from losing moisture. You can either wet brine or dry brine your chicken, but a dry brine is the easiest method. The difference between dry brining involves sprinkling salt into the meat and a wet brine is where you soak the chicken in a saltwater solution. The problem with wet brining is it will make the skin soggy, so if you want a crispy skin, avoid wet brining.
According to competition pitmasters and barbecue gurus, brining chicken before smoking can help add flavor and moisture to the meat. A brine is a mixture of water, salt, and sometimes other flavorings like sugar, herbs, and spices. When you soak the chicken in the brine, the salt and other flavorings will penetrate the meat, adding flavor and helping to keep the chicken moist during the cooking process.
Some experts recommend using a dry brine for chicken because it is easier to apply and doesn’t make the skin soggy like a wet brine can. To dry brine chicken, simply sprinkle a mixture of salt and other desired flavorings all over the surface of the chicken and let it sit in the fridge for a few hours or overnight.
Others recommend wet brining, which involves soaking the chicken in a saltwater solution for several hours or overnight. This can help to flavor the meat more deeply, but it can also make the skin soggy if not done carefully. To wet brine chicken, you can mix together water, salt, and any other desired flavorings in a large container or plastic bag. Place the chicken in the brine, making sure it is fully submerged, and let it soak in the fridge for several hours or overnight.
Regardless of whether you choose to dry brine or wet brine your chicken, be sure to rinse the chicken and pat it dry before cooking to remove any excess salt. This will help to prevent the chicken from becoming too salty.
Inject Moisture into the Chicken
Infecting the chicken is another way to get some extra flavor and moisture into the chicken. We’ll be cooking at a high temperature which can cause the bird to lose some of its moisture. You can use chicken broth or something similar to Butcher BBQ, a competition winning formula.
Injecting chicken with a marinade or other flavorful liquid before smoking can help to add moisture and flavor to the meat. Competition pitmasters and barbecue gurus often recommend using a meat injector to do this, as it allows you to distribute the marinade evenly throughout the chicken.
To inject chicken, you can mix together a marinade or other flavorful liquid in a bowl. Some common ingredients for a chicken injector marinade include butter, broth, and herbs like garlic, onion, and thyme. You can also add other seasonings like paprika, chili powder, and cumin to give the chicken extra flavor.
Once you have mixed together your marinade, fill a meat injector with the liquid. Then, insert the needle of the injector into the chicken at various points, injecting the marinade as you go. Be sure to inject the marinade into both the breast and the thighs of the chicken to ensure that it is evenly distributed.
After injecting the chicken, you can let it sit in the fridge for a few hours or overnight to allow the flavors to penetrate the meat. When you are ready to smoke the chicken, be sure to pat it dry and season it as desired before cooking.
Beer Can Chicken on a Traeger
Normally we smoke a chicken flat on the grill or spatchcocked, but a beer can chicken allows you to smoke a chicken vertically. You can buy the racks for beer can chicken, and they are inexpensive. A rack will help stabilize the chicken, which can sometimes lean over without the rack. It will take about 2 hours to smoke a beer can chicken at 300°F. The chicken can become too dark from the smoke. To prevent this from happening, cover the chicken in foil in the latter stages of the cook.
- Take a can of beer and remove 1/4 of the beer.
- Enlarge the hole in the can
- Sprinkle more seasoning into the can of beer (salt, pepper, garlic, bbq rub)
- Place the can in a rack. A beer can chicken rack will help the chicken sit upright.
- Place the chicken upright onto the beer can.
- Once the chicken is up on the can, apply more rub to fill in any gaps
- Fire up your Traeger and get the temperature above 300°F.
My Favorite Meat Smoking Tools
Thanks for checking out this article. I hope you learned a few things. Here are some of my favorite tools I use when smoking brisket that may be useful to you. These are affiliate links, so if you decide to purchase any of these products, I’ll earn a commission. But in all honesty, these are the tools I recommend to my family and friends who are just starting out.
Meat Thermometer: There are dozens of fancy thermometers on the market, but I still use my trusty TP20. For around $50, I have a high-quality meat thermometer with two probes, and can track the temperature of my smoker with one probe, and my meat with the other probe. The ThermoPro TP20 is an Amazon Best Seller because it’s the easiest thermometer to operate, is durable, highly accurate, and comes with pre-programmed meat settings.
Instant Read Thermometer: Arguably, the second most important tool you need is a fast and accurate instant-read thermometer. These tools play an important role in the latter stages of the cook when the meat needs regular checking in multiple areas. I use the ThermoPro TP19 because it can do everything a ThermaPen can do, but for a fraction of the cost. You can check out the TP19 on Amazon here.
Wireless Thermometer: The latest thermometers on the market have no wires and can be controlled by wi-fi via your phone. Airprobe 3 is the best of this technology.
Butcher Paper: Wrapping brisket in butcher paper has become a huge trend in barbeque thanks to Aaron Franklin. Wrapping your brisket in paper will give you a nice brisket bark. However, you can’t just use any old paper, it has to be unwaxed, food grade paper. You can find it on Amazon here.
Advanced Thermometer and Automatic Temperature Controller: Once you’re ready to take things seriously, the FireBoard 2 Drive is a six-channel Bluetooth/Wi-Fi thermometer that can monitor up to 6 pieces of meat, control and graph your cook sessions on your smartphone, and attaches to an an automatic blower that will convert your charcoal smoker to a set-and-forget. This is one of the most advanced meat thermometers on the market. You can check it out on the FireBoard website here.
Pellet Grill Articles
Pork Butt On A PitBoss – Pulled Pork On A Pellet Grill
Brisket On A Pit Boss Pellet Grill (We Asked The Pros)
Smoked Bison Brisket (Buffalo In A Smoker or Traeger Pellet Grill)
Deer On A Traeger: The 4 Best Ways To Cook Deer Meat on a Pellet Grill