
Are you looking to impress your friends and family with a tasty and unique recipe? Look no further than beer can chicken on your Traeger pellet grill! This popular cooking method involves using a partially opened can of beer to help roast a whole chicken to perfection. All you need is a can of beer, a chicken, some seasoning, and some pellets for your Traeger pellet grill. I asked the barbecue experts for their step-by-step guide, so you can create perfectly cooked and flavorful beer can chicken every time.
To cook beer can chicken on a pellet grill, start by applying a generous amount of dry rub and olive oil to the chicken. Remove 1/2 to 1/4 of a can of beer and insert it into the cavity of the chicken. Place the chicken upright on the grill, balancing on its legs, and set the grill to 300°F, using wood pellets for added flavor. Cook for around 2 hours or until the internal temperature reaches 165°F in the breast and 175°F in the thigh.
To prevent the skin from becoming soft and rubbery, avoid wet brining the chicken and make sure to dry the skin before cooking. Optionally, you can inject the chicken with broth or marinade or use a flavored beer or root beer can for extra flavor. When the chicken is finished cooking, allow it to rest for 10 minutes before slicing or shredding.
Key Points
Whole chicken can be a little tricky to get an even cook because it has an awkward shape and a large cavity. Unless you constantly rotate the chicken, it’s hard to cook evenly. The advantage of the beer can method is the chicken cooks more evenly. The beer will also create some extra steam—adding extra moisture and flavor to the chicken. Here are the key things to remember:
- Apply dry rub and olive oil to the chicken
- Insert a partially opened can of beer into the cavity of the chicken
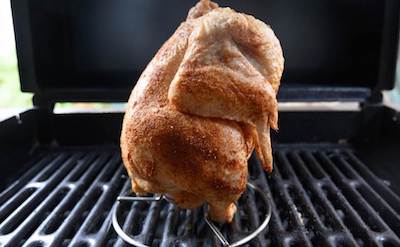
- Place the chicken on a rack to balance it on the grill
- Set the grill to 300°F and use wood pellets for added flavor
- Cook for about 2 hours or until the internal temperature reaches 165°F in the breast and 175°F in the thigh
- To prevent soft and rubbery skin, avoid wet brining the chicken and dry the skin before cooking
- Optionally, inject the chicken with broth or marinade or use a flavored beer or root beer can for extra flavor
- Allow the chicken to rest for 10 minutes before slicing or shredding
Beer Can Chicken: Step-by-Step
Here are the main steps involved when cooking beer can chicken on a pellet grill. For the full recipe, see the bottom of the article.
| Step | Description |
|---|---|
| 1 | Apply dry rub and olive oil to the chicken |
| 2 | Insert a partially opened can of beer into the cavity of the chicken |
| 3 | Place the chicken on a rack to balance it on the grill |
| 4 | Set the grill to 300°F and use wood pellets for added flavor |
| 5 | Cook for about 2 hours or until the internal temperature reaches 165°F in the breast and 175°F in the thigh |
| 6 | To prevent soft and rubbery skin, avoid wet brining the chicken and dry the skin before cooking |
| 7 | Optionally, inject the chicken with broth or marinade or use a flavored beer or root beer can for extra flavor |
| 8 | Allow the chicken to rest for 10 minutes before slicing or shredding |
How Long Does It Take To Cook Beer Can Chicken?
Plan for about 2 hours to cook a beer can chicken on a pellet grill. The total cook time will depend on the size of the chicken and the temperature of your grill. The chicken is done once the internal temperature reaches 165°F in the breast and 175°F in the thigh. Allow 10 minutes for the chicken to rest.
The Best Cooking Temperature For Beer Can Chicken
The ideal temperature to cook chicken is in the 300° F range. Any lower than 275° F, you may end up with soft, rubbery skin. There’s nothing worse than soft rubbery chicken skin. It’s even more important to cook above 300° F with the beer can chicken recipe. The beer can will create some extra steam, producing more moisture in the cooking chamber, and therefore softening the chicken skin.
Make Life Easier – Get A Chicken Rack
Balancing a chicken on a beer can be a challenge. You need to position the legs correctly, otherwise the bird will tip over. Some pitmasters use a chicken stand, which make s life so much easier. A chicken roasting stand is enough room to insert a can of beer in the middle, and we’ll prevent the chicken from falling over. Hardware stores sell chicken stand for about $10, or you can get one on Amazon here. You can also get roasting stands with stainless steel trays like the Steven Raichlen Chicken Roaster.
Brining Beer Can Chicken
Brining chicken is a blessing and a curse. A brine will make your chicken juicy and full of flavor, but it may also cause the skin to become soft and rubbery. If you decide to wet brine the chicken, dry the skin as much as possible prior to cooking. You can either do this by patting the chicken with a paper towel, or leave it uncovered in the refrigerator for a few hours. You could also sit the bird on an airing rack for an hour before applying the barbecue rub.
Chicken Brine Mixture
Here is a basic brine mixture for chicken:
- 1 gallon of water
- 1 cup of salt
- 1 cup of sugar
Dissolve the sugar and salt in a pot by adding a small amount of water. Then add the rest of the water into a container. For the best results, soak the chicken in the brine overnight. Otherwise, let the bird soak for about 6 hours if you can.
Dry Rub
There are dozens of rubs on the market, and even more rub recipes. I’ve got several recommendations, and a couple of simple recipes that you can try. If you want a pre-made rub, I would highly recommend Malcolm Reed’s Killer Hogs or Harry Soo’s Slap Yo Daddy rubs. Harry and Malcolm are both champion pitmasters and produce high-quality rubs.
I like to get the rub on the skin and underneath the skin. Try to get the rub over every part of the chicken. If the rub doesn’t stick, apply some olive oil to the bird, and then sprinkle your rub. The oil should help the rub stick. Try not to use water as a rub binder because we don’t want to soften the skin.
Some people will apply an all-purpose seasoning before adding the rub. All-purpose rub usually contains salt, garlic, pepper and some herbs.
Aaron Franklin Style Texas Rub
If you’ve ever watched barbecue guru Aaron Franklin smoke meat, you would know that he likes to keep things simple. In Texas, Pitmasters often use a simple salt and pepper rub. Franklin will sometimes add in a little of paprika for color, or some garlic powder and granulated onion for a savory taste. For a simple salt and pepper rub, use a coarse black pepper. Franklin uses is 16-mesh cafe grind black pepper, and Morton’s kosher salt. Mix a 50/50 ratio, and if you want some color to your beer can chicken, add in a little paprika.
Homemade Rub
There’s a couple of different rub recipes I use when making rub at home. The best recipe I’ve come across was created by the Linn Brothers. It’s a really delicious blend of spices, and extremely versatile. The great thing about this rub is you can add and subtract spices, depending on your taste, and make different versions of the rub. If you don’t like spicy, you can reduce the amount of chilli powder or cayenne pepper. Check out the video below for the recipe in the description.
Check The Salt Content Of Your Rub
Always be careful not to over-salt your chicken. Be careful with the salt in the rub if you have pre-brinded the chicken. Check the salt content of the rub you buy. If the rub has a lot of salt, be careful if you brine the chicken. If you’re making a homemade rub, then hold back on the rub or make a version without salt. I always like to salt my meat separately and make a version of rub with no salt.
How To Insert The Beer Can
- Once you’ve seasoned the chicken, insert the beer can into the chicken cavity.
- Remove at least 1/4 of the can of beer.
- If you Don’t want to use beer, you can also use Dr. Pepper or root beer.
- Sit the bird on the can so it looks like the chicken is standing up on its legs.
When Is Beer Can Chicken Done?
Smoke the chicken until it reaches an internal temperature of 165° F in the breast, and 175° F in the thigh. Use a good instant-read thermometer to check the internal meat temperature and don’t go by look or feel with chicken. The USDA recommends chicken is cooked to a safe internal temperature of 165° F. Chicken contains a lot of bacteria, so it needs to be cooked properly. Therefore, an instrument thermometer should be one of your most important tools when barbecuing. Smoked meat can deceive, because it leaves a pink ring around the outer layer of the meat. Some people mistake this pink smoke ring as underdone. A thermometer will give you peace of mind knowing that although the meat might have some pinkness, it is at a safe temperature and therefore safe to eat.
Can You inject Beer Can Chicken?
If you want to take your beer can chicken to the next level, use a meat injector and pump the bird with any liquid such as stock, broth. I highly recommend injecting the chicken with Butcher BBQ’s Bird Booster. Injecting is the only way to get moisture deep inside the meat. A wet brine will improve the tenderness and juiciness of the chicken, but injection will go deep. If you are wet brining the chicken, then you don’t need to inject and vice versa. You can get a decent stainless steel meat injector on Amazon for around $20- $30. This injector is an Amazon bestseller.
Best Wood Pellets For Chicken
Since chicken is a hot and fast cook, use a stronger smoking wood so you can impart more smoke flavor in a short period. Hickory wood pellets are a superb choice, but you can use whatever you have available. Normally I would recommend using mild fruit wood when smoking chicken, such as apple or cherry. Both woods are perfect for chicken, and cherry will give the chicken a nice mahogany color. Otherwise, cover all your bases by using a mixed blend.
Aaron Franklin, the owner of Franklin Barbecue in Austin, Texas and the host of the PBS series “BBQ with Franklin,” generally recommends using oak wood for smoking chicken. He prefers oak because it has a clean, mild flavor that complements the taste of the chicken without overpowering it.
Harry Soo, the competition barbecue champion, recommends oak wood for smoking chicken. He also likes to use fruitwoods like apple or cherry, which have a slightly sweeter flavor that can add a nice contrast to the savory taste of the chicken.
Malcolm Reed, the owner of Killer Hogs BBQ, recommends using a blend of oak and hickory wood for smoking chicken. He finds that the combination of oak and hickory provides a well-balanced, smoky flavor that pairs well with the chicken.
Meathead Goldwyn, the author of “Meathead: The Science of Great Barbecue and Grilling,” recommends using a variety of woods for smoking chicken, including oak, hickory, pecan, and cherry.
Can You Cook Beer Can Chicken Low-N-Slow?
You can also cook beer can chicken in the low and slow range between 225° F and 250° F. Although the skin won’t be as crispy, the meat will be much smokier and full of flavor. It would take around about 3 hours to cook a chicken in the low range.
Chicken skin will become soft and rubbery if it is cooked at low temperatures because the collagen in the skin does not have a chance to fully render and break down. If the collagen is not exposed to high enough temperatures for a long enough period of time, it will remain in its original form and the chicken skin will remain tough and rubbery. So cook the chicken at about 300°F or above. This will allow the collagen to fully render and break down, resulting in tender and crispy chicken skin.
Olive Oil Spray
Throughout the cook, I like to spray the chicken with an olive oil spray every half hour. Olive oil spray can help brown the skin of chicken by providing a thin layer of fat that can help the chicken skin become crispy and golden when it is cooked. When the chicken skin is coated in olive oil, it can help to seal in moisture and prevent the chicken from drying out during cooking.
The oil also helps to promote the Maillard reaction, a chemical reaction that occurs between amino acids and reducing sugars when food is cooked at high temperatures. The Maillard reaction is what gives grilled and roasted foods their distinct flavor and color. By applying a thin layer of olive oil to the chicken skin before cooking, you can help to enhance the Maillard reaction, resulting in crispy and browned chicken skin.
Resting
Barbecue experts suggest resting chicken between 10 and 15 minutes after smoking. This will allow the juices to redistribute and the meat to become more tender. Most pitmasters also suggest wrapping the chicken in foil or placing it in a covered container to keep it warm during the rest period.
Beer Can Chicken
Ingredients
- Whole chicken
- Barbecue rub
- 1 can of beer or root beer
Instructions
1. *Optional, pre-brine or inject your chicken.
2. Dry the chicken as much as possible.
3. Slather olive oil to the bird, and as a binder for the rub.
4. Apply the barbecue rub and/or all-purpose seasoning to the chicken.
5. Take a beer can, root beer, or Dr. Pepper, and remove 1/4 of the liquid.
6. Insert the can into the cavity of the chicken.
7. Balance the chicken with the legs to the front. Use a chicken rack to help balance the chicken better.
8. Use hickory wood pellets for a stronger smoke flavor. Other good choices are apple or cherry or mixed blends.
9. Fire up your Traeger, and set the temperature to 300° F.
10. *Optional. Spray the chicken with cooking oil every 30 minutes.
11. Cook the beer can chicken until the internal meat temperature reaches 165° F in the breast and 175° F in the thigh.
12. Allow the chicken to rest for 10 minutes prior to slicing or shredding.
Nutrition Information:
Serving Size:
100Amount Per Serving: Calories: 237 Total Fat: 13.49g
More Chicken Articles:
Whole Chicken On A Traeger – We Asked The BBQ Gurus How They Do It
How to Avoid Rubbery Skin on Smoked Chicken
Smoked Chicken Done Temp – Safe Internal Temperatures
My Favorite Meat Smoking Tools
Thanks for checking out this article. I hope you learned a few things. Here are some of my favorite tools I use when smoking brisket that may be useful to you. These are affiliate links, so if you decide to purchase any of these products, I’ll earn a commission. But in all honesty, these are the tools I recommend to my family and friends who are just starting out.
Meat Thermometer: There are dozens of fancy thermometers on the market, but I still use my trusty TP20. For around $50, I have a high-quality meat thermometer with two probes, and can track the temperature of my smoker with one probe, and my meat with the other probe. The ThermoPro TP20 is an Amazon Best Seller because it’s the easiest thermometer to operate, is durable, highly accurate, and comes with pre-programmed meat settings.
Instant Read Thermometer: Arguably, the second most important tool you need is a fast and accurate instant-read thermometer. These tools play an important role in the latter stages of the cook when the meat needs regular checking in multiple areas. I use the ThermoPro TP19 because it can do everything a ThermaPen can do, but for a fraction of the cost. You can check out the TP19 on Amazon here.
Wireless Thermometer: The latest thermometers on the market have no wires and can be controlled by wi-fi via your phone. Airprobe 3 is the best of this technology.
Butcher Paper: Wrapping brisket in butcher paper has become a huge trend in barbeque thanks to Aaron Franklin. Wrapping your brisket in paper will give you a nice brisket bark. However, you can’t just use any old paper, it has to be unwaxed, food grade paper. You can find it on Amazon here.
Advanced Thermometer and Automatic Temperature Controller: Once you’re ready to take things seriously, the FireBoard 2 Drive is a six-channel Bluetooth/Wi-Fi thermometer that can monitor up to 6 pieces of meat, control and graph your cook sessions on your smartphone, and attaches to an an automatic blower that will convert your charcoal smoker to a set-and-forget. This is one of the most advanced meat thermometers on the market. You can check it out on the FireBoard website here.