
Anyone can smoke a couple of racks of ribs on a Weber kettle. All you need is some charcoal, a few chunks of wood and you can smoke ribs like Aaron Franklin. In this article, I’ll walk you through a simple rib smoking technique used by some of the world’s most well-known barbecue gurus. For this recipe, we won’t be doing the 3-2-1 rib method, or any other fancy competition-style ribs. Just like Aaron Franklin, we’re going to keep things really simple.
The recommended temperature range for cooking ribs is between 225° F and 275° F. If you want the ribs done faster, cook at 275° F. The cook time for ribs on a Weber kettle will vary depending on the temperature and method used, with low-and-slow cooking taking about 5 hours and the 2-2-1 method taking 5 hours and the 3-2-1 method taking 6 hours.
Quick Tips
- Smoking ribs on a Weber kettle requires charcoal, wood chunks, and a meat thermometer.
- The best temperature for cooking ribs is between 225° F and 275° F, with 275° F being a quicker cook time and 225° F being safer for those still learning to control temperature.
- Different types of pork ribs should be treated differently, refer to an in-depth guide for more information.
- Cook time for ribs on a Weber kettle will vary depending on temperature and method used, with low-and-slow cooking taking about 5 hours and the 2-2-1 method taking 5 hours and the 3-2-1 method taking 6 hours.
- Instructions for setting up a Weber kettle for both 275° F and 225° F temperatures are provided, including the number of charcoal briquettes needed and vent adjustments.
Ribs On A Weber Kettle
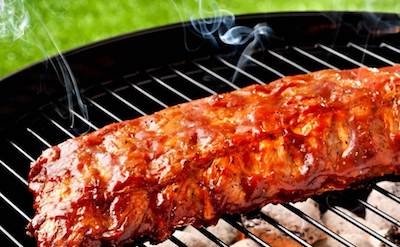
Tender, juicy charcoal and wood smoked ribs cooked low-and-slow on a Weber Kettle grill.
Ingredients
- Pork spare ribs
- Barbecue sauce
- Olive oil or yellow mustard (binder)
- Apple cider vinegar or apple juice in a spray bottle (spritz)
- Your favorite barbecue rub. Or, for a homemade rub, combine the following ingredients:
- - ½ Cup Paprika
- - ½ Cup Salt
- - ½ Cup Sugar
- - ½ Cup Granulated Garlic
- - ¼ Cup Granulated Onion
- - ¼ Cup Chili
- - ¼ Cup Cumin
- - 2 Tablespoons Black Pepper
- - 2 Tablespoons Dry Mustard
- - 1 Tablespoon Cayenne Pepper
Instructions
Prepare The Ribs:
- Trim the ribs removing the breastbone and square off.
- Cut off excess fat.
- Apply a binder using olive oil or yellow mustard. This will help the rub stick.
- Cover the ribs in the rub, leaving no gaps.
Set Up The Weber Kettle:
1. Light 10 coals in a charcoal starter.
2. Lay the other 120 unlit briquettes on the grill in a neat pile.
3. Pour the 10 lit coals beside the 120 unlit coals.
4. Open the bottom vent to 1/4 and leave for the whole cook.
5. Adjust the top vent between 1/8 to 1/4. Only make small adjustments with the top vent.
6. Clip your thermometer probe to the grill. Keep adjusting the top vent until you get that stable 275° F temperature.
7. Just before adding the meat, place 2 chunks of smoking wood onto the fire. Use hickory, apple or pecan.
The Cook
1. Fill the water pan with hot water.
2. Place the ribs on the grill ( on the opposite side to the fire) and close the lid.
3. Leave the ribs alone for the first two hours. Don't open the lid. Monitor the temperature and adjust the top vent.
4. After 2 hours, wrap the ribs in foil. About 20 minutes before wrapping, give the ribs a spritz with apple cider vinegar or apple juice.
5. Remove the ribs from the smoker and gently apply a barbecue sauce. Don't damage the bark.
6. Wrap the ribs in two layers of aluminium foil. Careful not to pierce the foil with bones.
7. Lay the ribs back onto the grill and close the lid. Cook for another 2 hours.
8. Remove the ribs from the foil wrapping, then apply more barbecue sauce.
9. Place the ribs back onto the kettle grill for another 15 minutes unwrapped.
10. Perform a tenderness test. Bend the ribs to see if the meat cracks between the bone. If the meat cracks, the ribs are tender. If the meat doesn’t crack when bent, then it needs a more time. Otherwise, twist a rib bone. If it feels like you could twist the bone clean off, then the ribs are done.
11. Rest the ribs for about 5 minutes. If you rest ribs too long, they may turn to mush.
The Best Temperature For Cooking Ribs On A Weber Kettle
The best temperature to cook ribs is anywhere between 225° F and 275° F. As long as you keep the Weber within this range, the ribs will turn out tender and juicy. Anywhere within this range will be safe. Avoid going over 300°F because it will put the ribs at risk of drying out. When smoking ribs on my Weber Kettle, I like to cook at 275°F because it cooks a little quicker. Pitmasters like Aaron Franklin smoke ribs at 275°F. So if it’s good enough for Franklin, it’s good enough for me.
If you have time, cook your ribs at 225°F because it’s much safer. Especially if you’re still learning how to control temperature on your Weber. However, allow an extra hour or two when cooking at 225°F. A 225°F is the ideal temperature for smoking brisket, pork butt, ribs, etc. You’ll need a lot of charcoal because these cooks are very long. I would highly recommend using the Minion Method, or the Snake Method.
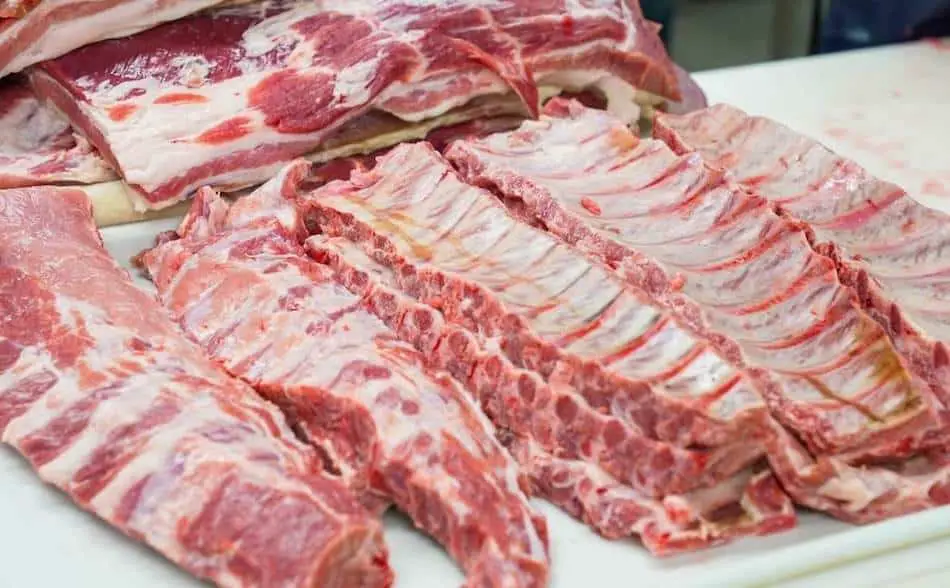
Different Types Of Pork Ribs
There are several types of pork ribs, and they all need to be treated differently. There are spare ribs, baby backs, and many more cuts. I’ve written an in-depth guide to the various pork ribs where I go into great detail. You can check it out here: The Pork Rib Guide.
How Long Does It Take To Cook Ribs On A Weber Kettle?
The total cook time will vary depending on the temperature of your Weber, and the cooking method. In general, ribs cooked low-and-slow will take about 5 hours. The 2-2-1 method takes 5 hours, while the 3-2-1 method takes 6 hours. However, most barbecue gurus cook to tenderness rather than using popular methods. It usually takes somewhere between 4-5 hours for ribs to reach perfect tenderness.
How To Set Up Your Weber Kettle For 275°F
This setup will allow you to cook the ribs at 275°F. To set up your Weber Kettle to cook your ribs at 275°F, you’ll need about 130 charcoal briquettes. For low-and-slow cooking, you need a duel-probe meat thermometer. This will allow you to monitor the temperature of your Weber with one probe, and the internal meat temperature with the other probe. Check out my thermometer recommendations at the bottom of this article.
- Start by lighting 10 coals in a charcoal starter.
- Lay the other 120 unlit briquettes in the Weber Kettle, making a neat pile.
- Once lit, place the 10 lit coals and lay them beside the 120 unlit coals. Don’t place the lit coals in the middle of the unlit briquette pile, otherwise the fire will become too hot. This method will provide heat for about 10 to 12 hours.
- Adjust the vents on your Weber Kettle. Open the bottom vent to 1/4 and leave for the entire cook.
- Open the top vent between 1/8 to 1/4. Throughout the cook, make slight adjustments with the top vent only. Stay within the 1/8 to 1/4 range for the entire cook. Wait 10 minutes between adjustments.
- Clip your thermometer probe to the grill on the “cool zone”.
- Adjust the top vent on the Weber Kettle until you get that stable 275° F temperature.
How To Setup Your Weber Kettle For 225°F
One hundred charcoal briquettes with the vents open 1/4 will give you about 5 to 6 hours of cooking time. To maintain a low-and-slow range of 225°F to 250°F, do the following:
- You will need 100 charcoal briquettes for a 225°F cook.
- Pre-light about 5-10 charcoal briquettes in a chimney starter.
- Place 90 briquettes in a neat pile on the grill.
- Tip the lit charcoal to the side of your charcoal pile.
- Close the lid and adjust the bottom vent to 1/4.
- Use the top vent to adjust the temperature, moving between 1/8 to 1/4.
- Only make slight adjustments but never open the vents over 1/4, otherwise the coal will burn too quickly.
- It will take about 30 minutes for the temperature to come up to the 225°F range.
How To Prepare The Ribs
Once your Weber is set up, it’s time to focus your attention on the pork ribs.
- Trim the ribs removing the breastbone and squaring them off.
- Remove any excess fat or anything that won’t render.
- Apply some olive oil or yellow mustard to the ribs as a binder to help the rub stick.
- If you want to do a simple Texas style rub, apply one part salt and two parts pepper. Aaron Franklin uses a 16-mesh black pepper and kosher salt. You can add in a little paprika if you want a bit of color. For a more savory flavor, mix in some onion flakes and garlic powder.
- If you want to more complex rub, try Slap Yo Daddy or Killer Hogs. Competition pitmasters make these rubs and are amazing on ribs. Otherwise, try out this homemade rub recipe.
How To Cook Ribs In A Weber Kettle
- Place the ribs in the Weber Kettle unwrapped. We want to cook our ribs with indirect heat, so make sure the ribs are on the opposite side to the coals. This is also called two-zone cooking. We want the ribs cooking in the cool zone.
- Place a water pan on the opposite side of the coals. This will add some extra moisture to the cooking environment. Plus, it will work as a drip pan. When topping up your water, use boiled water otherwise you will lose too much heat.
- Leave the ribs alone for the first two hours. Don’t open the lid of the Weber. Just keep an eye on the temperature and adjust the top vent.
- After 2 hours, wrap the ribs in foil. About 20 minutes before wrapping, give the ribs a spritz with apple cider vinegar or apple juice.
- Remove the ribs from the smoker and apply a barbecue sauce. Be careful not to damage the bark, so avoid using a basting brush. Use a spray bottle and spritz the sauce to spread the sauce over the ribs.
- Wrap the ribs in two layers of aluminium foil. Be careful not to pierce the foil with bones. Fold the ribs carefully for easy access.
- Place the wrapped ribs back into the Weber Kettle and cook for about another 2 hours.
- Remove the ribs from the foil wrapping, then apply more barbecue sauce. Place the ribs back onto the kettle grill for another 15 minutes unwrapped to set the glaze.
- Perform a tenderness test to judge if the ribs are done. The bend test involves bending the ribs to see if the meat cracks between the bone. If the meat cracks, the ribs are tender. If the meat doesn’t crack when bent, then it needs a more time.
- Another way to test for tenderness is to twist a rib bone. If it feels like you could twist the bone clean off, then the ribs are done.
- You can also perform a toothpick test by poking the meat between the ribs using a toothpick or a thermometer probe. If it feels like you’re poking a stick of butter, your ribs have reached perfect tenderness.
- When cooked, rest the ribs for about 30 minutes in foil. This will allow the meat to reabsorb juices. Some people will only rest for about 5 minutes. If you rest ribs too long, they may turn to mush.
The 3-2-1 Method On A Weber Kettle
There are hundreds of blogs and YouTube videos that show you how to cook ribs using the 3-2-1 method. The 3-2-1 method is good guide for the beginner, but it’s not how the pros cook ribs. Once you know what you’re doing, you’ll learn to cook to tenderness, not time.
The 3-2-1 method involves cooking the ribs for 3 hours unwrapped, 2 hours wrapped and 1 hour in sauce. Most experienced pitmasters don’t recommend the 3-2-1 method for ribs. Although this method is popular on YouTube, most pros believe the 3-2-1 method overcooks the ribs. If anything, I would use the 2-2-1 method which involves cooking the ribs 2 hours unwrapped, then 2 hours wrapped in foil, then 1 hour with a barbecue sauce.
Barbecue Sauce For Ribs
Applying the glaze (barbecue sauce) is the last step when smoking ribs on a Weber Kettle. This final layer of flavor will take the ribs to another level. Use your favorite barbecue sauce like Sweet Baby Rays and baste the ribs in the final 10 minutes of the cook.

How To Cook Ribs Like Aaron Franklin
If you want to learn how to smoke ribs like the master, I suggest watching this video by Aaron Franklin. Although he uses an offset smoker, you can adapt the same method to your Weber Kettle.
My Favorite Meat Smoking Tools
Thanks for checking out this article. I hope you learned a few things. Here are some of my favorite tools I use when smoking brisket that may be useful to you. These are affiliate links, so if you decide to purchase any of these products, I’ll earn a commission. But in all honesty, these are the tools I recommend to my family and friends who are just starting out.
Meat Thermometer: There are dozens of fancy thermometers on the market, but I still use my trusty TP20. For around $50, I have a high-quality meat thermometer with two probes, and can track the temperature of my smoker with one probe, and my meat with the other probe. The ThermoPro TP20 is an Amazon Best Seller because it’s the easiest thermometer to operate, is durable, highly accurate, and comes with pre-programmed meat settings.
Instant Read Thermometer: Arguably, the second most important tool you need is a fast and accurate instant-read thermometer. These tools play an important role in the latter stages of the cook when the meat needs regular checking in multiple areas. I use the ThermoPro TP19 because it can do everything a ThermaPen can do, but for a fraction of the cost. You can check out the TP19 on Amazon here.
Wireless Thermometer: The latest thermometers on the market have no wires and can be controlled by wi-fi via your phone. Airprobe 3 is the best of this technology.
Butcher Paper: Wrapping brisket in butcher paper has become a huge trend in barbeque thanks to Aaron Franklin. Wrapping your brisket in paper will give you a nice brisket bark. However, you can’t just use any old paper, it has to be unwaxed, food grade paper. You can find it on Amazon here.
Advanced Thermometer and Automatic Temperature Controller: Once you’re ready to take things seriously, the FireBoard 2 Drive is a six-channel Bluetooth/Wi-Fi thermometer that can monitor up to 6 pieces of meat, control and graph your cook sessions on your smartphone, and attaches to an an automatic blower that will convert your charcoal smoker to a set-and-forget. This is one of the most advanced meat thermometers on the market. You can check it out on the FireBoard website here.