Smoking a turkey can be a challenging, as there are many things that can go wrong. The key to success is to keep the meat moist and avoid the common pitfalls of soft, rubbery skin and dryness. These problems can be avoided by following a few basic techniques and avoiding certain practices. With a solid understanding of the fundamental principles of smoking a turkey, plus some helpful tips and tricks, you can consistently produce tender, juicy, and crispy-skinned birds. Practice and attention to detail are key to mastering the art of smoking a turkey.
Key Points
- Choose a turkey that is the right size for your smoker and properly thaw it if it is frozen
- Consider using the spatchcock method or cutting the turkey into smaller pieces for even cooking and faster cooking times
- Brine the turkey in a saltwater solution to add moisture and flavor
- Use a smoker or grill with a smoke box, maintain a temperature of 250-275 degrees Fahrenheit, and use indirect heat and a water pan to create extra moisture
- Check the internal temperature regularly with a meat thermometer
- Use soft fruit woods, such as cherry or apple, and mix and match woods to add different flavors and colors
- Avoid using resinous woods, like pine or cedar, as they can give the turkey a bitter taste
- To prevent a dry turkey, avoid basting or wrapping the bird and allow adequate resting time
- To prevent soft, rubbery skin, cook the turkey at a temperature above 275 degrees Fahrenheit and dry the bird with a paper towel before seasoning
- Inject the turkey with a flavorful solution or apply a homemade rub to add flavor
- Allow the turkey to rest for at least 20-30 minutes before carving to allow the juices to redistribute.
Aaron Franklin Style Turkey Recipe
Whenever I smoke turkey, I use Aaron Franklin’s turkey recipe from his YouTube channel. There are dozens of smoked turkey recipes out there, but I find this recipe to be the best. You don’t have to cook it the exact same way. You can change some things around to suit your preferences.
Ingredients:
- Water: 2 gallons
- Kosher salt: 2 cups
- White sugar: 2 cups
- Small turkey: 1
- Coarse black pepper
- Paprika
- Garlic powder
- Onion powder
- Butter
| Step | Cooking Instructions |
|---|---|
| 1 | Combine water, kosher salt, and white sugar in a pot and place on the stove. |
| 2 | Use a whisk to mix the ingredients until they are dissolved. |
| 3 | Keep the temperature low to prevent burning the sugar. This will create a concentrated brine mixture. |
| 4 | Pour the concentrate into a large bucket or pickle bucket. |
| 5 | To cool the brine mixture, add ice water to the pickle bucket. The total volume of ice and water should equal 2 gallons. |
| 6 | Place the turkey into the brine mixture and cover the bucket with a lid. |
| 7 | Place the pickle bucket in the fridge for 24 hours. |
| 8 | Let the turkey soak overnight in the brine mixture. |
| 9 | After brining the turkey, dry it with a paper towel. |
| 10 | Apply a 50/50 mix of kosher salt and black pepper, as well as paprika, garlic powder, and onion powder to the turkey. |
| 11 | Preheat your smoker to 325° F and use apple, cherry, or pecan wood. |
| 12 | After 1 1/2 hours, check the color of the turkey. Once it is dark, tent the turkey in aluminium foil. |
| 13 | Place the turkey in a foil pan, cover it with cubed butter, and wrap it in aluminium foil. |
| 14 | Place the turkey back in the smoker for about 1 hour or until it reaches an internal temperature of 165° F. |
1. Choosing the Right Turkey
- Consider purchasing two smaller birds instead of one large one, as large turkeys can be harder to cook evenly and may result in dry, overcooked meat.
- If you do decide to go with a large turkey, consider cutting it into pieces or spatchcocking it for an even cook.
- Fresh turkeys may produce better results, but frozen ones can still be delicious.
Buy a smaller bird. A large turkey looks spectacular in the middle of the dinner table, but the bigger the bird, the harder it is to cook evenly. The inside of a large turkey will take longer to cook, so the outside of the bird will be dry and overcooked. Rather than buying a huge turkey, buy two smaller birds. If you insist on a large turkey, cut it into pieces or spatchcock the bird for an even cook.
Fresh or Frozen? Anything fresh is always better than frozen, but most of the turkeys that are available to you will be frozen. Freezing can damage the cells that help meat retain moisture. If you can get your hands on a fresh bird, you will get better results. Frozen birds can still turn out delicious, and some say the difference between fresh and frozen is minimal.
Thawing a Turkey. Always thaw a turkey in the refrigerator a few days before you plan on cooking. Avoid thawing a turkey in the kitchen sink at room temperature because it will lose too much fluid.
2. The Spatchcock Method: A Faster Way to Cook a Turkey
- Cooking a whole turkey can be a challenge due to its uneven thickness and hollow cavity.
- One solution is to spatchcock the turkey, which involves removing the backbone and flattening the bird. This allows the turkey to cook evenly and more quickly, while also helping it retain moisture.
- Spatchcocking also makes it easier to season the turkey, ensuring that all the herbs and spices reach every part of the meat. Plus, a spatchcocked turkey is a visually impressive sight when placed on the dinner table.
- Another option is to cut the turkey into smaller pieces. This allows the meat to cook evenly and allows the seasonings to coat all parts of the meat. However, be mindful of overcooking the smaller pieces, as the breasts can dry out.
Spatchcock for an even cook. Cooking a whole turkey can be a challenge due to its uneven thickness and hollow cavity. One solution is to spatchcock the turkey, which involves removing the backbone and flattening the bird. This allows the turkey to cook evenly and more quickly, while also helping it retain moisture. Spatchcocking also makes it easier to season the turkey, ensuring that all the herbs and spices reach every part of the meat. Plus, a spatchcocked turkey is a visually impressive sight when placed on the dinner table.
Cut into pieces. Another option is to cut the turkey into smaller pieces. This allows the meat to cook evenly and allows the seasonings to coat all parts of the meat. However, be mindful of overcooking the smaller pieces, as the breasts can dry out.
Spatchcocking: Quick and Easy Steps
| Step | Description |
|---|---|
| 1 | Place the turkey on a cutting board, with the backbone facing up and the wings and breasts facing down. |
| 2 | Use a sharp knife to cut along the backbone on both sides. |
| 3 | Remove the backbone. |
| 4 | Scrape out any organs and other scraps from inside the cavity. |
| 5 | Turn the turkey over so the breasts are facing upwards. |
| 6 | Push the breastbone with two hands until it cracks. |
3. Brining for Moisture and Flavor
- Brining is an essential technique for producing a tender and juicy turkey. Salt helps the turkey retain moisture while cooking and adds flavor.
- Wet brining (using a liquid solution) is not recommended for turkey, as it can make the skin soggy. Instead, consider dry brining (rubbing kosher salt into the bird) the day before smoking. Allowing the salt to work its way into the flesh for several hours or overnight will produce the best results.
- Note that some stores sell pre-brined turkeys, so be sure to check before brining the bird yourself.
Brining is an essential technique for producing a tender and juicy turkey. Salt helps the turkey retain moisture while cooking and adds flavor. When it comes to brining, there are two main options: wet brining (using a liquid solution) and dry brining (rubbing kosher salt into the bird). While wet brining can make the skin soggy, dry brining is a better choice for poultry. To dry brine a turkey, simply rub kosher salt into the bird the day before smoking. You can also dry brine for a few hours before cooking, but the longer the better to allow the salt to fully penetrate the flesh. Keep in mind that many stores sell pre-brined turkeys, so be sure to check before brining the bird yourself.
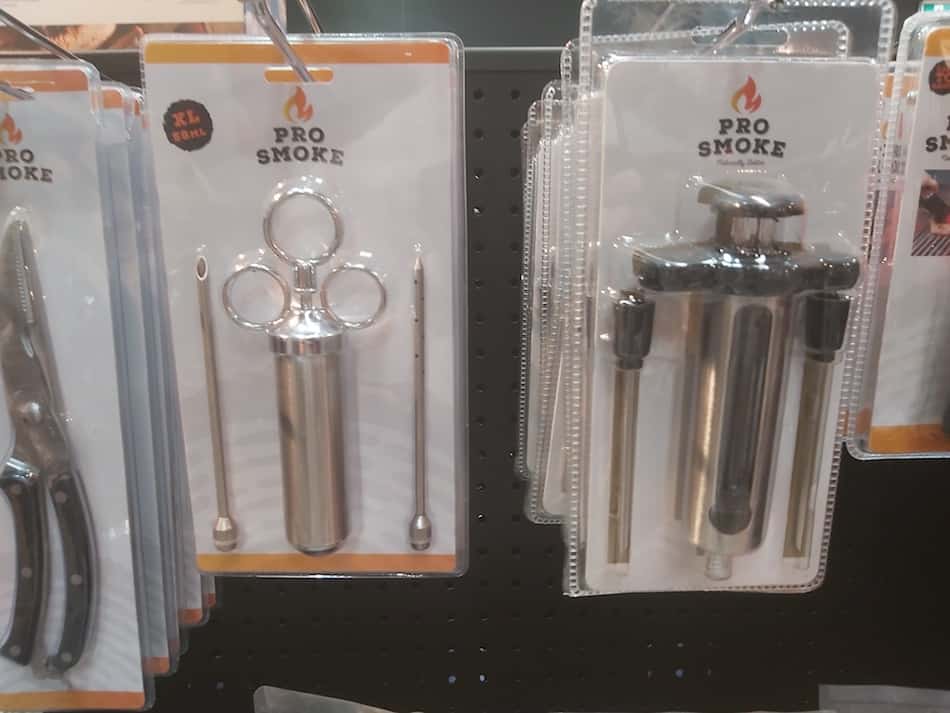
4. Injecting Flavor into Your Turkey: A Pitmaster’s Technique
- Injecting your turkey with a flavorful solution, such as melted butter mixed with spices, can add moisture and enhance taste.
- Injectors are syringes with needles that can be used to pump the meat with a liquid solution.
- An alternative to injecting with a solution is injecting with a marinade, like the Butcher BBQ’s Bird Booster marinade for turkey injection.
Injecting flavor into your turkey is a technique used by many pitmasters to add moisture and enhance the taste of the meat. One popular method is to inject the turkey with a flavorful solution such as melted butter mixed with spices. There are many different recipes available online, and some injectors even come with pre-made solutions like cajun spices, garlic, and broth. Injectors are syringes with needles that can be used to pump the meat with a liquid solution.
If you plan on smoking a lot of meat, it may be worth investing in a meat injector, which are relatively inexpensive and easy to use. An alternative to injecting with a solution is injecting with a marinade, and there are several good turkey marinades on the market that can give your bird a flavor boost. Butcher BBQ is a well-known company that offers competition-winning marinades such as the Bird Booster marinade for turkey injection. Check the latest price here. If you don’t have an injectors, there are dozens of suitable stainless steel injectors on Amazon for about $30 (check latest price here). The other style of injector is a pistol grip like the Butcher BBQ injector.
5. Homemade Turkey Rubs: Boost the Bird with Extra Flavor
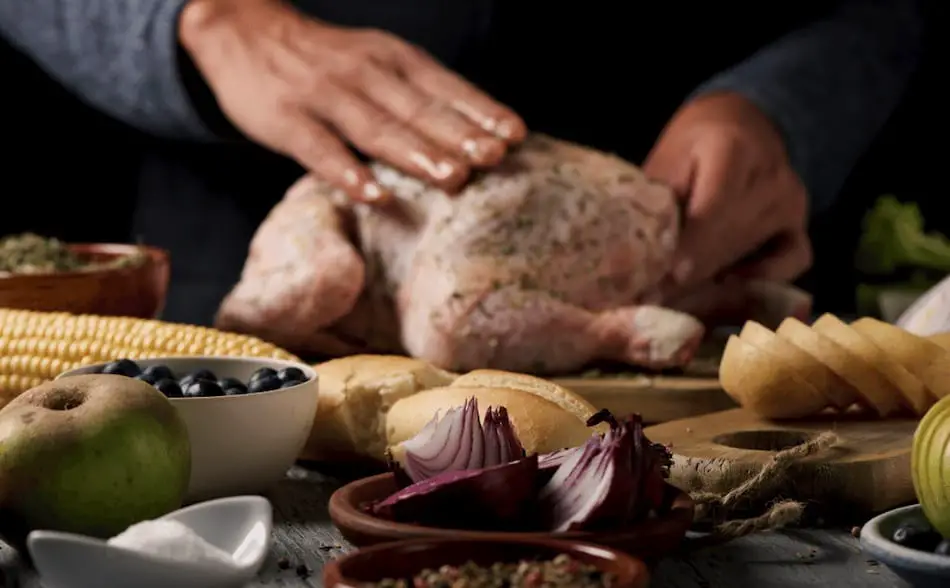
Applying a rub to your turkey is important because it adds flavor and helps to form a nice crust on the skin. A well-crafted rub can take the taste of your turkey to the next level. Before applying a rub to the turkey, it is important to dry the bird with a paper towel to remove any moisture. This will help the rub stick to the meat better. It is also helpful to use a binder such as an oil spray or butter to help the rub adhere to the turkey. Simply apply the binder to the turkey, then sprinkle on the rub, massaging it into the skin and cavity of the bird.
Aaron Franklin, a well-known pitmaster and owner of Franklin Barbecue in Austin, Texas, is known for his use of simple salt and pepper rubs. He recommends using equal parts kosher salt and coarse black pepper, along with a little paprika for color.
If you want a pre-made rub, I recommend rubs made by World Barbecue Champion Harry Soo, under the brand name Slap Yo Daddy. He produces a range of products including the Jailbird Chicken Rub Seasoning, a sweet rub with a little heat that is good for turkey. You can check out Harry’s rub on Amazon (check latest price here).
If you want a good homemade rub, check out this recipe:
Standard Barbecue Rub
I found this great rub recipe through How To BBQ Right. I use this recipe and alter it slightly depending on what I'm cooking. Made by the guys at Townsend Spice & Supply: https://townsendspice.com/
Ingredients
- - ½ Cup Paprika
- - ½ Cup Salt
- - ½ Cup Sugar
- - ½ Cup Granulated Garlic
- - ¼ Cup Granulated Onion
- - ¼ Cup Chili
- - ¼ Cup Cumin
- - 2 Tablespoons Black Pepper
- - 2 Tablespoons Dry Mustard
- - 1 Tablespoon Cayenne Pepper
Instructions
- Combine all the spices together in a large mixing bowl
- Store rub in rub shakers
6. Setting Up and Maintaining the Smoker for Turkey
- It is recommended to smoke a turkey at a temperature between 250-275 degrees Fahrenheit to help it cook slowly and retain moisture, and get crispy skin.
- To set up your smoker, start with clean and well-oiled grill grates.
- Set up your smoker for indirect cooking by placing the turkey on the side of the grill away from the heat source, or put a deflector plate in place.
- Use a water pan to create extra moisture.
- Place the turkey on the grill grates, leaving plenty of space for air circulation.
- Check the internal temperature of the turkey regularly with a meat thermometer to ensure even cooking and prevent drying out.
- When the internal temperature of the breast meat reaches 165 degrees Fahrenheit and the thigh meat reaches 175 degrees Fahrenheit, the turkey is safe to remove from the smoker.
- Let the turkey rest for at least 20 minutes before carving to allow the juices to redistribute and the meat to become more tender.
Turkey is a challenge. Smoking a turkey is a bit of a balancing act because you want to cook it to a safe internal temperature to prevent food poisoning, but you also want to avoid drying out the meat. In general, it is recommended to smoke a turkey at a temperature between 250-275 degrees Fahrenheit. This will allow the turkey to cook slowly and evenly, helping to retain moisture.
Indirect Heat. The way you cook your turkey will depend on your smoker. If you are using a charcoal grill, set up your smoker for indirect cooking. There are two ways of cooking meat; direct and indirect. Direct cooking is where you place the meat directly over the fire in the hot-zone for hot-and-fast cooks. Low-and-slow cooking is where the meat is placed on the grill away from the fire in the cool zone. Indirect cooking is by far the best way to smoke a turkey low-and-slow. If you cook the bird in the hot zone, it will dry out too fast.
Once your smoker is set up, you’ll want to place the turkey on the grill grates, making sure to leave plenty of space around the bird for air circulation. You’ll want to check the internal temperature of the turkey regularly with a meat thermometer to ensure that it is cooking evenly and to prevent it from drying out. When the internal temperature of the breast meat reaches 165 degrees Fahrenheit and the thigh meat reaches 175 degrees Fahrenheit, it is safe to remove the turkey from the smoker.
Let the turkey rest for at least 20 minutes before carving to allow the juices to redistribute and the meat to become more tender.

7. Flavorful Wood Options for Smoking Your Turkey
Turkey has a thin flesh so a harsh smoke, or too much smoke can easily ruin the bird. Smoke comes from burning wood, charcoal and grease dripping onto the fire. The type and amount of smoke that flavors your bird will depend on the style of smoker, because different smokers produce different smoke. A charcoal smoker will produce smoke from wood and charcoal. Another form of smoke is from grease dripping onto the fire. Too much of this type of smoke can be harmful to turkey but a moderate amount will add to the flavor profile. Pellet grills and offset smokers produce smoke from from wood alone. Electric and gas smokers produce smoke from wood chips. Different wood will give the meat a unique flavor.
The Best Smoking Wood For Turkey
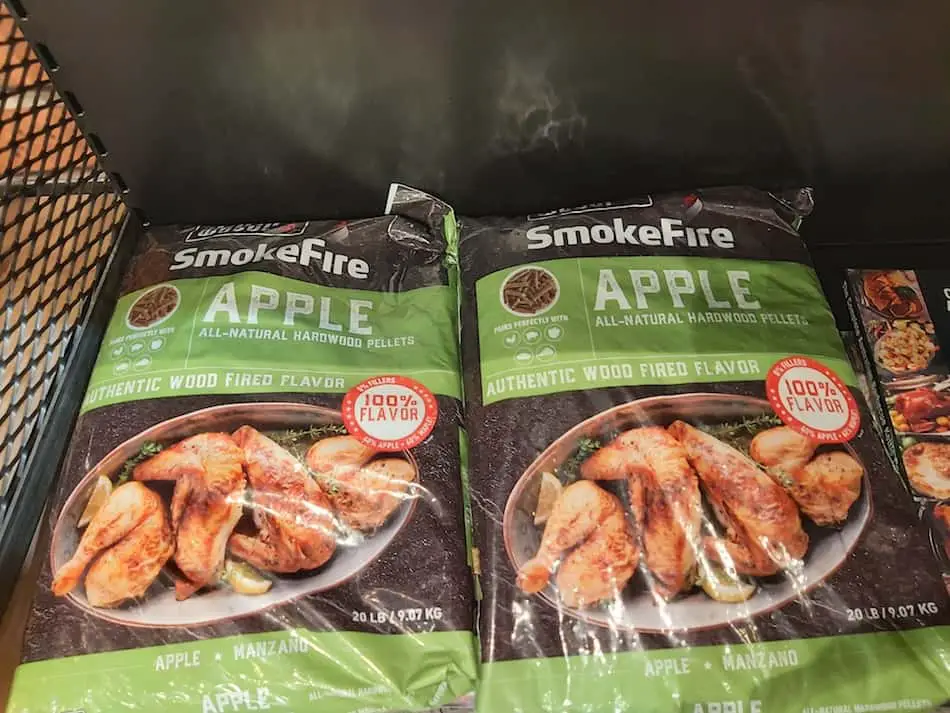
Turkey has delicate skin, so the wrong choice of wood will ruin your bird. For the best results, smoke turkey with one of the softer fruit woods like cherry or apple. Be careful using stronger woods such as hickory or oak. You can throw a little hickory in with a fruit wood for extra flavor, but if you use too much, your turkey will taste bitter. You can mix and match woods to combine flavors and colors. Apple/cherry is a popular choice for poultry. Here are the best woods for turkey:
- Cherry wood will give the bird a dark mahogany color and add a soft, sweet flavor.
- Apple wood produces a mild, smoke flavor.
- Pecan wood will infuse your turkey with a nutty flavor. Pecan has a stronger flavor than other fruit woods but isn’t too overpowering.
- Maple is great for turkey and has a slightly sweet flavored smoke.
- Other popular woods for smoked turkey include pear, plum and almond wood.
8. Smoking Time and Temperature: How Long and Hot to Go
A turkey is done once the internal temperature reaches 165°F and the thighs are 175°F. Measure multiple parts of the bird with an instant-read thermometer, checking the thighs and the breast because they will usually give different readings. If you remove the turkey from the smoker when the breast reads 158°F, the temperature will continue to rise when the bird is resting and land on 165°F.
How Long Does it Take to Smoke a Turkey?
On average, it takes 3.5 hours to smoke a 10 pound turkey at 275°F. Much will depend on the size of the turkey and the cooking temperature. You should also allow for at least 30-minutes resting time so the meat can reabsorb moisture. During the resting period, the turkey will continue to cook and raise the temperature another 3 to 5 degrees.
9. Let The Bird Rest
Allow the turkey to rest for about 30 or 40 minutes after it has been removed from the smoker. The temperature will continue to rise during the resting period and will give the meat time to reabsorb moisture so the juices aren’t lost when carving. As with other smoked roasts, a good practice is to wrap the bird in a towel and place in a dry cooler for an hour or two.
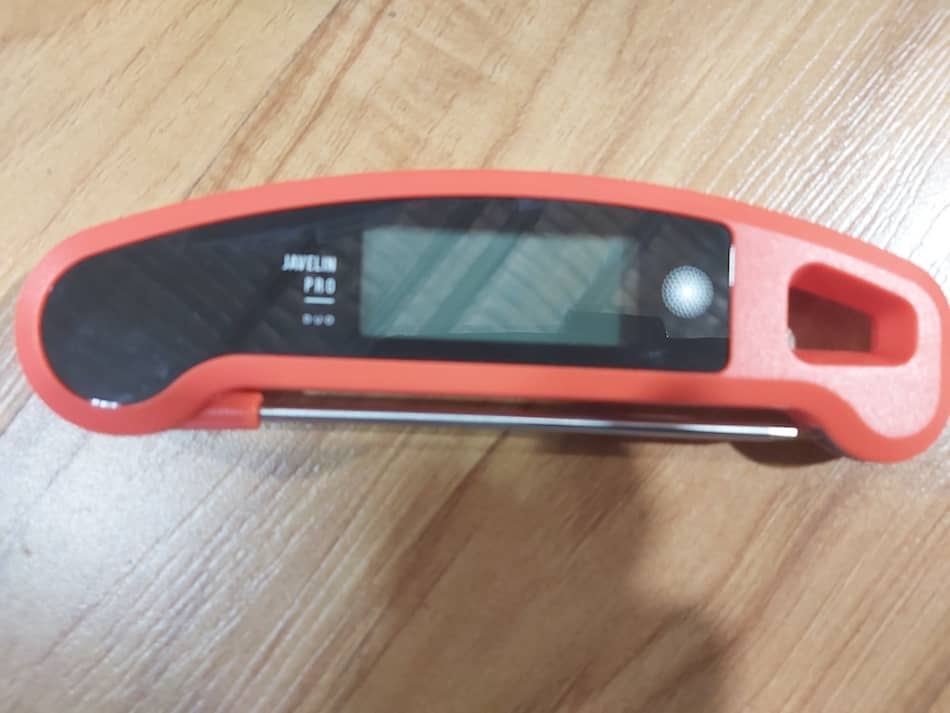
Thermometers: Essential Tools For Smoking Turkey
- Using a meat thermometer is essential when smoking a turkey
- There are two types of thermometers that are useful for smoking meat: a duel-probe digital thermometer and an instant-read thermometer
- A duel-probe digital thermometer has two probes: one that attaches to the grill to monitor the temperature of the smoker, and the other that is inserted into the meat to track the internal meat temperature
- An instant-read thermometer is a quick way to check the temperature of different parts of the meat
- It is important to use a quality thermometer to ensure accuracy and safety when cooking meat
- The Thermapen is a highly regarded instant-read thermometer, but it can be expensive
- A more affordable option is the TP19 from ThermoPro, which can be purchased on Amazon for around $30
Meat thermometers are your best friend when smoking a turkey, and if you don’t have a good thermometer, you are operations in the dark. To smoke meat, there are a few essential tools you need, and thermometers are the most important tool of all. Turkey is a fragile roast and managing a large bird is a delicate balancing act. The key to the perfect smoked turkey is cooking temperature. If your smoker is too hot, the bird will dry out. If the temperature is too low, your bird will have soft, rubbery skin. Most smokers come with an in-built thermometer, but factory thermometers are inaccurate most of the time. If you don’t believe me, do an Ice Bath Test and see how far out your thermometer may be.
Instant Read vs Duel Probe Thermometers
There are two types of thermometers that you need if you want to take meat smoking seriously, and that is a duel-probe digital thermometer and an instant-read thermometer. A digital duel-probe thermometer has two probes; one attaches to the grill to monitor the temperature of your smoker, and the other probe gets inserted into the meat to track the internal meat temperature. When smoking meat, we cook to internal meat temperature, not time. Cooking to internal meat temps is the only way you will achieve perfection. Without a good thermometer, you are guessing.
You don’t have to spend a lot of money to get set up with a good meat thermometer. I still use a ThermoPro TP20 that I purchased from Amazon for about $50 (see latest price here). Do your research before you make a purchase and don’t buy cheap thermometers because they are a waste of time. If a thermometer is inaccurate, then what’s the point? I’ve written some lengthy articles on thermometers, so if you want more information on the best meat thermometers, check out my article: The Best Thermometers For Smoking Meat.
Instant-Read Thermometers – Check All Parts
An instant-read thermometer is your second most important tool when smoking meat. A turkey is a large bird and will have different temperature readings on different parts of the body. The breast may be given a 165°F reading while the thigh is measuring 175°F. An instant-read thermometer is a quick way of checking the temperature on different parts of the meat. Most roasts are uneven, so you will get various temperatures across the roast. Raw turkey contains a lot of bacteria, so a quick-read thermometer will ensure you and your family are safe and eating meat that has reached a safe temperature.
Make sure you buy a quality instant-read thermometer with a solid reputation. Don’t just buy any old thermometer because you are putting you and your family’s safety at risk. The Thermapen is the king of instant-read thermometers, but is very expensive (about $100, check latest price here). Amazon sells some great thermometers, but the best value for money is the TP19, an instant-read buy one of the leading thermometer companies, ThermoPro. The TP19 does what the Thermapen can do, but for 1/4 of the price. You can get a TP19 for around $30 on Amazon which is great value for money. To see the latest price of the TP19, check it out here.
Troubleshooting Common Issues When Smoking a Turkey
There are a few common issues that can arise when smoking a turkey, but with a little know-how and some troubleshooting, you can avoid these problems and turn out a delicious, moist bird.
The Stall – Does it Happen to a Turkey?
Whenever you are cooking meat low-and-slow, you will probably face the stall, a phenomenon that occurs when the internal temperature of the meat hits about 150°F to 160°F. The stall occurs when the meat sweats and the increased moisture cools the surface of the meat, causing the temperature to stagnate. Turkey can sometimes avoid the stall because we cook poultry at higher temperatures. However, if you have a smoker that struggles to reach 275°F, then you might experience the stall.
The stall can be extremely frustrating because your meat may get stuck on 150°F for hours and make dinner late. Therefore, it’s best to plan the stall into your cook and allow more time. You can push meat through the stall by wrapping in foil and increasing the temperature of your smoker, but if you do this, be careful not to dry out the meat. Avoid wrapping turkey because the skin will soften and taste like rubber. Instead, increase the temperature a little to get the bird through the stall.
Why is My Turkey Black?
If presentation is important to you, avoid a black-colored turkey because you don’t want it to be mistaken as a burned bird. A turkey may turn black if we exposed the bird to smoke for a long period. The type of smoker you use will also influence the color of your bird. Charcoal smokers will cause the meat to become darker than pellet grills, and electric smokers will produce a much lighter colored turkey.
Cherry wood is a popular wood for smoking turkey and will give the bird a lovely mahogany color, but if you want a lighter colored turkey, choose another wood. Apple wood is a superb choice for turkey because it will produce a soft smoke that won’t overpower the meat and will have less of a darkening effect on the meat.Rubs and marinades can also cause the turkey to become black. When buying or making your own rubs, be sure to check the sugar content because the sugar will burn and turn your turkey black. There are several things you can do to soften the darkening effect on the bird, however the solutions may cause other problems like soft skin. Tenting, for example, is a common method to reduce the darkening caused by smoke.
Tenting Your Turkey
The most common way of protecting your bird from excess smoke is tenting your bird. Tenting is the best way to prevent the turkey from turning black. To tent a bird, all you need to do is take some foil and build a little tent around the bird. This will protect the skin from smoke. Don’t tent a bird until the latter stages of the cook because you still want some smoke to flavor the meat. The downside of tenting is it will soften the skin. If a crispy skin is important, place the turkey back onto the grill at the end and let the skin dry over the heat.
Dry Turkey? – Here’s Why
The most common reason a smoked turkey will turn out dry, and that is overexposure to high temperatures. Turkey is lean white meat with very little fat or collagen, which is why it dries out easily. Fattier cuts of meat are able to remain moist for longer because the fat and collagen melt during the cooking process, and the result is juicy meat. Therefore, moisture retention is paramount when smoking turkey, and we need to do all we can to prevent the bird from drying out.
How To Avoid a Dry Turkey
There are several things we can do to make sure our turkey doesn’t dry out. Methods such as brining and allowing adequate resting time will go a long way in helping the turkey retain moisture. Also, consider spatchcocking the turkey or cutting it into smaller pieces. This will allow the bird to cook more evenly and prevent dry areas of the bird. When selecting a turkey, buy two smaller birds rather than an enormous bird. An extra big turkey will be hard to keep moist but two smaller birds will be easier to manage.
Soft Rubbery Skin? 5 Ways To Avoid It
The most common causes of soft, rubbery turkey skin is cooking the bird at temperatures below 250° F. Turkey skin will begin browning much faster once the temperature goes above 300°F. If you cook the turkey at lower temperatures, the skin will remain soft and rubbery.
1. Don’t Baste a Turkey
Adding extra moisture to the bird is another cause of soft, rubbery skin, so avoid liquid brines, wrapping and tenting if you want crispy skin. Steer clear of mopping and spritzing turkey because wetting the bird will make the skin soggy. Some pitmasters will give turkey a quick spray of apple juice a few hours in, but this isn’t necessary.
2. Don’t Wrap a Turkey
Wrapping a bird in foil will help keep the meat moist by creating steam, but will soft turkey skin. Similar to wrapping, foil tenting is another common practice used to prevent darkening. There’s nothing wrong with building a tent around your bird, but it will soften the skin.
3. Don’t Put the Bird in a Pan
Avoid placing your turkey in a pan while cooking because this will make the bottom of the bird soggy. To prevent this from happening, lay the bird directly onto the grill and place a drip pan below to catch any drippings. If you insist on cooking your bird in a pan, you can harden the underside skin by placing the bird on the grill.
4. Don’t Use a Water Pan
I normally recommend water pans when smoking meat, but with turkey, the added moisture will contribute to soft skin. If your smoker gets really hot, a water pan will keep the temperature low and protect your bird, but if you want crispy skin, lose the water pan.
5. Cook above 275°F
If you cook your turkey below 275°F, the skin won’t become crispy. If your smoker won’t go higher than 275°F, then consider finishing the turkey in the oven to get a crispy skin. This is common with electric smokes which usually don’t go over 250°F to 275°F.
Want Crispy Skin? Do This
The best way to get a nice crispy skin on a turkey is to cook the bird between 275°-325°F. If your smoker can’t reach a high enough temperature, finish cooking the bird in the oven for a crispier skin. Remove as much moisture as possible by drying the bird with a paper towel. The more moisture you can remove from the bird, the crispier the skin. Wet brining is a common practice when smoking turkey, but the added moisture will contribute to a softer skin. Avoid using liquid brines and use a dry brine instead. To dry brine a turkey, all you need to do is rub kosher salt into all parts of the turkey and let it sit in the refrigerator overnight.
Can You Finish Smoked Turkey in the Oven?
You can always finish your turkey in a conventional oven if you want to shut down your smoker or you just want to bring the bird inside. As long as the turkey has had a few hours of smoke, cooking the bird in the oven for the last stage will take nothing away from the flavor. This is common practice, especially those with electric smokers. Electrics aren’t able to reach high enough temperatures when cooking chicken and turkey, so the oven is the way around the soggy skin problem.
To finish your turkey in the oven, smoke the bird in your smoker until the internal meat temperature reaches about 145°F. This should allow the turkey to absorb enough smoke before being removed. Pre-heat your oven to about 350°F and place the bird inside the oven until the internal meat temperature reaches 165°F.
Carve Turkey Like A Pro
- Rest turkey for 20 minutes.
- Cut and pull out wishbone.
- Run the knife down the breastbone in the centre, cut around the breast and remove.
- Slice the breast across the grain on a slight angle.
- Remove thigh and leg by cutting through the hip bone.
- Cut out the thigh bone.
- Separate the leg by cutting through thigh bone.
- Slice thigh fillets.
- Remove wings and serve whole.
Beer Can Turkey
The beer can chicken is a popular cooking method, and it works wonderfully with turkey. This is an excellent way to keep the turkey moist and tender. The best way is to place the turkey on a stainless steel beer can turkey rack or a ceramic stand.
- Add a rub to your turkey.
- Cut the top off a half-filled beer can.
- Sit the can on a grill.
- Lay the turkey over the beer can so it’s inside the turkey.
Safety Tips
Turkey carries a lot of bacteria so special care needs to be taken when handling poultry. Here are some safety tips:
- Make sure that the turkey is fully defrosted before cooking. Avoid defrosting the bird at room temperature. Defrost in the fridge.
- Ensure the internal temperature is above 165°F. This is the recommendation of the FDA.
- Make sure the temperature probe reaches the centre of the breast and the thigh and wing.
- Be careful not to cross-contaminate. Wash your hands after handling raw turkey.
More Turkey Tips
- Put the smoked turkey in the oven for ten minutes to make the skin crispy.
- If you need the turkey cooked on time, save yourself the stress and cook it early. If you wrap the turkey with a towel and place it in a cooler, it will remain hot for 3 hours.
- Foil the wings for the latter stages to prevent them from burning.
- Defrost your turkey in the refrigerator for 2 or 3 days prior to cooking.
- Use kitchen twine to tie the turkey legs together.
- Use a duel probe thermometer and an instant-read thermometer to probe different parts of the bird.
Weber Smokey Mountain – Smoking a Bird on a WSM
- Open all the vents and raise the chamber temperature to 300°F.
- When preheating, open all the vents. This will allow for the sharp temperature to drop once you add the meat.
- Once you hit 300°, slightly close off the bottom vents until you reach your target temperature of 350°F.
- Add the turkey to the breast side up. This will lower the temperature to 325°F, which is your target cooking temperature.
- For the best results, point the drumsticks towards the top vent.
- Don’t use a water pan.
- Use wood chunks or splits. Don’t use wood chips and avoid soaking wood beforehand.
- Use lump charcoal rather than briquettes.
- For a more even cook, direct the breast away from the top vent. This will prevent the breast from drying out.
- Allow about 3 hours to cook your turkey.
- Spatchcocking a turkey will allow for an even cook.
Offeset Smokers – Turkey on a Stickburner
- When smoking a turkey on an offset smoker, the ideal temperature is between 300° and 325°F.
- Put the legs towards the firebox. This will stop the breasts from drying out. The legs and the thighs can withstand more heat than the breast. If the legs look like they are burning at any point, wrap them with foil.
- Use a water pan in the offset smoker. This will ensure the turkey stays nice and moist.
- After 1.5 hours, baste the turkey for the second half of the cook. You can baste the turkey by spraying with oil or cover with butter and foil wrap the turkey. The foil will help retain the moisture.
- The safe temperature for poultry in 165°F. Probe the breast and the thighs with an instant-read thermometer to get an accurate reading.
Smoked Turkey on an Electric Smoker
Electric smokers have their critics, but you can still smoke a good turkey by following these tips and tricks. One problem with electric smokers is they can’t cook at high temperatures, which makes it difficult to get a nice crispy skin on your turkey. The way around this is to finish it in the oven at a high temperature to crisp up the skin. Make sure you turn your electric smoker up as high as it will go. Most electric smokers have a maximum temperature of 250-275°F.
- Place turkey in the electric smoker for 2-hours.
- Remove from smoker, add more oil or butter to the skin.
- Place turkey in the oven for 1 hour at 350°F.
- Rotate the racks half way through the cook.
- Allow an extra 30 minutes if you are smoking two smaller birds.
- Raise the bottom turkey as far as possible from the heating element.
- Remember, smoke will only absorb into the turkey for the first few hours, so spending the last hour in the oven will take nothing away from the smoked flavor.
How to Get More Smoke in an Electric
The other criticism of electric smokers is that they don’t produce enough smoke. The way around this is to use a smoke tube. A smoke tube is a metal cylinder that holds pellets or sawdust. The idea is to get the pellets smoldering inside the tube, and that will produce some wonderful smoke for hours. The other advantage of a smoke tube is you then don’t have to keep refiling the wood chip tray. For turkey, I would recommend using apple or cherry pellets.
Smoked Turkey on a Pellet Grill
- Set the temperature to 300℉.
- Pre heat the Traeger with the lid closed.
- The best wood for poultry is a 50/50 mix of fruit wood such as apple and cherry. Pecan also works well mixed in.
- A turkey should take between 2 and 3 hours.
- If you want to make the skin crispy, raise the temperature to 325℉ for the last hour of the cook.
- Remove once internal temperature reaches 165℉.
- Rest the turkey for 20 minutes.
How To Smoke Turkey on a UDS (Ugly Drum Smoker)
- Use a charcoal chimney are pre-light half your coals and throw them in the charcoal basket on top of the unlit coals.
- Get the smoker going long before you add your turkey. Make sure it is stable before adding the bird. Keep in mind the temperature will drop slightly once the turkey is added, so allow for this change.
- Bury about four chunks of a nice apple wood.
- Open your bottom intake vents all the way while until you reach your target temperature of about 350℉.
- You want to cook your turkey at 325℉.
- Keep the exhaust fan (top vent) open for the entire cook.
- Wait until the UDS is producing a nice, thin, blue smoke.
- Once the temperature is stabilized, place the turkey on the rack.
- Use a water pan if you wish. This will keep the turkey nice and moist.
Don’t Open the UDS Lid
Avoid opening the lid during the cook. Opening the lid will cause the temperature to spike. If you want to open the lid to baste, close off the intake valves beforehand and leave them closed for a few minutes afterwards. This will prevent huge spikes in temperature. Make minor adjustments and wait before making another change. Always use a wireless temperature probe. This will prevent you from opening the lid.
How to Smoke Turkey on a Big Green Egg
- Get the temperature of the Big Green Egg up to 300°F.
- Baste the turkey with oil or butter after about an hour to prevent it from drying out.
- Cook for another hour, then baste again.
- Keep it cooking until the internal probe in the breast reads 165°F.
- Rest the cooked turkey for 20 minutes.
- If you don’t want to serve the turkey immediately, wrap it in a towel and place in a cooler. This will keep warm for a few hours.
How to Smoke Turkey on a Weber Kettle
Weber Kettles are great for smoking turkey and they can produce a moist, smokey bird. There are several methods you can use on a weber kettle. Spatchcocking a turkey works well. So do roasting racks. There are a few options on how to lay your coals in a Kettle. The Snake Method and Minnion Method of laying the coals work well for low and slow cooking. However, you’ll need to allow more cooking time if you are using this method and the lower the temperature, the softer the turkey skin. If you use one of these methods, to crisp up the skin, put the turkey in a conventional oven at a high heat for an hour.
- Here are some tips for smoking a turkey in a Weber Kettle:
- The best way is to fill the charcoal baskets with coal and place them on the sides.
- Place two chunks of fruit wood in each coal basket. This should last 3 or 4 hours.
- Lay the turkey in the middle above the drip pan.
- Light the coals and get the temperature up to 325°F.
- Wait until you see a hint of blue smoke before you add the bird. Heavy white smoke will ruin your turkey!
- Keep the top vent open all the way. This will enable the bad smoke to escape and not spoil the turkey.
More Turkey Articles
Why is My Smoked Turkey Tough and Dry?
Why Is My Smoked Turkey Rubbery?
How Does Aaron Franklin Smoke Turkey?
Why is My Smoked Turkey Black? 5 Ways To Avoid It
How To Smoke Turkey in a Smoker
What’s the Best Wood For Smoking Turkey?
My Favorite Meat Smoking Tools
Thanks for checking out this article. I hope you learned a few things. Here are some of my favorite tools I use when smoking brisket that may be useful to you. These are affiliate links, so if you decide to purchase any of these products, I’ll earn a commission. But in all honesty, these are the tools I recommend to my family and friends who are just starting out.
Meat Thermometer: There are dozens of fancy thermometers on the market, but I still use my trusty TP20. For around $50, I have a high-quality meat thermometer with two probes, and can track the temperature of my smoker with one probe, and my meat with the other probe. The ThermoPro TP20 is an Amazon Best Seller because it’s the easiest thermometer to operate, is durable, highly accurate, and comes with pre-programmed meat settings.
Instant Read Thermometer: Arguably, the second most important tool you need is a fast and accurate instant-read thermometer. These tools play an important role in the latter stages of the cook when the meat needs regular checking in multiple areas. I use the ThermoPro TP19 because it can do everything a ThermaPen can do, but for a fraction of the cost. You can check out the TP19 on Amazon here.
Wireless Thermometer: The latest thermometers on the market have no wires and can be controlled by wi-fi via your phone. Airprobe 3 is the best of this technology.
Butcher Paper: Wrapping brisket in butcher paper has become a huge trend in barbeque thanks to Aaron Franklin. Wrapping your brisket in paper will give you a nice brisket bark. However, you can’t just use any old paper, it has to be unwaxed, food grade paper. You can find it on Amazon here.
Advanced Thermometer and Automatic Temperature Controller: Once you’re ready to take things seriously, the FireBoard 2 Drive is a six-channel Bluetooth/Wi-Fi thermometer that can monitor up to 6 pieces of meat, control and graph your cook sessions on your smartphone, and attaches to an an automatic blower that will convert your charcoal smoker to a set-and-forget. This is one of the most advanced meat thermometers on the market. You can check it out on the FireBoard website here.